background image


3


Remove all components from the shipping container. Retain all boxes and packaging materials 


In the event that you have to return the product to the manufacturer. Examine the package contents 


for any shipping damage. Contact the freight carrier immediately should damage exist.


Important Reminder:  Please keep carton, all contents & packing materials in case you need to return unit. 


Package Contents 


• 

S2VR Duo  

• 

2 Hard drives in tray modules 

• 

FASTA-4e HBA or FASTA-4x HBA depending on model. 

(Host Card) 

• 

e-SATA cable 

• 

Quick Installation sheet  

• 

Driver CD & Manual 

• 

Power Cord 


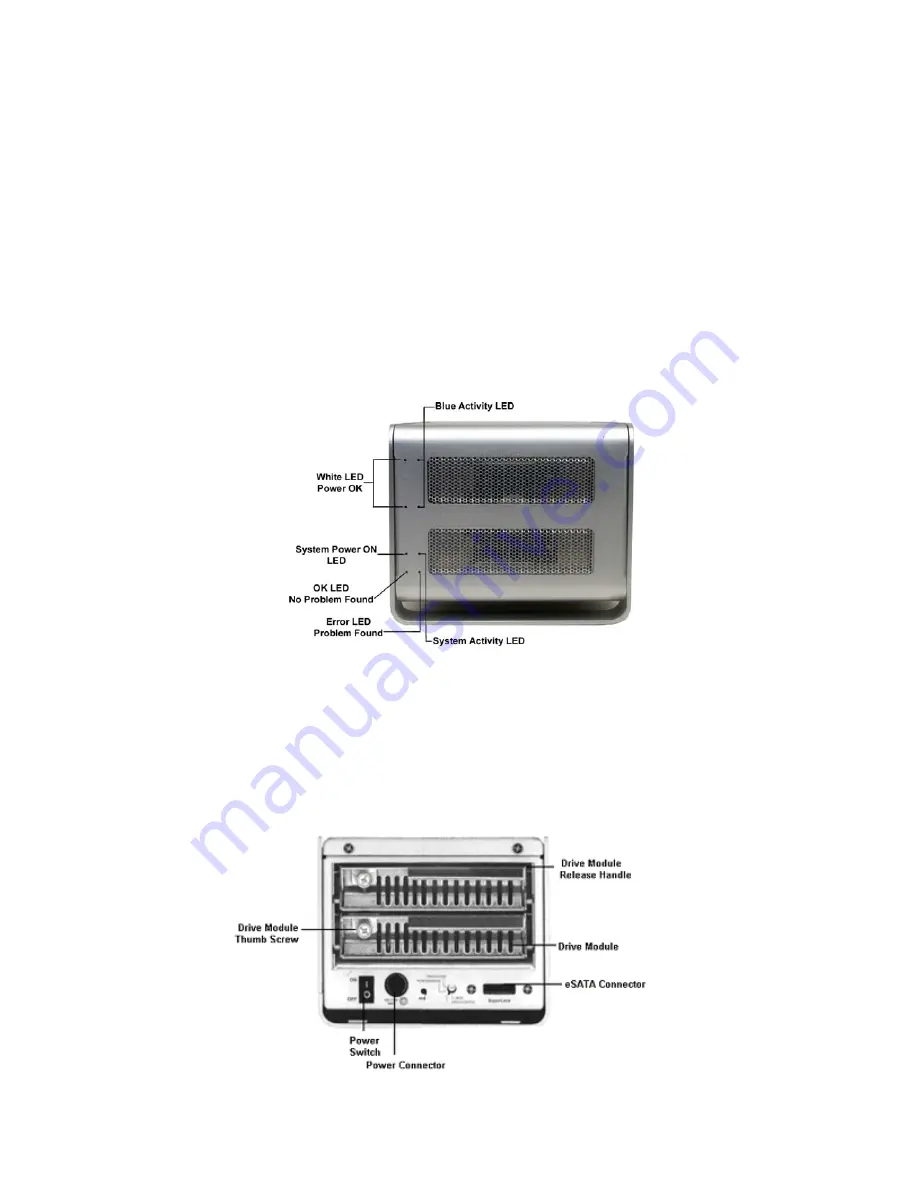
Front Panel LED Indicators


Note: During 

Performance

 operations, it is normal that one or more blue LEDs on the front panel of the S2VR will 

blink intermittently, or turn off altogether, (generally for only a few minutes at most), during the read/write process. 
Please don’t confuse this normal LED operation as an indicator that the drive is bad or failing, as this is not the 
case.  


Back Panel View S2VR DUO 


Hardware Requirements 

Summary of Contents for S2VR Duo

Page 1: ...ed to change without prior notice and does not represent a commitment on the part of the vendor who assumes no liability or responsibility for any errors that may appear in this manual Copyright 2006...

Page 2: ...iver Installation 4 Verify System Profiler 6 Install S2VR Manager 7 Installing the Hard Drive Tray Modules 9 Connecting the S2VR to the HBA Controller 9 Power S2VR DUO ON OFF 9 Open S2VR Manager 9 Set...

Page 3: ...y WARNING notations or RED typeface indicators Features and benefits of the S2VR Duo SATA 3Gb s Interface I F Bandwidth 3Gigabytes per second Modular Design Hot Swappable HDD and Power Supply JBOD pre...

Page 4: ...ents S2VR Duo 2 Hard drives in tray modules FASTA 4e HBA or FASTA 4x HBA depending on model Host Card e SATA cable Quick Installation sheet Driver CD Manual Power Cord Front Panel LED Indicators Note...

Page 5: ...power strip etc 2 Remove the cover of your computer and locate an available PCI e or PCI x slot on your motherboard install the required Host Adapter card Important Note PCI e and PCI x cards are NOT...

Page 6: ...5 6 Next CLICK Install 7 Finishing Installation CLICK Continue 8 Installation complete CLICK CLOSE...

Page 7: ...formational Factoid Did you know that there are demonstration videos available on the CalDigit website that will show you some of the technical aspects real life usage of the S2VR product line Go to h...

Page 8: ...7 Install S2VR Manager 1 Double CLICK the application on the provided CD CalDigit S2VR v1 0 1 pkg 2 Introduction CLICK Continue 3 Select your OS Hard Drive as the destination then CLICK Continue...

Page 9: ...Successful CLICK Close 5 Find the S2VR Manager Directory OS drive Applications Utilities CalDigit S2VR S2VR Manager 6 Drag S2VR to the Launcher 7 Restart your computer for the S2VR Manager Installatio...

Page 10: ...A cable 2 Plug the S2VR Duo into an AC power outlet turn the power switch of the S2VR Duo to ON back of unit wait approximately 20 seconds then move on to Power S2VR Duo ON OFF for the next steps Powe...

Page 11: ...ided fields The entered password must be a combination of 5 or more characters 4 Click OK to implement the new password 5 Click the Enable Voice notification box of the S2VR Duo GUI to configure voice...

Page 12: ...the selected settings Audio as above select the desired settings and the audio data rate will be calculated Storage Your S2VR manager will calculate the approximate capacity of the 2 sections above Yo...

Page 13: ...e showing the capacity of your current S2VR Duo Turbo mode setting For example 100GB RAID system with Turbo 80 your system will only display 80GB Note For the Performance Capacity rate relationship ch...

Page 14: ...R INTO A NEW RAID SETTING OTHERWISE YOUR SYSTEM WILL STILL READ THE OLD SETTING FROM SYSTEM MEMORY WHICH WILL CAUSE FALSE INFORMATION ON DISK UTILITY Your data will be lost as this process will reform...

Page 15: ...is highly recommended Your S2VR Duo comes reconfigured in Performance mode Out of the box If you want to change the project format into JBOD function follow these steps Please delete your original S2...

Page 16: ...15 2 The Following system messages will appear click Ignore 3 Open the Disk Utility 4 Create a partition for each hard drive on your S2VR...

Page 17: ...art your computer and your newly configured S2VR is ready to use Informational Factoid The FAQ section on our website has answers to the most common questions and or potential problem s that you may e...

Page 18: ...ly recommended Your S2VR Duo comes pre configured in Performance mode Out of the box If you want to change project and format into Performance function follow these steps Please delete your original S...

Page 19: ...18 2 After you change your S2VR s setting into Performance mode you S2VR Manager will be showing as below 3 Create Partition via Disk Utility remember to choose Mac OS Extended for maximum performance...

Page 20: ...process will reformat your drives Backing up your data on another S2VR Duo is highly recommended Your S2VR Duo comes pre configured in Performance mode Out of the box If you want to change the project...

Page 21: ...20 1 Open S2VR Manager Select Protected mode follow prompt to format your S2VR to Protected mode 2 After you change your S2VR s setting into Protected mode you S2VR Manager will be showing as below...

Page 22: ...uter and your newly configured S2VR is ready to use Informational Factoid The FAQ section on our website has answers to the most common questions and or potential problem s that you may encounter plea...

Page 23: ...knowing that your data is protected by the best technology in the market Your S2VR Duo allows you to choose from three rebuild settings Immediate Automatic Rebuild In the event of hard drive failure...

Page 24: ...ice your drive ASAP Important Note Always back up your important data Having another copy of your important work is always and highly recommended Informational Factoid The FAQ section on our website h...

Page 25: ...g the side covers will expose you to dangerous voltages or other hazards 2 Do not use this unit near water such as bathtub sink in a wet area or near a swimming pool doing so increases the chances of...

Page 26: ...module with a new module sold as a separate accessory item through CalDigit or your authorized reseller dealer Glossary Daemon A component of the S2VR manager responsible for status tracking and SAFE...

Reviews: