background image

9

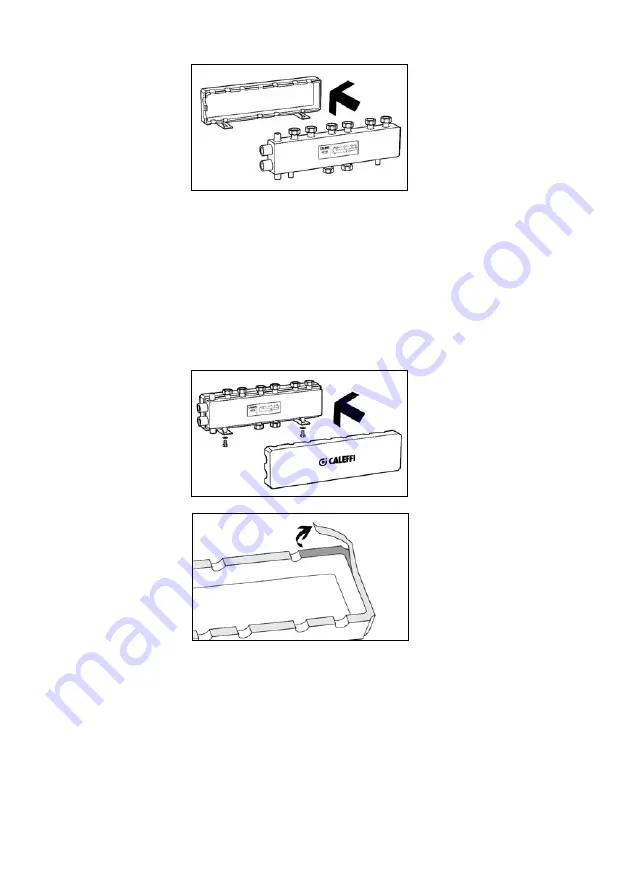
1.

Posizionare 

la 

parte 

posteriore della coibentazione a 

muro  inserendo  il  SEPCOLL  in 

corrispondenza  degli  appositi 

incavi.

1.

Position  onto  the  wall  the  rear 

part  of  the  insulation  and  then 

insert  the  SEPCOLL  into  the 

hollows provided.

1.

Die  Rückseite  der  Isolierung  an  der  Wand  anbringen  und  den  SEPCOLL  in  die 

vorgesehenen Aussparungen einsetzen. 

1.

Placer au mur l'arrière de la coque isolante et introduire le SEPCOLL dans les formes 

correspondantes.

1.

Poner la parte posterior del aislamiento contra la pared y encajar el SEPCOLL en las 

muescas.

1.

Colocar  a  parte  posterior  do  isolamento  na  parede,  inserindo  o  SEPCOLL  nos 

respetivos encaixes.

1.

Plaats  de  achterkant  van  de  isolatieschaal  tegen  de  wand  en  plaats  het  SEPCOLL-

toestel bij de groeven.  

2.

Posizionare il SEPCOLL sulle staffe 

fissandolo  con  le  apposite  viti. 

Richiudere 

incastrando 

delicatamente la parte anteriore 

della 

coibentazione 

come 

indicato in figura.

NOTA:  La  coibentazione  dei 
codici  559320  e  559331 
(compatibile  con  l’uso  acqua 
refrigerata) 

è 

dotata 

di 

apposite 

strisce 

adesive 

anticondensa. 

Togliere  il  film 

di 

protezione 

prima 

di 

applicare la coibentazione.

2.

Position  the  SEPCOLL  on  the 

brackets and fix with the screws 

provided.  Close  by  delicately 

slotting  in  the  front  insulation  as 

shown in the figure.

NOTE:  The  insulation  of
codes  559320  and  559331 
(suitable  for  use  with  chilled 

water) is equipped with specific anticondensation adhesive stripes. Remove the 
protective film before applying the insulation.

2.

Den  SEPCOLL  auf  den  Halterungen  anbringen  und  mit  den  entsprechenden 

Schrauben  fixieren  und  befestigen.  Zum  Schließen  die  Vorderseite  der  Isolierung  wie 

in der Abbildung gezeigt vorsichtig einrasten lassen.

HINWEIS:  Die  Isolierung  der  Serien  559320  und  559331  (Geeignet  für  den  Einsatz 

mit  Kühlwasser)  ist  mit  kondenswasserdichten  Klebestreifen  ausgestattet. 

Entfernen sie vor der Montage der Isolierung die Schutzfolie von den Klebestreifen.

2.

Installer  le  SEPCOLL  sur  les  étriers  en  le  fixant  à  l'aide  des  vis  prévues  à  cet  effet.     

Refermer  en  emboîtant  avec  le  plus  grand  soin  la  partie  avant  de  la  coque  isolante 

comme le montre la figure.

Note  :  la  coque  isolante  des  codes  559320  et  559331  (compatible  pour  utilisation 

avec  eau  réfrigérée)  est  équipée  de  bande  adhésive  anti-condensation.  Enlever  le 

film de protection avant de joindre la coque.

Procedura di
assemblaggio
coibentazione
cod. 559222 - 559231
- 559221 - 559220 -
559320 - 559331

Insulation assembly
procedure –
codes 559222 -
559231 - 559221 -
559220 - 559320 -
559331

Montage für die
Modelle Art.Nr.
559222 - 559231 -
559221 - 559220 -
559320 - 559331

Procédure
d’assemblage du
revêtement isotherme
des code 559222 -
559231 - 559221 -
559220 - 559320 -
559331

Procedimiento de
montaje del
aislamiento cód.
559222 - 559231 -
559221 - 559220 -
559320 - 559331

Procedimento da
montagem do
isolamento cód.
559222 - 559231 -
559221 - 559220 -
559320 - 559331

Procedure voor
monteren van de
isolatieschalen, 
Art. code 559222 -
559231 - 559221 -
559220 - 559320 -
559331

Summary of Contents for SEPCOLL 559 Series

Page 1: ...gs und Klimaanlagen ermöglicht er die unterschiedliche Regelung mehrerer Stränge bei Vorhandensein nur eines Kessels oder Kühlers Die verschiedenen Ausführungen sind so kompakt und ergonomisch dass sie durch einfache Handhabung platzsparend in jeden hydraulischen Kreislauf eingebaut werden können Sie sind in den beiden Versionen mit einem Achsabstand der Sekundärkreise von 90 und 125 mm erhältlich...

Page 2: ... toegepast in verwarmings en luchtbehandelingssystemen Ze maken het mogelijk om in aanwezigheid van een gemeenschappelijke warmtegenerator of koelmachine verschillende thermische regelingen voor verschillende ruimten te verwezenlijken De diverse kompakte configuraties van de toestellen zijn eenvoudig te integreren in alle soorten hydraulische installaties Het voordeel hiervan is dat de installatie...

Page 3: ...4102 class B2 Technical specification of insulation for heating and cooling codes 559022 559031 559021 559121 559331 559320 Material EPP Thickness 20 mm Thermal conductivity 0 037 W m K at 10 C Density 45 kg m3 Working temperature range 5 120 C Reaction to fire UL 94 class HBF Technical specification of insulation for heating only codes 559222 559231 559221 559220 Portate massime consigliate agli ...

Page 4: ...möglich Die 1 2 IG Anschlüsse dürfen nur für die Montage von Schnellentlüftern oder Entleerungen verwendet werden nicht aber zum Anschluss eines Heizkreises Bei senkrechten Einbau sollten keine Schnellentlüfter montiert werden Die Version mit 125 mm Achsabstand hat Überwurfmuttern an den Abgängen Les SEPCOLL composés d un séparateur hydraulique côté primaire et d un collecteur coplanaire compact c...

Page 5: ...são com entre eixo de 125 mm possui derivações com porca louca SEPCOLL units bestaande uit een evenwichtsfles primaire kant en een compacte verdeler secundaire kant die direct verbonden is aan de open verdeler kunnen op allerlei posities geïnstalleerd worden Ook ondersteboven en of links rechts Hiervoor dien je enkel de labels te respecteren op het toestel die de verbindingen aangeven Men kan ook ...

Page 6: ...th 90 and 125 mm Die Halterungen wie in den Abbildungen gezeigt montieren und danach die Dichtheit überprüfen Diese Vorgehensweise gilt sowohl für die Modelle mit einem Achsabstand der Sekundärkreise von 90 als auch 125 mm Fixer le tout comme le montrent les figures puis procéder au test hydraulique NB La procédure concerne aussi bien les modèles avec entraxe des circuits secondaires de 90 que de ...

Page 7: ... Il est possible d orienter la partie murale du L des étriers vers le haut ou vers le bas ATTENTION Pour la version 2 2 entraxe 125 mm orienter impérativement cette partie vers le haut Los soportes pueden fijarse con el brazo horizontal de la L hacia arriba o hacia abajo ATENCIÓN En la versión 2 2 con distancia entre centros de 125 mm el brazo horizontal de las L debe ubicarse abajo Os suportes po...

Page 8: ...0 minutes et refermer 2 Si el dispositivo SEPCOLL se utiliza con agua refrigerada reparta en el borde exterior del aislamiento una ligera capa de sellante espere que el disolvente se haya evaporado 10 minutos aprox y vuelva a cerrar 2 Se o SEPCOLL for utilizado com água refrigerada aplicar nas bordas exteriores do isolamento uma ligeira camada de selante esperar que o solvente evapore cerca de 10 ...

Page 9: ...equipped with specific anticondensation adhesive stripes Remove the protective film before applying the insulation 2 Den SEPCOLL auf den Halterungen anbringen und mit den entsprechenden Schrauben fixieren und befestigen Zum Schließen die Vorderseite der Isolierung wie in der Abbildung gezeigt vorsichtig einrasten lassen HINWEIS Die Isolierung der Serien 559320 und 559331 Geeignet für den Einsatz m...

Page 10: ...uitgerust met speciale anti condensatie kleefstroken Verwijder de speciale beschermingstrip voor de plaatsing van de isolatie Attenzione La coibentazione dei cod 559222 559231 559221 559220 è utilizzabile solo su impianti di riscaldamento e non è utilizzabile su impianti con acqua refrigerata Caution The insulation of codes 559222 559231 559221 559220 can only be used on heating systems and not on...

Page 11: ...3 4 Después de haber elegido la instalación proceda como se indica en los puntos 1 2 3 4 Uma vez escolhida a posição de instalação na caixa proceder como indicado nos pontos 1 2 3 4 Nadat u de plaats in de verdelerkast heeft bepaald ga tewerk zoals omschreven in onderstaande punten 1 t m 4 Procedura di installazione e assemblaggio coibentazione cod 559121 Installation and insulation assembly proce...

Page 12: ... 1 2 3 1 Togliere la fascia di protezione della superficie adesiva posteriore e posizionare il SEPCOLL all interno 1 Remove the protection film from the back adhesive surface and position the SEPCOLL unit inside the insulation shell 1 Entfernen Sie den Schutzfilm der unteren Klebefläche und positionieren Sie den SEPCOLL innerhalb der Isolierung 1 Oter la bande de protection de la surface adhésive ...

Page 13: ...caldaia murale e SEPCOLL da incasso 2 1 System with wall mounted boiler and built in SEPCOLL 2 1 Installation mit Wandkessel und SEPCOLL Unterpuz 2 1 Installation avec chaudière murale et SEPCOLL 2 1 à encastrer Instalación con caldera mural y SEPCOLL 2 1 a empotrar Instalação com caldeira mural e SEPCOLL de encaixe 2 1 Installatie met wandketel en SEPCOLL 2 1 voor inbouw cod 559021 221 ...

Page 14: ...oiler and SEPCOLL 3 1 System mit bodenstehendem Kessel und SEPCOLL 3 1 Installation avec chaudière au sol et SEPCOLL 3 1 Instalación con caldera de pie y SEPCOLL 3 1 Instalação com caldeira de pavimento e SEPCOLL 3 1 Installatie met staande ketel en SEPCOLL 3 1 cod 559231 331 ...

Page 15: ...o over tighten the threaded connections Otherwise in time failure could arise with water loss causing damage to objects and or people Water temperatures in excess of 50 C can cause serious scalding During the installation commissioning and maintenance of SEPCOLL all necessary steps should be taken to ensure that water temperature do not cause danger to people Leave this operating manual with the u...

Page 16: ...ificado de acordo com as normas nacionais e ou requisitos locais Se o SEPCOLL não for instalado colocado em funcionamento e mantido segundo as instruções contidas neste manual poderá não funcionar corretamente e colocar o utilizador em perigo Certificar se de que todas as ligações tenham vedação hidráulica Na realização das ligações hidráulicas ter atenção para não forçar mecanicamente as ligações...

Reviews: