2
SPECIFICATIONS FOR INSTALLATION IN THE BATHROOM
Installation must comply with the standards and laws in force in the country of destination.
For electrical specifications and the IP electrical protection rating, please consult the label on the radiator and follow the
warnings given below
CAUTION - the radiator must be positioned so that the switch or electronic controls are not accessible while the person is in the shower or in
the bath.
CAUTION - if the power cable is damaged, it must be replaced in order to prevent any risk. CAUTION - for versions with an electrical
resistance with a cable output, ensure that the connection is carried out properly, using a terminal compliant with EN 60998-1, which
guarantees the same IP degree of protection as indicated in the manual of the resistance and on the label on the radiator bearing the
specifications.
CAUTION - for versions with CLASS II electrical resistance and cable output, perform the connection in compliance with EN 60998-1 using a
terminal that guarantees double insulation.
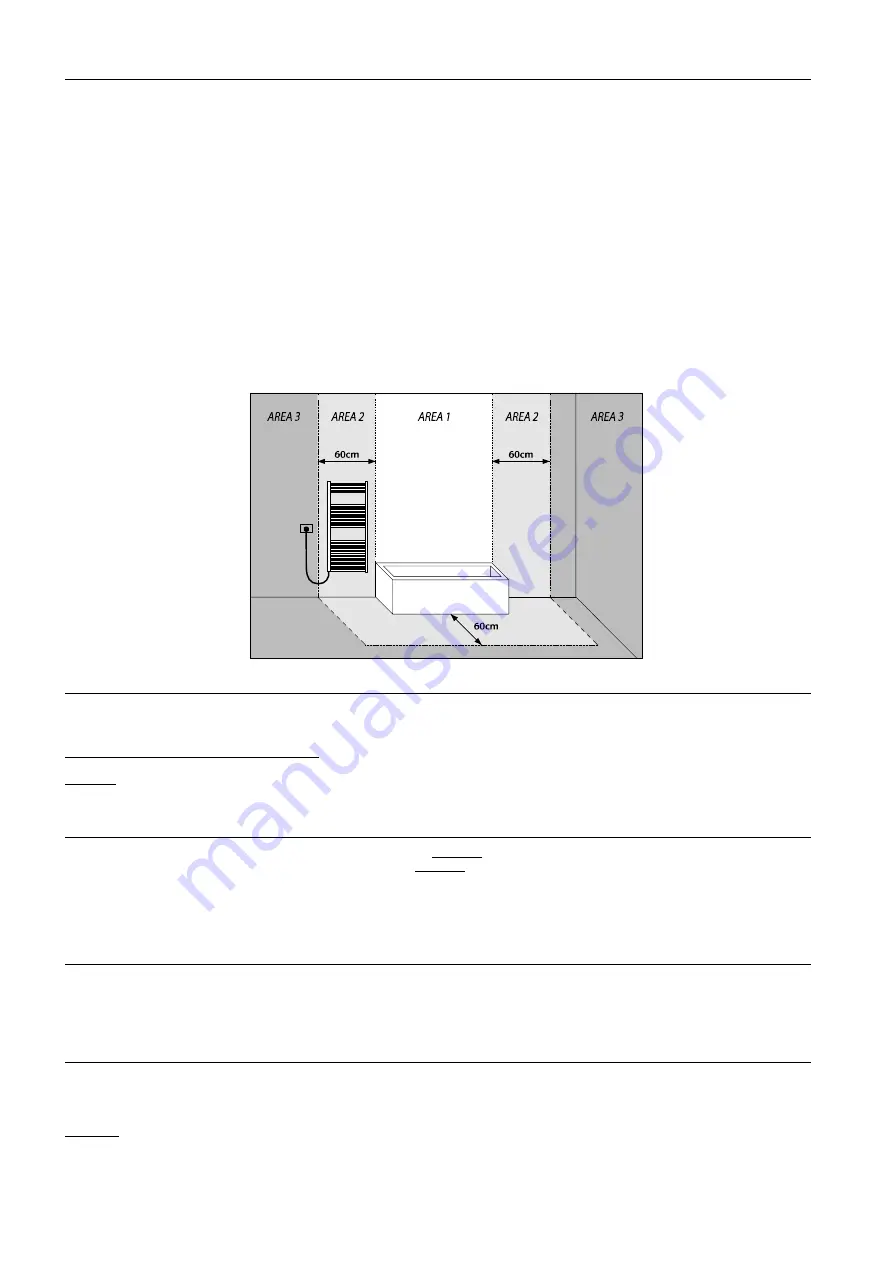
CAUTION - for versions with a resistance that require connection to the electricity mains with a plug, ensure that the socket is in AREA 3, as shown
in figure 1 (page 3).
CAUTION - for versions with CLASS II electrical resistance, connect the radiator to a device that ensures the disconnection of the omnipolar
mains, with a gap between contacts of at least 3 mm.
CAUTION - versions with CLASS II electrical resistance do NOT have to be earthed. CAUTION
– for radiators installed in a bathroom, it is
necessary to protect the power line with a high-sensitivity 30mA differential device.
A multi-pole cut-off device must be installed. There must be a gap of at least 3 mm between the contacts. Taking all of the above warnings
into consideration, the radiator can be installed in areas 2 and 3, as shown in
Figure 1
INSTALLING THE RADIATOR
The radiator must not be installed in a niche or under a socket.
Any element that could obstruct the proper distribution of heat must be placed at a minimum distance of 50 cm from the front of the
radiator.
The ideal installation height is 30 cm from the floor.
CAUTION - To avoid posing a threat to very young children, this appliance must be installed so that the last heating element at the bottom is at least
600 mm above the floor.
CLEANING THE RADIATOR
CAUTION - disconnect the power supply before each cleaning operation. CAUTION - cleaning
operations must be carried out with the radiator switched off and cold. CAUTION - do not use
abrasive or corrosive products.
Clean the heating part using soapy water and rinse with a soft cloth. When cleaning plastic parts, only a dry cloth use and avoid contact with
chemicals or alcohol.
MALFUNCTION
In the event of a malfunction, refrain from using the appliance, disconnect it from the power supply, and contact a qualified technician who is
authorised to work on this type of product.
Repairs that require the liquid container to be opened must be carried out by the manufacturer.
The manufacturer accepts no liability for damage to persons, animals or property resulting from tampering with or improper handling of the radiator.
WARRANTY
The radiator body is guaranteed for 5 years; the electrical and electronic components are guaranteed for 2 years from the date of purchase of
the radiator.
A document proving the date of purchase (tax receipt, invoice, till receipt) must be presented for the warranty to be valid,
CAUTION: For the guarantee to be valid, installation must comply with current standards and laws and be carried out properly.
Components subject to normal wear and tear or consumption, and damages occurring during transport are not covered by warranty.


