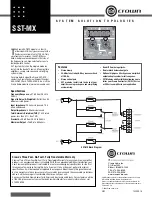

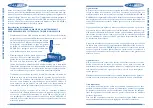

6 Low Pass Output Level Control
This allows you to adjust the output level to match both the input level of
your subwoofer amplifiers and the relative level to the High Pass output.
7 Remote Low Pass Level control
Docking port for the jack of the supplied CXR Remote control.This gives
you the possibility to adjust your Low Pass Level on dash.
8 Low Pass Output Peak LED
This indicator will illuminate constantly when the output voltage reaches
or surpasses 15V RMS maximum out for the Low Pass output.
9 Low Pass Crossover Frequency Selector
Adjusting this four position switch, you may select between crossoverpoints
60Hz / 80Hz / 100Hz / 120Hz for the Low Pass (sub-woofer) output.
10 High Pass Output
Docking ports for the RCA connectors leading to your High Pass amplifiers
or alternative crossover.
11 High Pass Output Level Control
This allows you to adjust the output level to match both the input level of
your High Pass amplifiers and the relative level to the Low Pass output.
12 High Pass Output Peak LED
This indicator will illuminate constantly when the output voltage reaches
or surpasses 15V RMS maximum out for the High Pass output.
13 High Pass Crossover Frequency Selector
Adjusting this four position switch, you may select between crossoverpoints
80Hz / 100Hz / 120Hz or Full Range for the High Pass output.
14 Power Terminals
”+” Connect to the vehicle’s positive 12V supply (+12V DC)
”
-
” Connect to the vehicle’s ground (
-
12V DC)
”R” Connect to the head unit’s remote turn on leads.
”D/R” Delayed Remote output. Connect to all the amplifiers and crossovers
following the CXQ20.This will delay the turn on of these units by 2 seconds
after the system is powered up.
15 Fuse 1A
The 1A fuse will help to protect the CXQ20 in case of a short.
16 Power Indicator LED
Lights up when the CXQ20 is powered up and properly installed.
Specifications CXQ20
General
Frequency response
10Hz to 30KHz ±1dB
T.H.D.
0.02%
Signal to noise ratio
>100dB
Channel separation
>80dB
Input level
7V to 0.2V
Input impedance
20K
Ω
Maximum output level
15V
Output impedance
50
Ω
Balanced
Crossover
Crossover frequencies
High-pass
80/100/120Hz and Full Range
Low-pass
60/75/85Hz and Full Range
Crossover slope
18dB
Dimensions W x L x H (mm)
280 x 180 x 35 (mm)
Features CXQ20
(See illustration on the inside cover)
1 Input
Docking ports for the RCA connectors arriving from the source unit’s
output.
2 Input Level Control
Input sensitivity control adjusts to your source unit’s output.
3 Equaliser On/Off switch
This switch allows you to bypass the equalizer by switching it to the off
position
4 Input Peak LED
This indicator will illuminate when the input level is too high and clipping is
occurring. If the LED is illuminating, back the input level control (2) to a
less sensitive setting.
5 Low Pass Output
Docking ports for the RCA connectors leading to your sub-woofer amplifier.
2
3
SPECIFIC
A
TIONS
AND FEA
TURES
SPECIFIC
A
TIONS
AND FEA
TURES