Description of the functions
Power
Power function to activate or deactivate the unit.
Band
Band selection allows you to select different reception bands, f.i. FM1, FM2, FM3, DAB1, DAB2, DAB3
AF
AF stands for Alternative frequencies; the tuner will return to alternative frequencies whenever the reception signal is getting worse.
TA
TA stands for Traffic announcement which means that it will give you information about the traffic (if broadcasted) no matter what mode you are in (SD,USB, etc.) it will automatically interrupt the cd
and give the information, after that it automatically switches back to the selected mode
Manual up/down
Long press to move the radio frequency number up/down step by step.
Menu (system)
Press the VOL/SEL (2) button for several seconds to activate the cyclical mode to choose from the following user instructions:
AF > TA > TAVOL > REG > EON > SEL (Press to enter go to next function, rotate to change value)
Audio Menu
The Audio menu button gives you the possibility to adjust your sound system with the following options Bass, Treble, Balance and Fader. These options can be used to fine tune your sound.
In EQ mode you can choose from preset EQ settings: FLAT, CLASSIC, POP, ROCK
Mode
The mode button allows you to go from one source (f.i. USB) to another source (f.i. Tuner, DAB) by pushing the button as many times as needed.
Rotary volume
This knob allows you to adjust the volume from minimum to maximum level. NOTE high sound levels may cause damage to your ears.
In menu’s this knob allows you to change values
M1- M6
These are the preset stations where you can store your favourite radio stations if in tuner mode.
Pause/Play
This button allows you in USB or SD mode to play or to pause the music.
Scan
Scan will play 10 seconds of each song on the USB or SD. If the preferred song is playing, push again and it will play that song.
Repeat
Repeat will play a selected song or album continuously. Available in USB and SD mode.
Shuffle
Shuffle will play all the songs random. Available in USB and SD mode.
File down/up
In MP3 mode press this button to go up or down one folder.
Track down/up
In MP3 mode press this button to go up or down one track
fast forward/backward
Long press to fast forward to the USB or SD.
3,5mm AUX jack in
To connect an external audio system.
USB poort
When inserting a USB stick the unit will switch to USB mode. (Max 32GB)
Micro SD card input
When inserting a micro SD card the unit will switch to micro SD mode. (Max 32GB card)
Reset
Use a pointed object to press and hold the reset button for 5 seconds. The unit will be set to factory default.
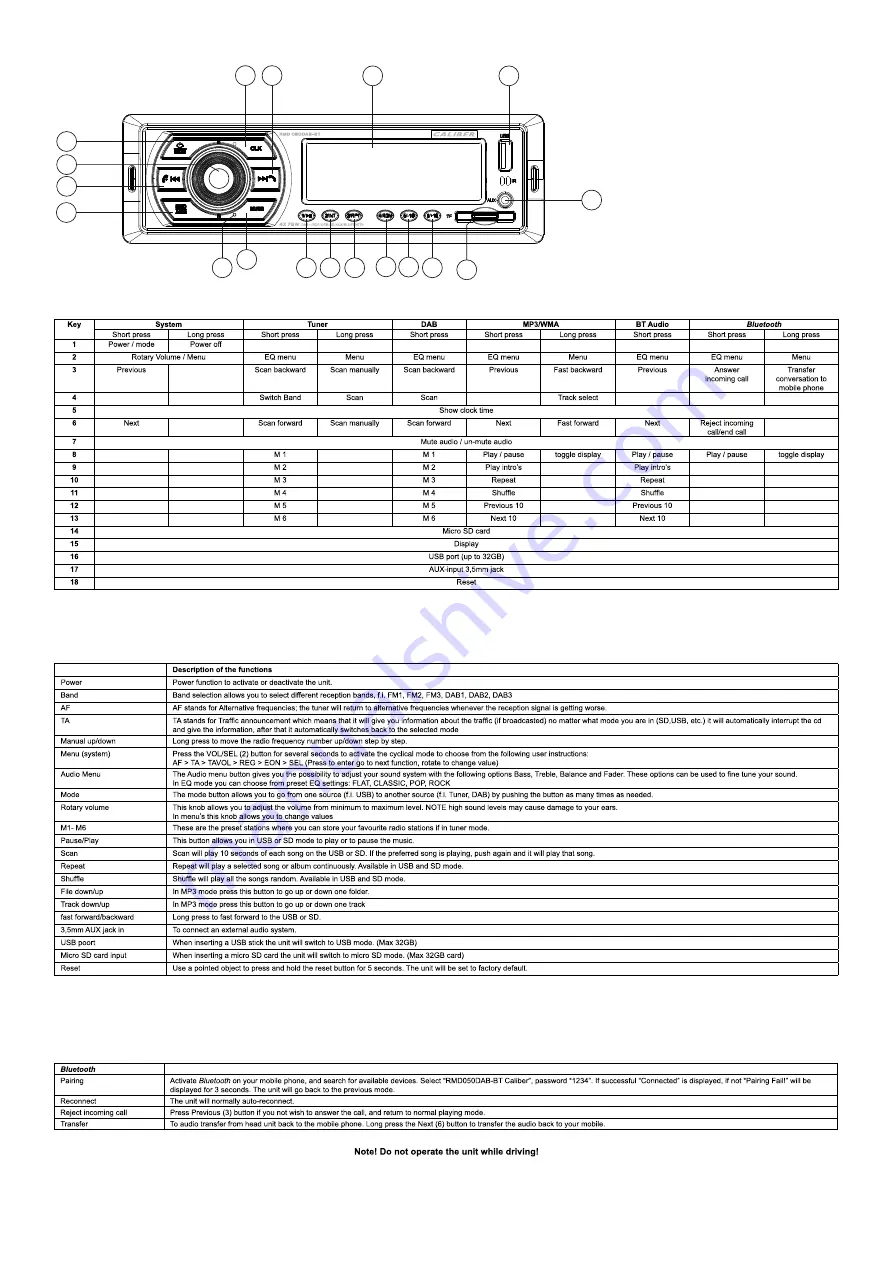
1
2
2
3
4
9
11 12 13
14
7
5
6
15
17
10
16
8
18
Key
System
Tuner
DAB
MP3/WMA
BT Audio
Bluetooth
Short press
Long press
Short press
Long press
Short press
Short press
Long press
Short press
Short press
Long press
1
Power / mode
Power off
2
Rotary Volume / Menu
EQ menu
Menu
EQ menu
EQ menu
Menu
EQ menu
EQ menu
Menu
3
Previous
Scan backward
Scan manually
Scan backward
Previous
Fast backward
Previous
Answer
incoming call
Transfer
conversation to
mobile phone
4
Switch Band
Scan
Scan
Track select
5
Show clock time
6
Next
Scan forward
Scan manually
Scan forward
Next
Fast forward
Next
Reject incoming
call/end call
7
Mute audio / un-mute audio
8
M 1
M 1
Play / pause
toggle display
Play / pause
Play / pause
toggle display
9
M 2
M 2
Play intro’s
Play intro’s
10
M 3
M 3
Repeat
Repeat
11
M 4
M 4
Shuffle
Shuffle
12
M 5
M 5
Previous 10
Previous 10
13
M 6
M 6
Next 10
Next 10
14
Micro SD card
15
Display
16
USB port (up to 32GB)
17
AUX-input 3,5mm jack
18
Reset
Bluetooth
Pairing
Activate
Bluetooth
on your mobile phone, and search for available devices. Select “RMD050DAB-BT Caliber”, password “1234”. If successful “Connected” is displayed, if not “Pairing Fail!” will be
displayed for 3 seconds. The unit will go back to the previous mode.
Reconnect
The unit will normally auto-reconnect.
Reject incoming call
Press Previous (3) button if you not wish to answer the call, and return to normal playing mode.
Transfer
To audio transfer from head unit back to the mobile phone. Long press the Next (6) button to transfer the audio back to your mobile.


