background image

MANUAL

12. DAB+ instructions


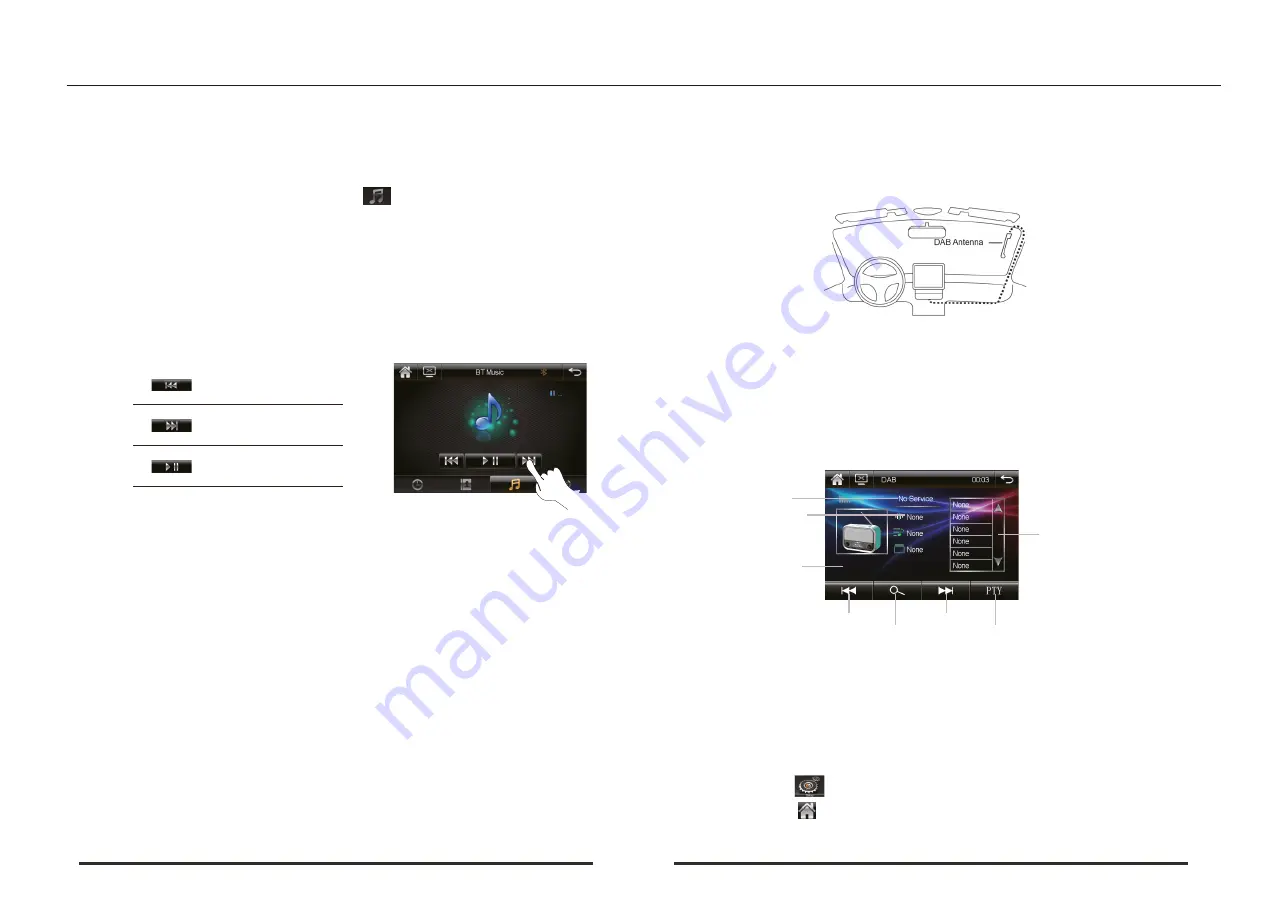
        INSTALLATION OF DAB ANTENNA

        For this operation, contact a professional installer.

(1)The DAB antenna supplied requires installation on the front windscreen in a vertical position (see        

     figure).

(2)Clean the glass where you want to attach the antenna.

(3)Carefully remove the protective film from the adhesive on the antenna and place it in the chosen 

    location. The antenna must be positioned so that the ground contact can be spread on the metal  

    body of the car (it is not necessary to remove the paint).

( 7) Play Bluetooth music

a). In the main interface of Bluetooth, touch the icon                to enter the interface of playing

     Bluetooth music.

b). If  the connected mobile phone supports Bluetooth music play function, the audio played by the

     mobile phone can be transmitted to the car audio system for playing.

c). In the state of connection of the equipment with Bluetooth, enable connection of mobile phone

     stereo and play music, at this time, audio signal of the mobile phone can be transmitted to the car

     audio system.

     tips:  Setup methods differ due to different mobile phones , the objective is to use this system as

             a Bluetooth earphone by setup, refer to the related instructions for detailed steps of setup.

d). Touch five icons at left side of the screen to play music saved in the mobile phone.

e). Exiting from Bluetooth play interface or closing music play function of the mobile phone will

 close the music play function of the Bluetooth.

Tips: 1.Only support Bluetooth mobile phone has " stereo player" or "telecontrol" function, which

can operate music playing interface.

2.Music of the cell phone can be played only while in the Bluetooth music play interface.

Play/pause

Play previous trach

Play next track


13. SYSTEM SETUP

This section describes the system setup information, including general, audio, date & time , wallpaper

and others.

(1) Enter exit

a). Touch the icon             at the system main interface to enter system setting interface.

b). Touch the icon            to exit the setting interface and return to system main interface.

13

14

(4)Position the cable (length 3 m) inside the car dashboard until you reach the position of the radio.   

    Connect the cable with golden connector to the DAB antenna input on the rear of the car radio 

    and secure it by screwing the connector.

If a second thinner black cable is present, it must be connected to the main power 12V 

(key).


Caution:

              - Do not install the antenna in a position that obstructs the driver's view.

              - Do not place the cable and the antenna where they could interfere with the proper           

                functioning of the AirBag or other safety devices or where they could impede the driving 

                of the vehicle.

              - The use on shielded glass reduces the antenna performance.

RADIO DAB OPERATIONS

Previous station                     Next station 

                       Auto searching                      Program type

Radio name
Radio frequency

Programme  list

Radio content

Summary of Contents for RMD 803DAB-BT

Page 1: ...RMD 803DAB BT MANUAL ENGLISH ...

Page 2: ...unique serial number here SN range 320123 00001 320123 00500 RMD 803DAB BT 9 10 11 12 SUB OUT RIGHT OUT LEFT OUT VIDEO OUT AUX AUDIO R IN AUX AUDIO L IN REAR CAM IN FRONT CAM IN AUX VIDEO IN RADIO Antenna USB 5VDC 1 5A Charge output only DAB 13 MIC IN 1 2 3 4 5 6 7 8 9 10 11 13 12 SUB V OUT F CAM R OUT R IN R CAM L OUT L IN V IN ANT USB 5V 1 5A DAB MIC Frequency Range FM 87 5 108 MHz AM 522 1620 K...

Page 3: ...uction to main interface function icons 4 6 Radio function operation 5 7 USB function operation 7 8 SD function operation 8 9 AUX function operation 9 10 Mirror Link Description 10 11 Bluetooth function operation 11 12 DAB instructions 13 Contents 13 System setup 14 14 Audio video support format list 20 ...

Page 4: ...peration system only Before installing the unit make sure your vehicle is connected to DC12V negative ground electrical system The negative battery terminal must be disconnected before making connections which can decrease the chance of damaging the unit due to short circuit Be sure to connect the color coded leades correctly according to the diagram Incorrect connection may cause the unit malfunc...

Page 5: ...ed with before power off is the default of the machine audio video signal multimedia play card slot For example in the interface of radio mode touch icon at top right corner to enter the system main interface Multiple preset EQ JAZZ ROCK POP CLASSIC After startup of the system in any operating mode press MENU button on panel to enter the system main interface as a shortcut Change the background im...

Page 6: ...ss and hold any button frequency icon below to save the radio frequency c Touch this icon to step forward 0 05 MHZ for FM waveband and 9KHz forAM waveband 3 Wave band selection In the radio interface touch icon to switch over among the wave bands of FM1 FM2 FM3 AM1 and AM2 in circulation 6 RADIO FUNCTION OPERATION 1 Enter Exit b Touch icon at top right corner of the radio interface to return to th...

Page 7: ...and video player When the main unit is equipped with slot for multimedia storage card this operation is available 1 Insert Take out SD card a Insert the SD card with media information into the SD card slot directly until the card is locked b For taking out the SD card exit from SD card playing status first and then press the SD card slightly to cancel the locking status of the SD card and eject the...

Page 8: ... screen and the invisible operational icons will be displayed b Touch icon to turn off screen display touch the sreen for returning to display c Touch icon to exit the AUX mode to the system main interface 9 10 3 Corresponding to the role of the icon 10 MIRROR LINK DESCRIPTION 1 Notes a Support Android two way control version to Android 10 iOS 13 Version and latest Model under iPhone X b The conne...

Page 9: ...n case of a wrong entering touch icon for deletion one by one c When completing entering touch icon of green speaker to dial a call d During the phone call touch icon switch over the voice on the line between car sound and mobile phone 5 Answer a call a In the state of Bluetooth connected in case of call in the system will automatically switch over to Bluetooth interface and play ring of the call ...

Page 10: ...ng from Bluetooth play interface or closing music play function of the mobile phone will close the music play function of the Bluetooth Tips 1 Only support Bluetooth mobile phone has stereo player or telecontrol function which can operate music playing interface 2 Music of the cell phone can be played only while in the Bluetooth music play interface Play pause Play previous trach Play next track 1...

Page 11: ...l calibration Brightness Set brightness of dimmer by sliding the icon Touch panel calibration a Use stylus click cross center the order shall be the upper left upper right lower left lower right conter of the panel to be calibrated b The calibration is completed Touch the icon to pop up password in putkeyboard enter logo setting interface by inputting 0000 2 Touch the favorite car flag pictures to...

Page 12: ...ng interface for setting display effec of video played RESET 16 16 16 16 0 BRI CON HUE SAT SHA Adjust Adjust Brightness Contrast Hue Saturation Sharpness 1 Brightness This is used to adjust the brightness of the pictures while playing the video 2 Contrast This is used to adjust the contrast of the pictures while playing the video 3 Hue This is used to adjust the hue of the pictures while playing t...

Page 13: ... MP2 MP3 C od ec u factory settings will shut down and restart when boot the h b W res ore th sys em efa t a a Wh W en choose the host restores the t e d ul ost will restore the system default settings hen choose X the host will cancel settings DAT dat MPEG 1 MPEG 2 Dolby igital AC3 720 480 576 30fps LPCM MPEG Audio MP1 MP2 MP3 FLV flv H 264 LPCM MP3 720 480 576 AAC LC 2ch 30fps RV8 9 10 RMVB COOK...

Page 14: ...WWW CALIBEREUROPE COM CALIBER EUROPE BV Kortakker 10 4264 AE Veen The Netherlands ...

Reviews: