background image

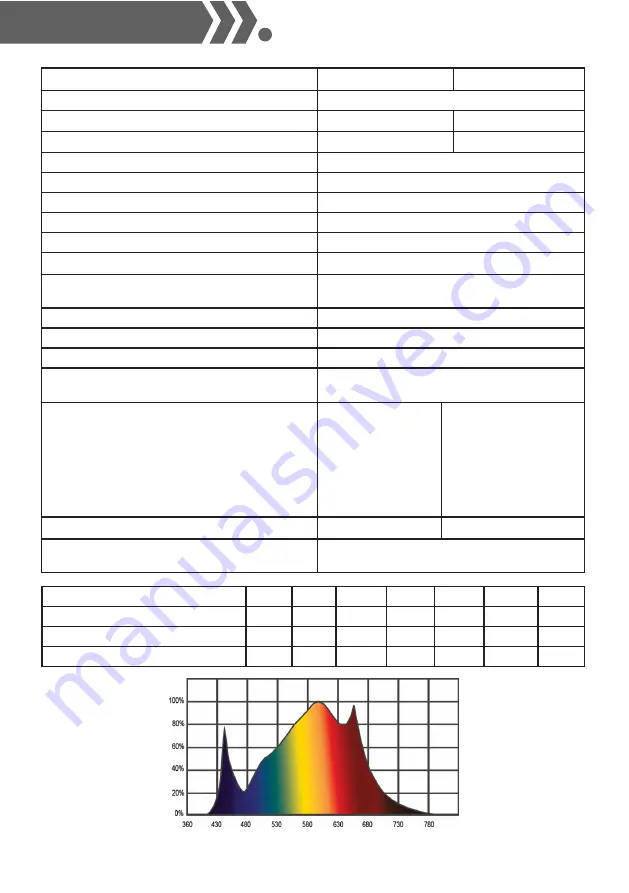
AC VOLTAGE / TENSION

120V

208V

230V

277V

347V

400V

480V

AC COURANT / AC CURRENT

5.43A

3.06A

2.76A

2.28A

1.87A

1.61A

1.34A

AC ALIMENTATION / AC POWER

652W

636W

635W

631W

648W

645W

644W

PUISSANCE / POWER FACTOR

0.997

0.991

0.99

0.98

0.995

0.989

0.974

TECHNICAL SPECIFICATIONS / SPÉCIFICATIONS TECHNIQUES 

EN - FR

SYSTEME  D’ECLAIRAGE  HORTICOLE.  NE  CONVIENT  PAS  A  L’ILLUMINATION  DES  PIECES  DES  MENAGES.                    

Paramètres

    Grizzly 600                Grizzly Pro 600

SPECTRUM / SPECTRE

Full spectrum / Spectre complet

LIGHT OUTPUT PPF / SORTIE LUMINEUSE


1512 μmol/s     


1700 μmol/s

EFFICACY / EFFICACITÉ

        2.4 μmol/J  @277AC 


2.7 μmol/J   @277AC 


AC INPUT POWER / PUISSANCE D’ENTRÉE CA

631W @ 277V AC

LIGHT DISTRIBUTION / DISTRIBUTION DE LUMIÈRE

120°

MOUNTING HEIGHT / HAUTEUR DE MONTAGE

50 CM - Above Canopy

THERMAL MANAGEMENT / GESTION DE LA CHALEUR

Passive

MAX.AMBIENT TEMPERATURE / TEMPÉRATURE MAX.AMBIANTE

95°F - 35°C

CONTROLLER / VARIATEUR

10 V-Source / 25% - 50% - 75 % - 100% EXT

TOTAL HARMONIC DISTORTION / DISTORSION 
HARMONIQUE TOTALE 

<10%

LIFE TIME / DURÉE DE VIE

L 90: > 50 000 hrs

IP RATING / NOTATION IP

IP65

WEIGHT AND DIMENSION / POIDS ET DIMENSIONS

1091,95mm(43’’)x1090mm(42,90’’)x51,6mm(2,03’’) / 9KG

CONNECTIONS / CONNEXIONS                  

RJ45 INPUT/ OUTPUT (External cont linkable /

Contrôleur e liaison)

LIGHT SOURCE / SOURCE LUMINEUSE

  Philips (blanc -whites) 
  Osram GH (rouge-reds) 
  6 bars :  3.232diodes 

   
   Samsung LM301H
   (blanc-whites) Osram GH
   (rouge-reds) / 6 bars :
    2.226 diodes

DRIVER

               Calitek    


                  Meanwel HLG-600H-54AB 

DIMENSIONS-DRIVER-POID/WEIGHT

276mm(10,87’’) x 144mm(5,61’’) x 49,2mm(1,94‘‘) / 3.9KG

Spectrum graph / Spectre

Summary of Contents for Grizzly 600

Page 1: ...FR EN...

Page 2: ...ION DISTRIBUTION DE LUMI RE 120 MOUNTING HEIGHT HAUTEUR DE MONTAGE 50 CM Above Canopy THERMAL MANAGEMENT GESTION DE LA CHALEUR Passive MAX AMBIENT TEMPERATURE TEMP RATURE MAX AMBIANTE 95 F 35 C CONTRO...

Page 3: ...ables l int rieur L ouverture ou la modification de la lampe LED peut tre dangereux et r voquera la garantie Utilisez pas la lampe Calitek si celle ci ou le c ble d alimentation sont endommag s Si le...

Page 4: ...pour nettoyer la lampe car cela pourrait endommager les optiques secondaires Utilisez un chiffon tissu propre et sec la place N utilisez pas la lampe proche de substances inflammables explosives ou r...

Page 5: ...GE DU CADRE 1 Connectez les supports A et B au ch ssis principal en appuyant sur le bouton du connecteur de ch ssis et en les ins rant dans l embout et le verrou du ch ssis Attention Le transformateur...

Page 6: ...des barres lumineuses dans la lampe comme montr ci dessus 4 INSTALLATION DE LA LAMPE Assurez vous que toutes les barres lumineuses soient install es de fa on s curis e Retournez la lampe et attachez l...

Page 7: ...out de la lampe 1 au port RJ14 in de la lampe 2 c Continuez ainsi connecter les lampes en serie jusqu 100 lampes par contr leur 7 CONNEXION DE LA LAMPE LED L ALIMENTATION Assurez vous que l alimentati...

Page 8: ...ent que les c bles de la lampe ne soient pas endommag s STOCKAGE RECYCLAGE Placez la lampe Grizzly dans un environnement sec et propre ayant une temp rature ambiante situ e entre 25 C et 55 C Le produ...

Page 9: ...tdoors This product will work best between 20 C and 30 C Do not exceed ambient temperatures above 35 C The product can be used in humid environments from 20 to 90 without condensation LEGAL INFORMATIO...

Page 10: ...ning agents to clean the LED lamp as this could damage the secondary optics Use a clean dry cloth cloth instead Do not use the LED lamp near flammable explosive or reactive substances This LED lamp ca...

Page 11: ...he CALTEK light under load MOUNTING INSTRUCTIONS 1 FRAME ASSEMBLY 1 Connect brackets A and B to the main chassis by pressing the button on the chas sis connector and inserting them into the end cap an...

Page 12: ...magnetic connection is secure Assemble the rest of the light bars into the fixture frame as shown in the figure above 4 INSTALLING THE FIXTURE Ensure all light bars are installed correctly and are sec...

Page 13: ...e fixture 1 RJ14 port in b Connect RJ14 out of fixture 1 to RJ14 in of fixture 2 c Continue to connect fixtures in series for up to 100 fixtures per controller 7 CONNECTING THE LED FIXTURE TO THE MAIN...

Page 14: ...ture using a dry or damp cloth Regularly check the cables of the LED fixture to ensure it is undamaged STORAGE AND DISPOSAL Store the Grizzly fixture in a dry and clean environment with an ambient tem...

Page 15: ...IS 32 34 rue de la R gale F 77181 COURTRY CONTENTS 1x MANUAL 2x METAL CABLE HANGERS 1x FRAME A 1x LED DRIVER Power output cables male connectors to face Frame B 1x FRAME B Contains power input cables...

Page 16: ......

Reviews: