background image


57 


Proprietary Information: Not for use or disclosure except by written agreement with Calix. 

© Calix. All Rights Reserved. 

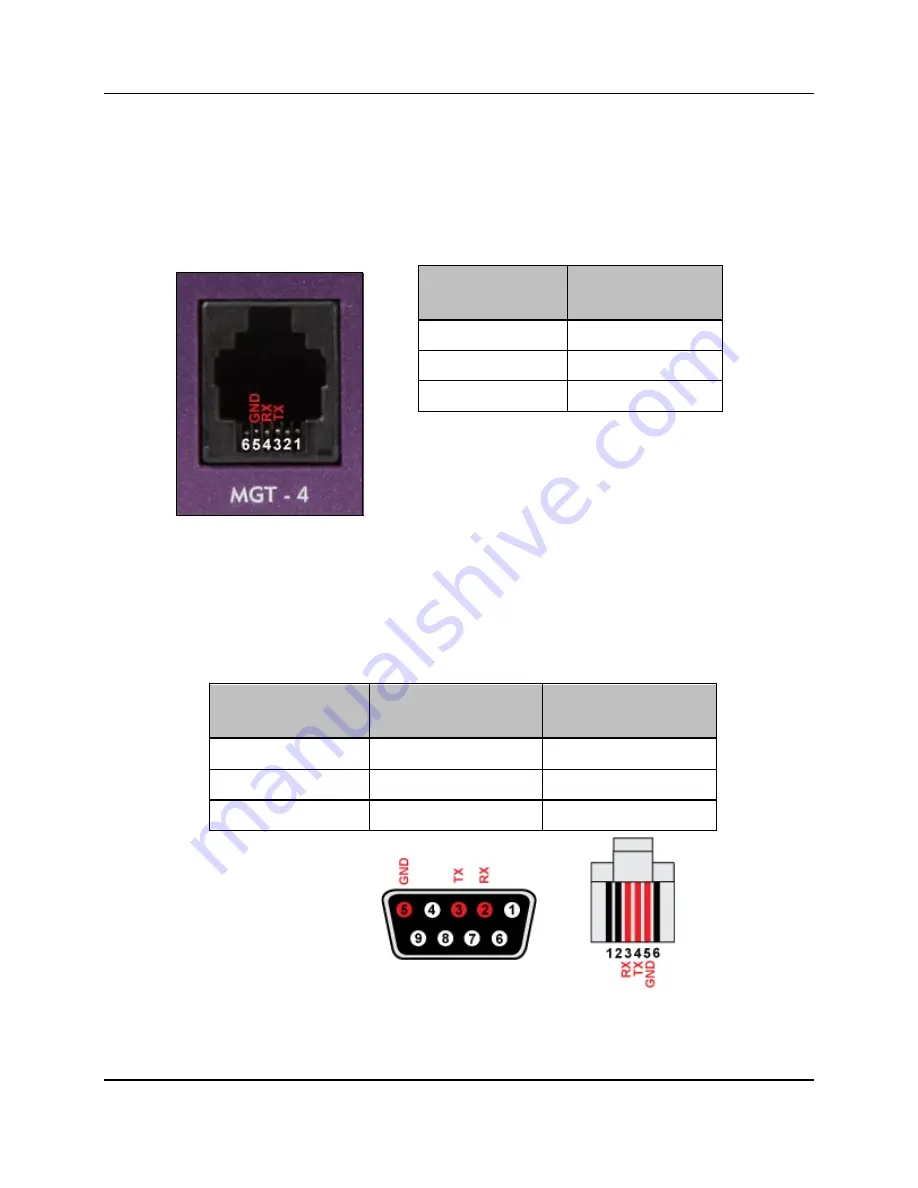
RS-232 Serial Port Pins 

The E7-2 RS-232 serial port enables console connections to the E7-2 CLI, accessible via an 

RJ-11 connector located on the E7-2 fan module (labeled 

MGT-4

). 


E7-2 Serial Port


RJ-11F Connector


RS-232 Signal 

(From E7-2) 

Serial Port 

RJ-11F 


TX


Pin 3 


RX


Pin 4 


GND


Pin 5 


Calix offers an RS-232 console cable (DB-9F to RJ-11M) to connect a PC to the E7-2 serial 

port. Alternatively, you may use the pin assignments below to make your own console cable, 

as required. 


Console Cable


RS-232 Signal 

(From PC) 

PC End: 

DB-9F 

E7-2 End: 

RJ-11M 


RX


Pin 2 

Pin 3 


TX


Pin 3 

Pin 4 


GND


Pin 5 

Pin 5 


DB-9F Connector


RJ-11M Connector


Summary of Contents for E7-2

Page 1: ...Calix E7 2 Installation Guide May 2013 220 00320 Rev 13...

Page 2: ......

Page 3: ...ct Dimensions 10 Chapter 2 Installation Considerations 11 Installation Guidelines 12 Safety Recommendations and Notices 13 Required Items 14 Preparations Before You Begin 16 Chapter 3 Installing the C...

Page 4: ...terfaces 37 Wiring External Alarms 37 Wiring the BITS Timing Interface 39 Connecting the E7 2 Line Interfaces 41 Installing Pluggable Transceiver Modules 42 Connecting Fibers 43 Connecting to the Copp...

Page 5: ...well as standards based Ethernet technologies and conventions is recommended Related Documentation You can access all Calix product documentation including Calix E7 2 configuration practices from the...

Page 6: ...NT Fiber optic radiation can cause severe eye damage or blindness Do not look into the open end of an optical fiber CE Marking Conformity The Calix E7 2 product complies with the Council of European C...

Page 7: ...Reserved Chapter 1 Calix E7 2 Product Overview This chapter introduces the Calix E7 2 Ethernet service access platform and provides a general overview of the E7 2 small form factor chassis and compone...

Page 8: ...transport high density residential triple play services over GPON and point to point Ethernet Metro Ethernet Forum MEF compliant business services mobile backhaul and protected GE aggregation Calix E7...

Page 9: ...ion Copper access service line cards Calix E7 2 copper cards e g VDSL2 terminate on the E7 2 rear panel All E7 2 line cards use pluggable transceiver modules for optical and copper based interfaces in...

Page 10: ...ct Dimensions E7 2 chassis dimensions The Calix E7 2 chassis exterior dimensions follow Height 1 7 inches 4 3 cm Width 17 5 inches 44 5 cm Depth 11 45 inches 29 1 cm E7 2 fan module dimensions The Cal...

Page 11: ...erations This section discusses general installation considerations and guidelines Review this information before starting the installation process Topics Covered This section covers the following top...

Page 12: ...ays wear standard safety gear when performing installation and maintenance tasks hardhats safety headgear reflective vest eye protection insulated gloves For safety keep bystanders and other unauthori...

Page 13: ...ets the applicable criteria of GR 974 CORE or GR 1361 CORE Failure to utilize an appropriate surge protector could result in susceptibility to lightning surges or create a potential hazard due to powe...

Page 14: ...ping mounting screws 12 24 for rack mounting 1 Power cable A B inputs 18 AWG 12 ft 3 66 m 1 Ground cable 8 AWG 12 ft 3 66 m plus termination hardware 2 ea washers nuts 1 Spare 2 hole ground lug 8 AWG...

Page 15: ...aterials are required for installation Power drill with universal sockets and screwdriver bits Socket wrench nut driver set standard Screwdriver set standard Cable ties tie wraps Wire stripper Compres...

Page 16: ...em the Calix E7 2 is suitable for installation in network telecommunication facilities including outside plant OSP locations The E7 2 requires one rack unit 1 RU of mounting space on a standard 19 or...

Page 17: ...ing the Calix E7 2 This section describes how to install the Calix E7 2 chassis and components onto a standard equipment rack Topics Covered This section covers the following topics Installing the E7...

Page 18: ...l the E7 2 chassis 1 Get a pair of mounting ears and 8 flat head screws from the installation kit Note The kit includes two sets of mounting ears one pair for 19 inch 48 26 cm racks and another for 23...

Page 19: ...mounting flange on the top b Position the bracket against the rack at the identified location aligning the bracket s mounting holes with counterpart holes on the rack c Attach the top bracket to the r...

Page 20: ...he frame as required Mount the E7 2 chassis with its right side fan tray on the bottom to direct airflow upward To install an E7 2 with the ETSI rack mounting kit 1 Get the pair of ETSI rack mounting...

Page 21: ...ways wear a grounded ESD wristband to avoid damaging the electronic equipment To ground the E7 2 chassis 1 Get the ground cable and supplied hardware pair of 10 32 Keps nuts and washers from the insta...

Page 22: ...appropriate lug A spare lug is included in the installation kit b Connect the ground cable to the main ground system or rack frame per PANI guidelines Note Grounding surfaces must be brought to a bri...

Page 23: ...7 2 rear panel loosen the captive thumbscrew securing the clear plastic power terminal cover to the chassis and then remove the cover 3 Connect the DC power cable to the E7 2 chassis as follows a Conn...

Page 24: ...ce environments only Do not use the air filter for outdoor cabinet deployments to provide maximum airflow to the E7 2 To install the E7 2 fan module 1 Unpack the E7 2 fan module from its packaging 2 F...

Page 25: ...ure except by written agreement with Calix Calix All Rights Reserved 3 Insert the fan module into the housing on the right side of the E7 2 chassis 4 Push the fan module all the way back into the slot...

Page 26: ...2 For applications using only one E7 2 line card the Blank card must occupy the second slot Remove the Blank card for applications using two E7 2 line cards ESD ALERT Beware of electrostatic discharg...

Page 27: ...tly with the guide rails in the slot before inserting the card c Insert the card into a vacant E7 2 card slot Slot 1 bottom Slot 2 top d Push the card ejector lever into the closed locked position to...

Page 28: ...bly After installing the E7 2 chassis install the fiber guide as described below Alternatively for flush and mid mounts you can install the fiber guide while installing the E7 2 chassis To install the...

Page 29: ...tal or vertical Note This procedure applies to any 19 or 23 inch rack 1 Unpack the fiber guide kit and locate the mid mounting bracket 2 On the left side of the E7 2 chassis oriented horizontally or v...

Page 30: ...iber guide with the fiber management on the left outside 3 Position the fiber guide s flat mounting plate against the right side of the installed ETSI mounting ear aligning the threaded fasteners on t...

Page 31: ...xhaust kit from its packaging 2 Orient the left rear exhaust plenum on the left side of the E7 2 chassis with the vent in the back aligning the plenum s inner mounting holes with the counterpart holes...

Page 32: ...with Calix Calix All Rights Reserved 6 Install a rack mounting ear to each plenum as follows a Position a mounting ear against the plenum aligning its mounting holes with the counterpart holes on the...

Page 33: ...he E7 2 Network Interfaces This section describes how to wire out the Calix E7 2 network interfaces including management alarms and service line interfaces Topics Covered This section covers the follo...

Page 34: ...band management connection to the E7 2 Calix recommends using the rear Ethernet management port to connect to the LAN Note Use a standard straight through Ethernet patch cable to connect to the E7 2 E...

Page 35: ...connection to the E7 2 To connect to the rear Ethernet management port 1 Get an Ethernet patch cable with RJ 45 connectors on both ends 2 Connect the cable to the E7 2 rear Ethernet management port la...

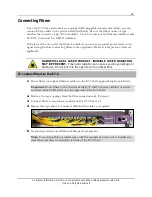
Page 36: ...nector on one end and a DB 9 female connector on the other end See RS 232 Serial Port Pins on page 57 for more information To connect to the RS 232 serial port 1 Get an appropriate RS 232 console cabl...

Page 37: ...ne output position Output Input OUT AL1 AL2 AL3 AL4 AL5 AL6 AL7 OUT AL1 AL2 AL3 AL4 AL5 AL6 AL7 Alarm Inputs AL1 to AL7 You can configure the E7 2 alarm input positions to interface with up to 7 exter...

Page 38: ...of alarm wires to the first input position AL1 Wrap the first wire typically black to the AL1 pin Wrap the second wire typically white to the AL1 pin b Repeat Step 3a for each additional alarm input...

Page 39: ...ut Calix offers a connectorized daisy chain BITS cable or you can wire wrap the individual daisy chain links between shelves To wire the BITS timing input interface 1 Get up to two 24 AWG shielded 2 w...

Page 40: ...4 for installation instructions 2 Strip approximately one inch 2 54 cm of insulation from the wire ends 3 Wire the E7 2 external timing output as follows a Connect the timing wires to the E7 2 BITS OU...

Page 41: ...ther suppliers with some restrictions Refer to the Calix E7 2 Product Planning Guide for complete details Note When using SFP modules not supplied by Calix you must use modules that comply with the SF...

Page 42: ...the exposed PCB side facing down Insert the module into an appropriate socket on an E7 2 line card as follows To equip 10GE ports a Insert XFP modules into sockets labeled XFP 1 or XFP 2 as required b...

Page 43: ...LASER PRODUCT INVISIBLE LASER RADIATION MAY BE PRESENT Fiber optic radiation can cause severe eye damage or blindness Do not look into the open end of an optical fiber To connect fibers to the E7 2 1...

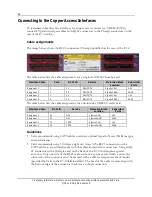
Page 44: ...48 The table below lists the cable assignments for a double slot VDSL2 Overlay card Interface Cable RJ 21 ID Service Protection Block Location Subscriber Ports Equipment 1 P1 DSL 1 ports 1 24 1 24 Equ...

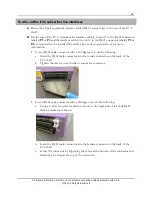
Page 45: ...line card s See Cable assignments above for more information For an RJ 21 male connector with a 110 degree exit do the following a Insert the RJ 21 male connector into the female connector on the bac...

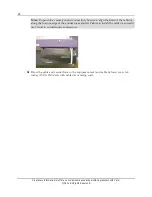
Page 46: ...securely mated connection be sure to align the head of the cable tie along the bottom edge of the connector as shown Failure to install the cable tie correctly may result in an inadequate connection 3...

Page 47: ...erved Chapter 5 Maintenance This chapter describes how to perform routine maintenance on worn or failed E7 2 equipment Topics Covered This chapter covers the following topics Replacing pluggable trans...

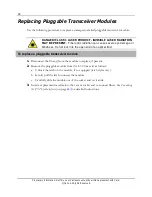
Page 48: ...ge or blindness Do not look into the open end of an optical fiber To replace a pluggable transceiver module 1 Disconnect the fiber s from the module to replace if present 2 Remove the pluggable module...

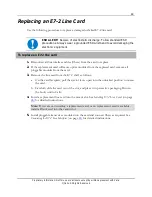
Page 49: ...e replaced card remove all pluggable modules from the card 3 Remove the line card from the E7 2 shelf as follows a On the card faceplate pull the ejector lever open into the unlocked position to unsea...

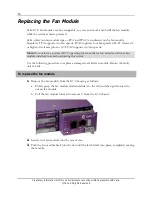
Page 50: ...2 supports two fan speeds Note Do not leave a powered E7 2 operating for more than a few minutes without a fan module installed to avoid overheating the system Use the following procedure to replace a...

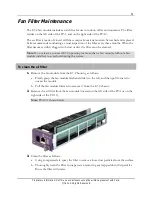
Page 51: ...aned Note Do not leave a powered E7 2 operating for more than a few minutes without a fan module installed to avoid overheating the system To clean the air filter 1 Remove the fan module from the E7 2...

Page 52: ...the filter using an absorbent towel or cloth d Spray the filter with compressed air to remove any remaining moisture on the outside of the filter Note If the filter is badly worn replace it with a ne...

Page 53: ...Reserved Appendix A Reference Information This appendix provides general reference information about the Calix E7 2 Ethernet service access platform Topics Covered This appendix covers the following...

Page 54: ...o 72 VDC input range Fusing 7 5 Amps maximum A and B Environmental Operating range 40 C to 65 C 40 F to 149 F Humidity 10 to 95 non condensing Altitude up to 10 000 feet 3049 m Storage range 40 C to 8...

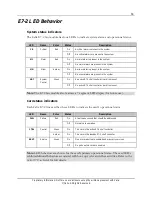
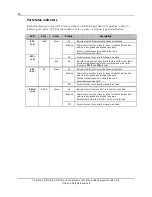
Page 55: ...f controller card is present Off No active E7 2 shelf controller card is present Note The E7 2 fan module also features a 7 segment LCD display for future use Card status indicators Each Calix E7 2 li...

Page 56: ...s vacant or an invalid module is inserted Red On Indicates a module has been inserted into a 10GE socket that is directed to the backplane for connectivity between two cards Applies to XFP 2 and SFP 2...

Page 57: ...2 fan module labeled MGT 4 E7 2 Serial Port RJ 11F Connector RS 232 Signal From E7 2 Serial Port RJ 11F TX Pin 3 RX Pin 4 GND Pin 5 Calix offers an RS 232 console cable DB 9F to RJ 11M to connect a P...

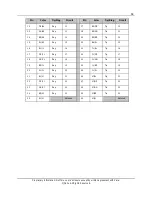
Page 58: ...pins 1 and 26 110 degree exit 90 degree exit For instructions on installing an RJ 21 connector see Connecting to the Subscriber Interfaces on page 44 Pin assignments The E7 2 standard RJ 21 pinout ass...

Page 59: ...13 38 BK GN Tip 13 14 BR BK Ring 14 39 BK BR Tip 14 15 SL BK Ring 15 40 BK SL Tip 15 16 BL YL Ring 16 41 YL BL Tip 16 17 OR YL Ring 17 42 YL OR Tip 17 18 GN YL Ring 18 43 YL GN Tip 18 19 BR YL Ring 1...

Page 60: ...he fiber under slight pressure run the cutting tool across the stationary fiber at a perpendicular angle Properly done the cleave produces a perpendicular mirror like finish without hackles or lips If...

Page 61: ...onnector by blowing off the cylindrical and end face surfaces of the connector using the compressed gas Use a pad or a wipe saturated with optical grade isopropyl alcohol to gently wipe the cylindrica...

Page 62: ...62 Proprietary Information Not for use or disclosure except by written agreement with Calix Calix All Rights Reserved...

Reviews: