background image

30  


Proprietary Information: Not for use or disclosure except by written agreement with Calix. 

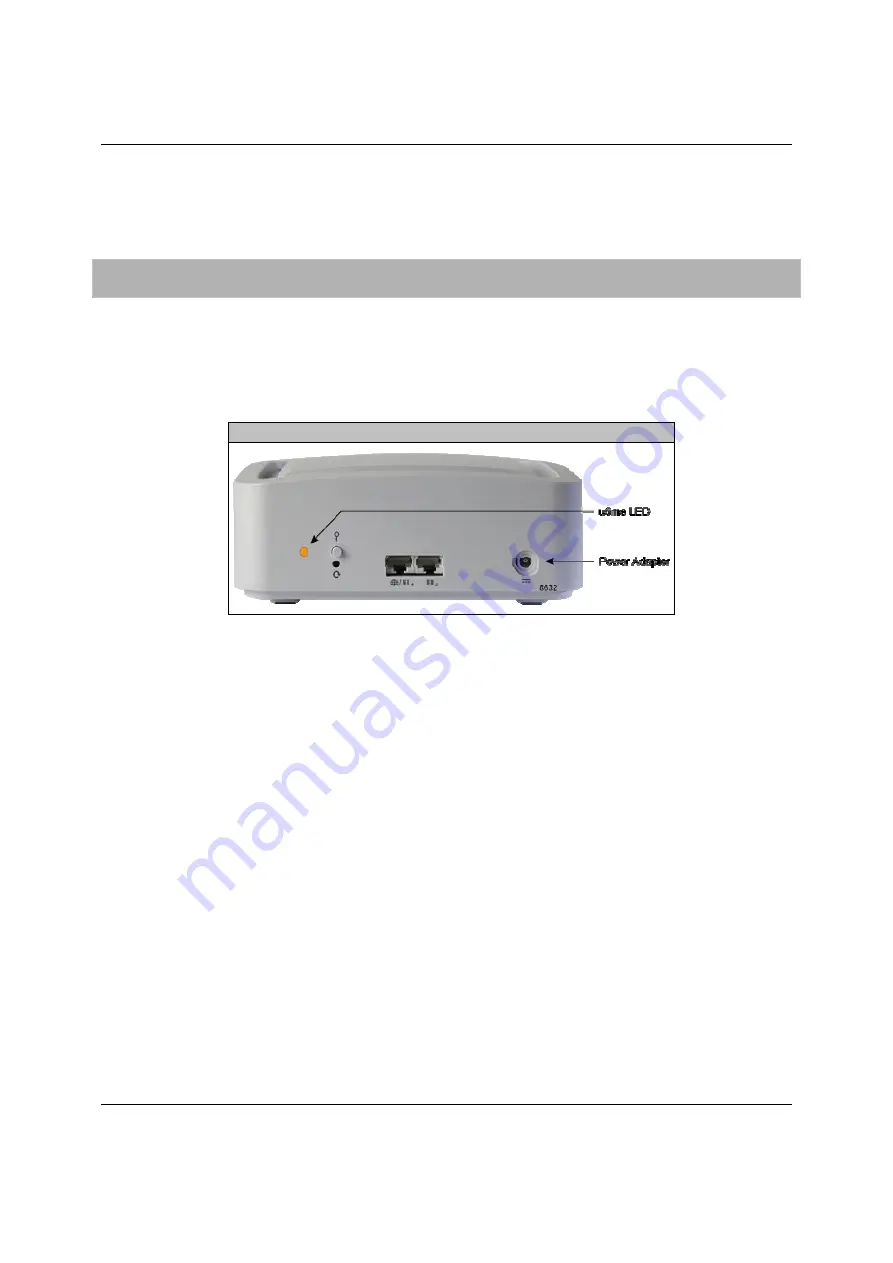
Powering the GigaSpire BLAST u6me 

The information below describes the powering of any GigaSpire BLAST. 

To power up the BLAST u6me 

1. 

Locate the 12 VDC Power Adapter. 

2. 

Attach one end (2-pin barrel connector) to the rear of the device. 

3. 

Plug the other end into any available 110/220 VAC wall outlet. 

4. 

The GigaSpire BLAST begins its start-up sequence (Flashing amber LED).   

BLAST  Power Connection 


Summary of Contents for GigaSpire BLAST u6me

Page 1: ...GigaSpire Mesh BLAST u6me Installation Guide January 2022 Part 220 01228 10 ...

Page 2: ......

Page 3: ...u6me Overview 8 Device Features 12 Agency Listing 12 Site Preparation 15 Before you Begin 15 Introduction 16 Chapter 2 Installation 18 Installation Tips 18 Installation Variables 20 Unpacking the GigaSpire u6me 20 Tabletop Wall Mounting Dimensions 21 Tabletop Mounting the BLAST u6me 22 Wall Mounting the u6me 23 Additional Mounting Considerations 24 ...

Page 4: ... use or disclosure except by written agreement with Calix Chapter 3 Final Set up and Testing 27 GigaSpire Mesh BLAST u6me Reset Behavior 27 Powering the GigaSpire Mesh BLAST u6me 30 Connecting to the Internet 31 Wall Mount Template 32 ...

Page 5: ...e designed to provide reasonable protection against harmful interference when the equipment is operated in a commercial environment This equipment generates uses and can radiate radio frequency energy and if not installed and used in accordance with the instruction manual may cause interference to radio communications Operation of this equipment in a residential area may cause harmful interference...

Page 6: ...ce the risk of fire electric shock and injury to persons including the following Do not use this product near water For example near a bathtub washbowl kitchen sink or laundry tub in a wet basement or near a swimming pool Use only the power cord indicated in this manual For external power supplies the external power supply used in this device is to be Class II or a Limited Power Source LPS power s...

Page 7: ...7 Proprietary Information Not for use or disclosure except by written agreement with Calix ...

Page 8: ...ugh features vary depending on the roll the unit plays in the network The GigaSpire BLAST u4 is a premium smart home system that delivers the latest Wi Fi 6 certified technology 802 11ax The GigaSpire BLAST u4 uses a Gigabit Ethernet link at the subscriber s premises to provide carrier class Wi Fi and Gigabit Ethernet interfaces for customer multi media devices The GigaSpire BLAST u4 enables resid...

Page 9: ...i 6 Mesh BLAST u4m With the BLAST u4 as the hub and the Mesh BLAST u4m as the satellite consumers can gain the entire home smart home experience For even higher mesh performance multiple GigaMesh systems can be connected to the GigaSpire BLAST u4 With the GigaSpire BLAST u4 Calix has redefined how to install and activate residential services at a subscriber s premises Using the Calix Smart Command...

Page 10: ...HCP server options DHCP IPoE and PPPoE network connections Network Access Translation NAT public to private IP addressing Configurable IP address schemes subnets static IP addresses DNS server Bridge port assignment and data traffic mappings Port forwarding Firewall and security Application and website filtering Selectable forwarding and blocking policies DMZ hosting Parental controls time of day ...

Page 11: ...naged self configuration Air time fairness Dynamic Mesh load balancing band node steering interference management Self Healing diagnostics events 1 Gigabit Ethernet GE WAN interface 10 100 1000 BASE T Ethernet auto negotiating Gigabit Ethernet GE LAN interfaces Two 2 ports of Multi rate 10 100 1000 BASE T Ethernet auto negotiating for residential IPTV and data services USB port USB 2 0 Type A host...

Page 12: ...y interference received including interference that may cause undesired operation These devices have been tested and found to comply with the limits for a Class B digital device pursuant to Part 15 of the FCC Rules and Regulations These limits are designed to provide reasonable protection against harmful interference when this equipment is operated in a commercial environment This equipment genera...

Page 13: ... the receiving antenna Increase the separation between the equipment and receiver Connect the equipment into an outlet on a circuit different from that to which the receiver is connected Consult the dealer or an experienced radio TV technician for help FCC Caution Any changes or modifications not expressly approved by the party responsible for compliance could void the user s authority to operate ...

Page 14: ...1244 RCM Telcordia GR 49 無法顯 示連結 的圖 像 檔 案可能 已移 動 重 新命名 或刪 除 請 驗證連 結指向 正確的 檔案及 位置 Telcordia GR 2890 Wi Fi Alliance Certified 802 11ax CISPR 22 無法顯示連結的圖像 檔案可能已移動 重新命名或刪除 請驗證連結指向正確的檔案及位置 Radiated Emissions This Class B digital device complies with radiated emissions requirements as defined in Canadian ICES 003 Power Supply Note When using the standard power adapter units will be inoperable after loss...

Page 15: ...rds In order to complete the installation a power cords is required Connectorized Power and Signal Cable A 2 pin barrel connector to the local AC power receptacle Type A Coaxial Cables Note that Coaxial cable connections are to be internal connections only Outdoor connections are not allowed Before you Begin Before starting the installation process check that the following conditions are met Ensur...

Page 16: ...n be wall mounted using the mounting holes molded into the back of the unit Powering Options Attach to any 110 220 VAC power outlet using the supplied 12 VDC wall transformer Note For the BLAST u6me the power cord configuration must be appropriate for use in the country where the device is being deployed Note Only provided and approved power cords or voltage adapters should be used to connect to t...

Page 17: ...17 Proprietary Information Not for use or disclosure except by written agreement with Calix ...

Page 18: ...those specified here may result in hazardous radiation exposure Follow these tips when installing a GigaSpire u6me device For subscribers using data services all data wiring inside the home must be CAT5 cable or better Make sure subscriber connections are tightened properly Check the contents of each box carefully as you receive them Components may not be located where you might expect them due to...

Page 19: ...e of reflections in the over the air path to carry additional data However Calix recommends that when possible Calix GigaSpires should be placed in a centralized location within the home to yield the best possible results for Wi Fi coverage Building Materials and Their Effect on Wi Fi Signals Material Wi Fi Attenuation Wood Drywall Particle Board Tile Low Glass Low Water Medium Bricks Cinder Block...

Page 20: ...e be routed What type of building material is used in this facility Make sure you have the appropriate drills drill bits and fasteners for routing Ethernet or power cables as they pass through walls and the like BLAST u6me Unpacking the GigaSpire u6me Each device is shipped individually in its own carton and contains the following 1 GigaSpire BLAST u6me 1 Power Adapter interface cord wall wart 1 S...

Page 21: ...gaSpire BLAST u6me are included here for reference Note There is no wall mount bracket necessary to mount this device The bottom surface of the BLAST u6me includes two hanger posts to facilitate wall mounting BLAST u6me Product Dimensions 8828 7 0 inches 17 8 cm 6 5 inches 16 5 cm 2 625 inches 6 68 cm 1 75 inches 4 4 cm 2 0 inches 5 1 cm 3 5 inches 8 9 cm 3 0 inches 7 62 cm ...

Page 22: ...abletop mounting Due to component placement inside the chassis do not remove the rubber feet that are installed on the bottom of the unit Locate the device on the desktop in a location that is unlikely to be bumped or jostled Make sure that the Ethernet cable s if used and power supply wiring attached to the GigaSpire are secured properly and out of harms way Note Once the unit is connected and tu...

Page 23: ...tically without operator intervention To wall mount the GigaSpire BLAST u6me 1 Find a suitable location for attaching unit to the wall Be mindful of the power source and Ethernet cable requirements when determining a mounting location 2 Using the template included in the back of this guide mark the two screw locations on the wall making sure the device will remain level after mounting Note If atta...

Page 24: ...s standpoint keep the following in mind Calix recommends mounting the BLAST as high as possible for Wi Fi performance reasons However this deployment scenario still mandates that an AC power outlet is located within the power cord distance of the Wi Fi source If installing in a greenfield environment initial installation plan on placing the GigaSpire BLAST within 4 feet of the power supply As an a...

Page 25: ...25 Proprietary Information Not for use or disclosure except by written agreement with Calix ...

Page 26: ......

Page 27: ...1 Basic reset reboot Restarts the unit 2 Configuration reset Resets the RG configuration settings those visible to the subscriber Admin user in the EWI such as SSIDs LAN IP scope etc to defaults but retains operator configured management settings those visible only to the Support user in the EWI such as ACS URL and SPID 3 Factory reset Resets the router and any attached mesh satellites to factory ...

Page 28: ...minutes while it completes the reboot process Basic Reset Software EWI Utilities Reboot Router reboots RG configuration and subscriber s custom settings persist Subscriber Admin user has access to the EWI to invoke a soft reset All configuration information persists Device goes off line for 2 3 minutes while reboot process completes Configuration Reset Hardware Press and hold Reset button 10 secon...

Page 29: ...29 Proprietary Information Not for use or disclosure except by written agreement with Calix ...

Page 30: ...ion below describes the powering of any GigaSpire BLAST To power up the BLAST u6me 1 Locate the 12 VDC Power Adapter 2 Attach one end 2 pin barrel connector to the rear of the device 3 Plug the other end into any available 110 220 VAC wall outlet 4 The GigaSpire BLAST begins its start up sequence Flashing amber LED BLAST Power Connection ...

Page 31: ...GigaSpire or wirelessly connect the two devices Additional Comments Once your units LED turns GREEN you are connected to the upstream WAN modem At start up Wi Fi radios are defaulted to on To configure your BLAST device connect an Ethernet cable between your PC and one of the LAN ports of the and enter the default IP Address of the device 192 168 1 1 into your browser Wi Fi radios can be configure...

Page 32: ...t template is included This template is scaled to size and should be used when marking the hole locations for the wall mount option The figure below is a representative example of the template but should not be used as it is not scaled appropriately For additional information refer to Wall Mounting the u6me on page 23 located in the Installation chapter of this guide ...

Page 33: ...xcept by written agreement with Calix Example Wall Mount Drilling Template Not to Scale Template inserted in the gift box is to scale and should be used for installation purposes The above template is an example only and should not be used at installation ...

Reviews: