


CALREC
Putting Sound in the Picture
87
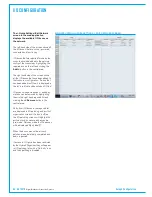
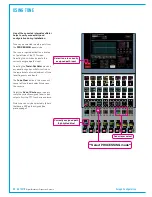
Assignablefaders
Each fader has an A and B sub-layer,
which can be switched between by
pressing the assign buttons above and
below the fader's label display. The
two sub-layers, A & B are not related
by default and can control two distinct,
unrelated audio paths. The upper half of
the fader label display is green and refers
to the A layer, the lower half is yellow and
refers to the B layer. An open fader will
remain open and passing audio after the
layer is changed.
Pressing the assign button above (A
layer) or below (B layer) the label display
makes it the currently assigned path
and highlights it blue. Only one path
(unless user splits are in place) can be
the currently assigned path at any given
time. Path specific changes are applied to
the currently assigned path. For example,
adjusting settings on an assignable panel
in PROCESSING or SEND-ROUTE
mode will affect the currently assigned
(highlighted blue) path.
In addition to A & B sub-layers, there are
in fact a total of 12 fader layers, each with
an A & B sub-layer. All layers and A/B
sub-layers are active irrespective of which
is currently visible. Fader layer is selected
from the assign row (control cell row
above the fader label row) of any panel.
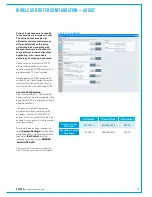
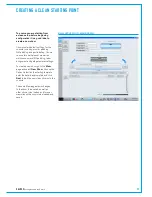
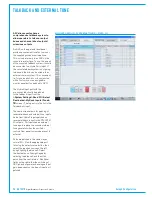
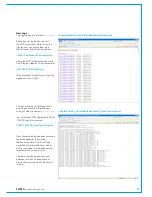
Assigningpaths
A or B layer faders with a blank label
field have no DSP path assigned.
Path assignment is achieved from the
Tools>Fader Assignment
menu (see
the highlighted drawing to the right).
Select
New Channels
to assign input
channels. Three channel widths are
currently supported - Mono, Stereo and
5.1. Pressing one of these buttons will
assign that channel type to the currently
assigned fader (as long as no path is
already assigned on that fader).
PEAK
STRIP
FDR
CUT/ON
AUTOM
EXT
CUT
MR
SL
MR
SL
PEAK
STRIP
FDR
CUT/ON
AUTOM
EXT
CUT
MR
SL
MR
SL
PEAK
STRIP
FDR
CUT/ON
AUTOM
EXT
CUT
MR
SL
MR
SL
PEAK
STRIP
FDR
CUT/ON
AUTOM
EXT
CUT
MR
SL
MR
SL
PEAK
STRIP
FDR
CUT/ON
AUTOM
EXT
CUT
MR
SL
MR
SL
PEAK
STRIP
FDR
CUT/ON
AUTOM
EXT
CUT
MR
SL
MR
SL
PEAK
STRIP
FDR
CUT/ON
AUTOM
EXT
CUT
MR
SL
MR
SL
PEAK
STRIP
FDR
CUT/ON
AUTOM
EXT
CUT
MR
SL
MR
SL
Currently assigned path
(highlighted blue)
1. Tools menu
2. Fader
Assignment
3. New channels
menu
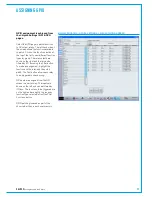
ASSIGNING PATHS TO FADERS
To assign the same channel type to
multiple faders, press and hold the
channel type button whilst selecting the
faders you wish to be assigned.
To clear a path from a fader, select the
Layer Tools
menu (Button above Tools).
Press
Clear Path
from the row above
then
Exec
to clear the currently assigned
path. To clear multiple paths, press and
hold Clear Path whilst selecting the faders
to clear before confirming by pressing
Exec.
Summary of Contents for Artemis
Page 5: ...calrec com Putting Sound in the Picture ARTEMIS INFORMATION...
Page 9: ...calrec com Putting Sound in the Picture ARTEMIS CONTROL SURFACE...
Page 26: ...26 ARTEMIS Digital Broadcast Production Console...
Page 27: ...calrec com Putting Sound in the Picture ARTEMIS PROCESSING CORE BEAM SHINE...
Page 33: ...calrec com Putting Sound in the Picture ARTEMIS PROCESSING CORE LIGHT...
Page 40: ...40 ARTEMIS Digital Broadcast Production Console...
Page 41: ...calrec com Putting Sound in the Picture ARTEMIS CONNECTION INFORMATION...
Page 66: ...66 ARTEMIS Digital Broadcast Production Console...
Page 67: ...calrec com Putting Sound in the Picture ARTEMIS EXTERNAL CONTROL...
Page 80: ...80 ARTEMIS Digital Broadcast Production Console...
Page 81: ...calrec com Putting Sound in the Picture ARTEMIS SETUP CONFIGURATION...
Page 100: ...100 ARTEMIS Digital Broadcast Production Console...
Page 101: ...calrec com Putting Sound in the Picture ARTEMIS PANEL OPTIONS...
Page 110: ...110 ARTEMIS Digital Broadcast Production Console...
Page 111: ...calrec com Putting Sound in the Picture ARTEMIS OBSOLETE PANELS...
Page 114: ...114 ARTEMIS Digital Broadcast Production Console...
Page 115: ...calrec com Putting Sound in the Picture ARTEMIS SPECIFICATIONS...


