Digital Broadcast Production Console
INSERTS
Artemis has a pool of 256 mono insert
resources available. These may be
used to create inserts for any width of
path in the system.
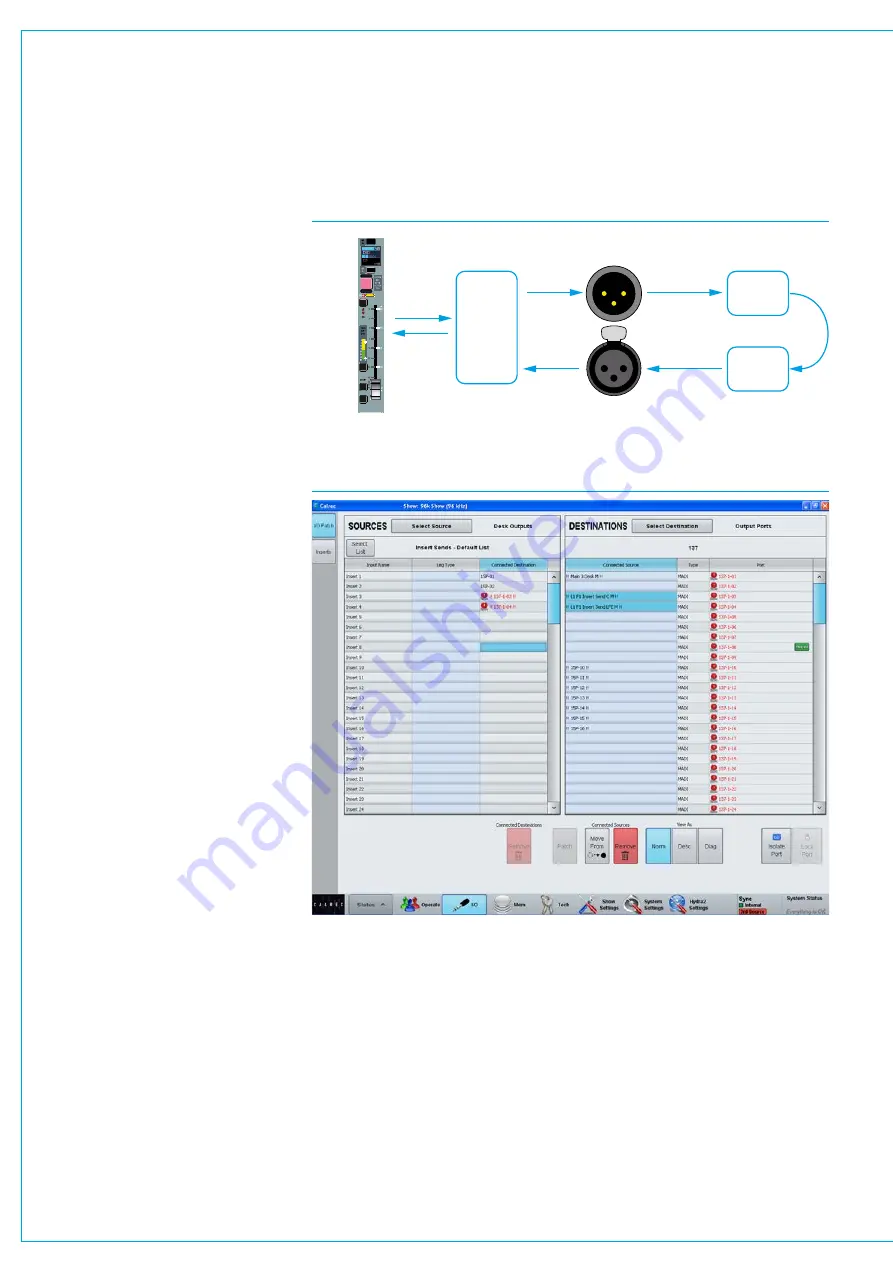
Configuring inserts is a two step process.
First any insert send and return resources
should be patched to output ports and
input ports respectively. The insert
resources should then be connected to
the required paths on the surface. This
process is shown in Fig 1.
Patchinginsertresourcestoports
Insert sends and returns can be patched
to ports in
>I/O>I/O Patch
screen of the
main application. This screen is shown in
Fig 2.
In this screen select ‘Insert Sends’ from
the sources list and ‘Output Ports’ in the
destinations list. Select the required
insert sends and outputs ports then touch
the ‘Patch’ button.
Now select ‘Input Ports’ from the
sources list and ‘Insert Returns’ from the
destinations list and patch the required
ports to insert returns.
Insertsatdifferentsamplerates
From version 8.0 the desk can be
configured to operate at different sample
rates such as 48kHz & 96kHz.
At the higher sample rate the pool size for
inserts is halved, meaning that the pool
of 256 mono inserts becomes 128 mono
inserts. Note that for Artemis light these
figures are 128 mono inserts at 48kHz
and 64 mono inserts at 96kHz.
The image in Fig 2 shows the Insert
sends to Output Ports. Note that the first
2 inserts have been made at a matched
sample rate whilst Inserts 3 & 4 have
been patched to output ports at the wrong
sample rate.
FIG 1 - INSERT ABSTRACTION
Hydra2 output port
Send to
inserted
equipment
Return from
inserted
equipment
Hydra2 input port
Insert
resource
Path on
Apollo
surface
CUT
AFL
PFL
DIR
TB
ISO
FIG 2 - PATCHING INSERTS
The image in Fig 3 shows the Inserts to
faders screen note that Inserts that are
unavailable when operating at a higher
sample rate are shown in pale red and
cannot be used.
The example shown in Fig 3 is from an
Artemis Light which normally has 128
inserts but when running at the higher
sample rate this reduces to 64 which
is why inserts 65 and upwards appear
unavailable.
Summary of Contents for Artemis
Page 7: ...calrec com Putting Sound in the Picture ARTEMIS INFORMATION ...
Page 11: ...calrec com Putting Sound in the Picture ARTEMIS INTRODUCTION ...
Page 17: ...calrec com Putting Sound in the Picture ARTEMIS CONTROL OVERVIEW ...
Page 29: ...calrec com Putting Sound in the Picture ARTEMIS CONTROL PANEL MODES ...
Page 36: ...36 ARTEMIS Digital Broadcast Production Console Control Panel Modes WILDABLE CONTROLS ...
Page 39: ...calrec com Putting Sound in the Picture ARTEMIS GETTING SIGNALS INTO ARTEMIS ...
Page 69: ...calrec com Putting Sound in the Picture ARTEMIS PROCESSING AUDIO ...
Page 93: ...calrec com Putting Sound in the Picture ARTEMIS ROUTING AUDIO ...
Page 109: ...calrec com Putting Sound in the Picture ARTEMIS PASSING SIGNALS OUT OF ARTEMIS ...
Page 117: ...calrec com Putting Sound in the Picture ARTEMIS MONITORING ...
Page 132: ...132 ARTEMIS Digital Broadcast Production Console Monitoring ...
Page 133: ...calrec com Putting Sound in the Picture ARTEMIS COMMUNICATIONS ...
Page 138: ...138 ARTEMIS Digital Broadcast Production Console ...
Page 139: ...calrec com Putting Sound in the Picture ARTEMIS METERING ...
Page 148: ...148 ARTEMIS Digital Broadcast Production Console ...
Page 149: ...calrec com Putting Sound in the Picture ARTEMIS SHOWS MEMORIES AND PRESETS ...
Page 163: ...calrec com Putting Sound in the Picture ARTEMIS CONSOLE FACILITIES ...
Page 168: ...168 ARTEMIS Digital Broadcast Production Console ...
Page 169: ...calrec com Putting Sound in the Picture ARTEMIS EXTERNAL INTERFACING ...
Page 180: ...180 ARTEMIS Digital Broadcast Production Console External Interfacing ...
Page 181: ...calrec com Putting Sound in the Picture ARTEMIS SYSTEM STATUS ...
Page 184: ...184 ARTEMIS Digital Broadcast Production Console ...
Page 185: ...calrec com Putting Sound in the Picture ARTEMIS GLOSSARY OF TERMINOLOGY ...
Page 191: ...calrec com Putting Sound in the Picture ARTEMIS FEATURES BY SOFTWARE VERSION ...


