Digital Broadcast Production Console
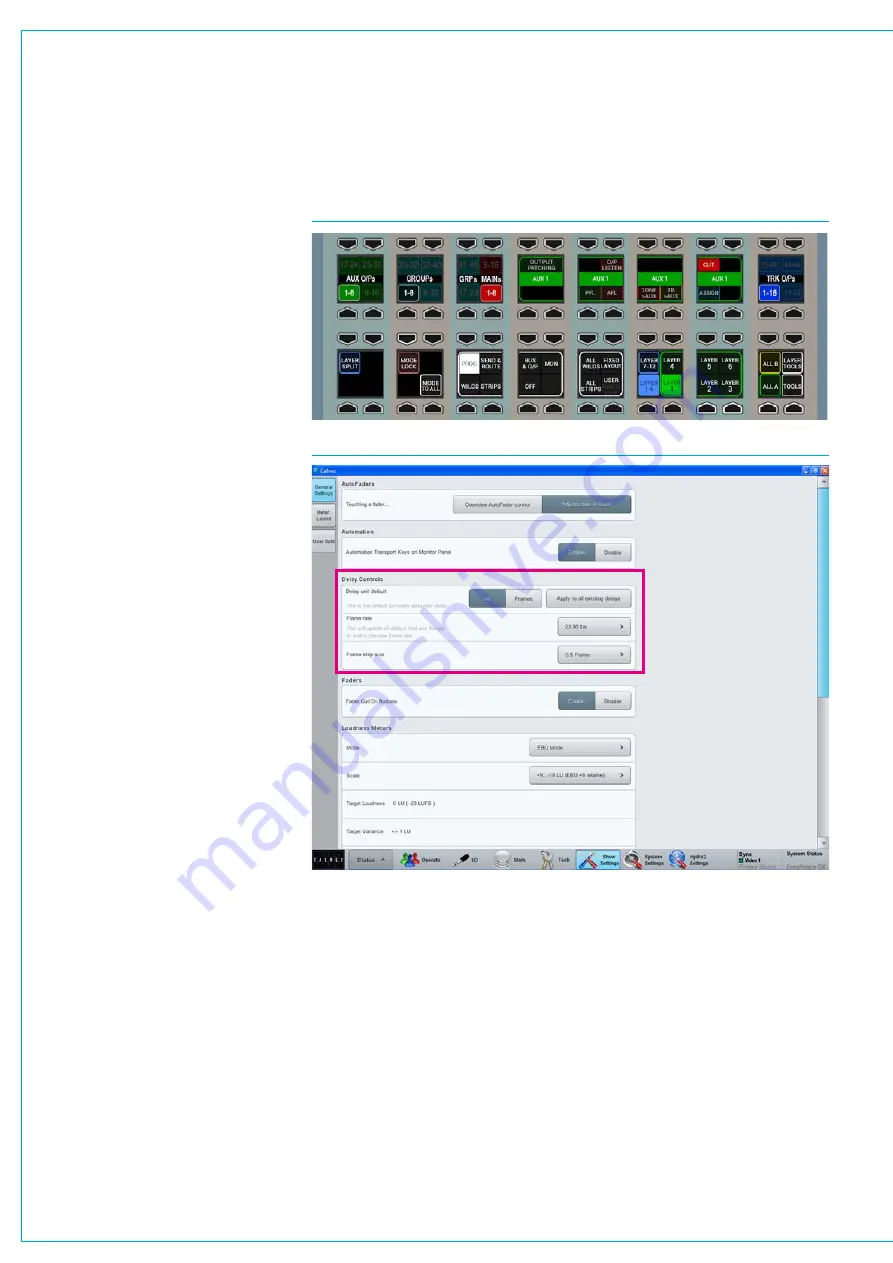
FIG 2 - GLOBAL DELAY CONTROLS - MAIN APPLICATION
The
Framerate
selection button is used
to set the video frame rate for all frame-
based delay assignments. The frame rate
should be set to match the frame rate
of the video signal that the audio feed is
related to.
FIG 1 - ASSIGNING DELAY WHEN A PATH IS NOT ASSIGNED TO A FADER
DELAY SETTINGS
Once Input or Output Delay is assigned
(or for Path Delay already present), the
rotary controls and up/down stepper
buttons for use as an alternative to the
rotary controller for setting the delay time
become available to the user.
The TFT screen shows the Delay Units
either in Time format in milliseconds /
seconds or Frame format which can be
set for each delay type from the screen
buttons.
The current delay settings and ON / OFF
status are shown at the bottom of the
screen. See Fig 1 on the previous page
for the Delay processing mode.
AssigningDelaytoaFaderlessPath
To assign Delay to a path which is not
assigned to a fader, put a panel into
OUTPUTS mode and press on the rotary
controller associated with that output.
This brings up the selected bus controls
within the Fader row, on which there
is an assign button. Press this assign
button and then assign delay in the usual
way from any surface panel that is in
PROCESSING-DELAY mode, see Fig 1.
GlobalDelaySettings
Global delay controls can be accessed
from the main application by selecting:
>Show Settings> General Settings
.
There are three global delay settings as
shown in Fig 2 on the right.
DelayUnitDefault
sets the resolution
type for all new delay assignments,
the interface is a two state button to
switch between ‘ms’ and ‘frames’. This
‘ms’/’frames’ selection can be applied to
all existing delay assignments by clicking
‘Apply to all existing delays’.
Finally there is the
FrameStepSize
selection button which sets the resolution
of the stepper button within the surface
pop-up shown above. There are two
options: 1 frame and 0.5 frames.
Summary of Contents for Artemis
Page 7: ...calrec com Putting Sound in the Picture ARTEMIS INFORMATION ...
Page 11: ...calrec com Putting Sound in the Picture ARTEMIS INTRODUCTION ...
Page 17: ...calrec com Putting Sound in the Picture ARTEMIS CONTROL OVERVIEW ...
Page 29: ...calrec com Putting Sound in the Picture ARTEMIS CONTROL PANEL MODES ...
Page 36: ...36 ARTEMIS Digital Broadcast Production Console Control Panel Modes WILDABLE CONTROLS ...
Page 39: ...calrec com Putting Sound in the Picture ARTEMIS GETTING SIGNALS INTO ARTEMIS ...
Page 69: ...calrec com Putting Sound in the Picture ARTEMIS PROCESSING AUDIO ...
Page 93: ...calrec com Putting Sound in the Picture ARTEMIS ROUTING AUDIO ...
Page 109: ...calrec com Putting Sound in the Picture ARTEMIS PASSING SIGNALS OUT OF ARTEMIS ...
Page 117: ...calrec com Putting Sound in the Picture ARTEMIS MONITORING ...
Page 132: ...132 ARTEMIS Digital Broadcast Production Console Monitoring ...
Page 133: ...calrec com Putting Sound in the Picture ARTEMIS COMMUNICATIONS ...
Page 138: ...138 ARTEMIS Digital Broadcast Production Console ...
Page 139: ...calrec com Putting Sound in the Picture ARTEMIS METERING ...
Page 148: ...148 ARTEMIS Digital Broadcast Production Console ...
Page 149: ...calrec com Putting Sound in the Picture ARTEMIS SHOWS MEMORIES AND PRESETS ...
Page 163: ...calrec com Putting Sound in the Picture ARTEMIS CONSOLE FACILITIES ...
Page 168: ...168 ARTEMIS Digital Broadcast Production Console ...
Page 169: ...calrec com Putting Sound in the Picture ARTEMIS EXTERNAL INTERFACING ...
Page 180: ...180 ARTEMIS Digital Broadcast Production Console External Interfacing ...
Page 181: ...calrec com Putting Sound in the Picture ARTEMIS SYSTEM STATUS ...
Page 184: ...184 ARTEMIS Digital Broadcast Production Console ...
Page 185: ...calrec com Putting Sound in the Picture ARTEMIS GLOSSARY OF TERMINOLOGY ...
Page 191: ...calrec com Putting Sound in the Picture ARTEMIS FEATURES BY SOFTWARE VERSION ...


