CalreC
Putting Sound in the Picture
31
The following instructions were
prepared to set up a Dolby DP570
or DP564. They are included for
convenience but may only apply to
Dolby firmware circa 2006. If other
versions of firmware are used, it
may be necessary to revise this
procedure as detailed in Dolby
supplied documentation.
Interconnections need to be made
between the Dolby unit and the Omega
GPIO relays. These are in, and have
connections on the rear of, the PSU
distribution unit which is normally located
near the PSUs and console processing
rack. Alternative interconnection schemes
may be able to use the Darlington outputs
located on the rear of the console surface.
These same connectors also provide
access to the Omega’s opto isolated GPIO
inputs.
In all cases, GPIO cables does not come
from Calrec and need to be supplied as
part by the installation cabling.
dOlby dp70 & dp setup
On the Dolby unit:
<label>
means press the button with the
name label.
Power up the unit and wait for it to
initialise.
<setup>
<down arrow>
until you see “SYSTEM
SETTINGS”
<enter>
Unit name is now displayed
<down arrow>
until you see “GPI
setup”
<enter>
“GPI pin 23” is displayed
<enter>
“GPI pin 23 trigger” is displayed
<enter>
<down arrow>
until you see “Edge”
<enter>
<esc>
“GPI pin 23 trigger” is displayed
<down arrow>
“GPI pin 23 Polarity” is
displayed
<enter>
<down arrow>
until you see “Positive/
High”
<enter>
<esc>
“GPI pin 23 Polarity” is displayed
<down arrow>
“GPI pin 23 Function” is
displayed
<enter>
<down arrow>
until you see “FULL”
meaning surround.
<enter>
<esc>
“GPI pin 23 Function” is displayed
<esc>
“GPI pin 23” is displayed
<down arrow>
“GPI pin 24” is displayed
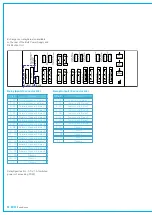
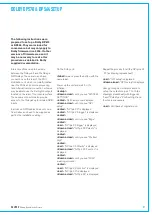
Repeat the process for all the GPI pins 24
- 31 (as drawing/spreadsheet)
<esc>
“GPI setup” is displayed
<down arrow>
“GPO setup” is displayed
Now go though a similar procedure to
set up the outputs on pins 7 to 14 (as
drawing/spreadsheet) with trigger as
“Level”, Polarity as “Positive/High”, and
function as necessary.
<esc>
Until back at original menu.
Summary of Contents for OMEGA
Page 7: ...calrec com OMEGA Putting Sound in the Picture Overview...
Page 13: ...calrec com OMEGA Putting Sound in the Picture Frame Options and Dimensions...
Page 18: ...18 OMEGA with Bluefin...
Page 19: ...calrec com OMEGA Putting Sound in the Picture Equipment Installation...
Page 37: ...calrec com OMEGA Putting Sound in the Picture Hydra Audio Networking...
Page 51: ...calrec com OMEGA Putting Sound in the Picture Audio I O Interfaces...


