PH600 Radio Maintenance Manual
All rights reserved. No spreading abroad without permission of Caltta.
31
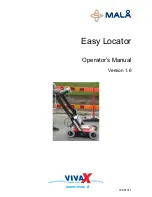
15. To dismantle the MIC, remove the white sealing (A) around the MIC, and use the screwdriver
to take it out.
4.4 Assemble Steps
The assemble steps can refer to the disassemble steps and vice versa. Note that if the speaker
and MIC are damaged and need to be replaced, first clean the white sealing around the speaker
and MIC, then take them out with tweezers. When assembling the speaker, pay attention to its
direction. Meanwhile the edge of the speaker needs to be glued (model TONSAN1527). The
dispensing tool can use the 5ML syringe and the 1.0mm diameter needle. Leave it 4 hours after
dispensing and then continue the remaining assembly after the glue is dry.
It is needed to organize the wiring when assembling and soldering the speaker and MIC. Note that
the positive and negative electrodes on the main PCB. The red wire is soldered to the positive
electrode and the black wire is soldered to the negative electrode. Do not burn the radio and the
cover during soldering.


