background image

Page 11 of 16 

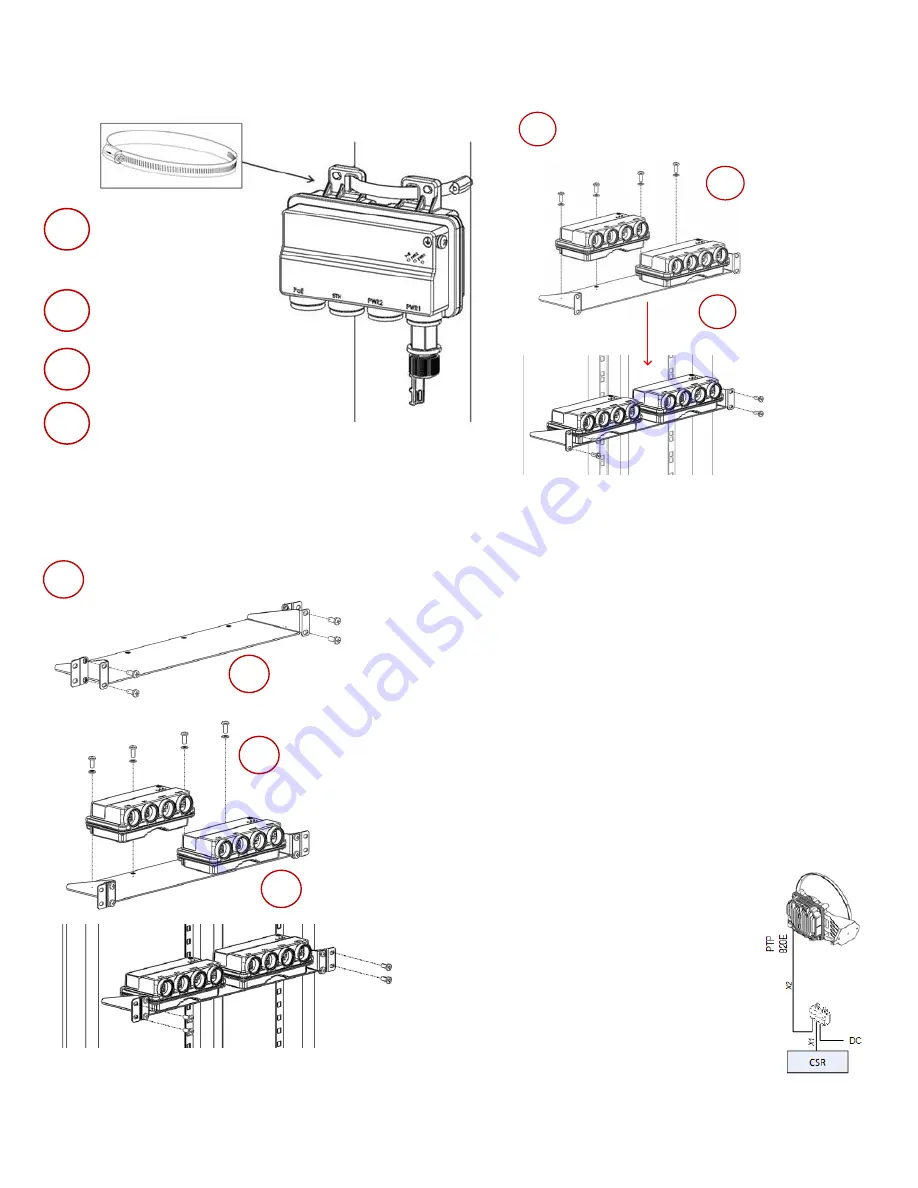
To mount a PoE Injector on a pole: 
 

To mount a PoE Injector on a 19” rack: 

Mount and tighten the 

Injector to a 114mm 

pole using a stainless 

steel hose clamp.

1

2

Pass the hose 

clamp through the 

pole mount slots.

Connect the ends of the 

hose clamp and tighten 

using the captive screw.

4

3

Attach the Injector 

to the pole.


Mount the Injector to a 19" 

rack using a 19" rack adaptor.

1

2

Mount the Injector on 

the adaptor through 

the wall mounting 

holes, using M6 

screws and washers.

Mount the adaptor 

to the rack using 

four M6 screws 

and cage nuts.

3


To mount a PoE Injector on an ETSI rack: 


Mount the PoE Injector to an ETSI 

rack using a 19" rack adaptor and 

ETSI adapting ears.

1

3

Mount the PoE Injector 

on the adaptor through 

the wall mounting holes, 

using M6 screws and 

washers.

4

2

Connect ETSI adapting 

ears to a 19" rack adaptor 

using four M6 screws.

Mount the 19" rack 

adaptor with the ETSI 

ears on the ETSI rack 

using four M6 screws 

and cage nuts.


To ground a PoE Injector: 
 
1.


On the right side of the PoE Injector, loosen the screw, 
plain washer, and serrated washer. 

2.


Place the cable lug supplied with the PoE Injector kit 
between the plain and serrated washer. 

3.


Tighten the screw. 

 
To connect the PoE Injector cables: 


The total length of the cable between the PTP 820E 
port and the Switch/Router the device is connected to 
should not exceed 100m/328ft. This length includes the 
connection between the PTP 820E and the PoE Injector 
(X1 + X2 

 100m/328ft in the figure to the right). 


The length of the cable connecting the customer 
equipment to the PoE injector should not be longer 
than 10m (according to ANSI/TIA-568 standard). 


Summary of Contents for PTP 820E

Page 1: ...Quick Installation Instructions PTP 820E System Release 10 9 ...

Page 2: ...terial Accordingly any copyrighted material of Cambium its licensors or the 3rd Party software supplied material contained in the Cambium products described in this document may not be copied reproduced reverse engineered distributed merged or modified in any manner without the express written permission of Cambium Furthermore the purchase of Cambium products shall not be deemed to grant either di...

Page 3: ...ore detailed instructions Installation Guide for PTP 820E Detailed instructions for hardware assembly of all supported PTP 820E link types User Guide for PTP 820C PTP 820S and PTP 820E Detailed instructions for software configuration PTP 820E Rear View Left and Front View Right PTP 820E Interfaces Cable Gland Construction ...

Page 4: ...Page 4 of 16 PoE Injector PoE Injector Interfaces ...

Page 5: ...e the transparent pressure window located on the antenna interface For horizontal polarization locate the twist with the letter H at 3 o clock and fasten the two screws For vertical polarization locate the twist with the letter V at 3 o clock and fasten the two screws ...

Page 6: ...ntenna using the four M8 captive screws and washers that are supplied assembled in the PTP 820E and tighten the screws When tightening the captive screws use 20 Nm torque In order to avoid misalignment screws should be tightened progressively ...

Page 7: ...Page 7 of 16 Cabling To connect an optical Ethernet cable and SFP ...

Page 8: ...Page 8 of 16 To connect an electrical Ethernet cable To connect a DC power cable ...

Page 9: ...No grounding is required for optical SFP cables External shielded CAT5E cable should be grounded to the antenna tower at the top next to the PTP 820 unit and the bottom of the external run and every 50m using the kit CAT5E_gnd_kit ...

Page 10: ...nt and tighten the PoE Injector to a wall using two M6 bolts and anchors Use Anchor Stainless Steel with flanged Hexagonal nut M6X70 1 2 Drill two 6mm diameter holes with 100mm between the center of the holes Insert the anchors with the bolts place the washers on the bolts and tighten the nuts 3 ...

Page 11: ...the adaptor through the wall mounting holes using M6 screws and washers 4 2 Connect ETSI adapting ears to a 19 rack adaptor using four M6 screws Mount the 19 rack adaptor with the ETSI ears on the ETSI rack using four M6 screws and cage nuts To ground a PoE Injector 1 On the right side of the PoE Injector loosen the screw plain washer and serrated washer 2 Place the cable lug supplied with the PoE...

Page 12: ...cordance with applicable national code and regulations rated maximum 20A shall be installed for full power disconnection in a building installation Any outdoor antenna cable shield shall be permanently connected to protective earth in a building installation Connecting to the Unit 1 Connect your laptops LAN port to the MGT port on the PTP 820E 2 Configure an IP address on the laptop within the sam...

Page 13: ...e opens Select IPv4 or IPv6 The unit will use the selected protocol when initiating communications Description of unit optional You can enter an IP address in IPv4 format use the IP address field or IPv6 format use the IPv6 Address field Before configuring the radio link ensure that both ends of the link have unique IP addresses ...

Page 14: ...ays a yellow background and an activation key violation warning After a 48 hour grace period all other alarms are hidden until the capacity and features in use are brought within the activation key s capacity and feature set Demo mode is available which enables all features for 60 days When demo mode expires the most recent valid activation key goes into effect To enter a new activation key select...

Page 15: ...ional Mode field enter the maximum and minimum profiles for the script in these fields Fixed ACM mode applies constant TX and RX rates In Adaptive ACM mode TX and RX rates are dynamic An ACM enabled radio system automatically chooses which profile to use according to channel fading conditions Select Yes to configure in band management or No if you do not need in band management If you selected Yes...

Page 16: ... the voltage measured at the BNC port is not accurate and should be used only as an aid Verify that the Radio Bit Error Rate BER is 10E 11 or higher If working with ATPC verify that ATPC is operating as expected RSL reference level To display the BER using the Web EMS go to the Aggregate PM report Radio PM Statistics Aggregate To display the current RSL RX using the Web EMS go to the Radio Paramet...

Reviews: