background image

Contents

For your own safety please read the following important safety 
instructions carefully before attempting to connect this unit to the mains 
power supply. They will also enable you to get the best performance from 
and prolong the life of the unit:

  1.  Read these instructions.

  2.  Keep these instructions.

  3.  Heed all warnings.

  4.  Follow all instructions.

  5.  Do not use this apparatus near water.

  6.  Clean only with a dry cloth.

  7.  Do not block any ventilation openings. Install in accordance with the 

manufacturer's instructions.

  8.  Do not install near any heat sources such as radiators, heat registers, 

VWRYHVRURWKHUDSSDUDWXVLQFOXGLQJRWKHUDPSOLÀHUVWKDWSURGXFH

heat.

  9.  Do not defeat the safety purpose of the polarized or grounding-type 

plug. A polarized plug has two blades with one wider than the other.  
A grounding-type plug has two blades and a third grounding prong.  
The wide blade or the third prong are provided for your safety. If the 

SURYLGHGSOXJGRHVQRWÀWLQWR\RXURXWOHWFRQVXOWDQHOHFWULFLDQIRU

replacement of the obsolete outlet.

10.  Protect the power cord from being walked on or pinched, particularly 

at plugs, convenience receptacles and the point where they exit from 
the apparatus.

2QO\XVHDWWDFKPHQWVDFFHVVRULHVVSHFLÀHGE\WKHPDQXIDFWXUHU

12.  

Use with only the cart, stand, tripod, bracket, or 

WDEOH VSHFLÀHG E\ WKH PDQXIDFWXUHU RU VROG ZLWK WKH

apparatus. When a cart is used, use caution when 
moving the cart/ apparatus combination to avoid injury 
from tip-over.

13.  Unplug this apparatus during lightning storms or when unused for 

long periods of time.

5HIHU DOO VHUYLFLQJ WR TXDOLÀHG VHUYLFH SHUVRQQHO 6HUYLFLQJ LV

required when the apparatus has been damaged in any way, such 
as the power-supply cord or plug having been damaged, liquid has 
been spilled or objects have fallen into the apparatus, the apparatus 
has been exposed to rain or moisture, does not operate normally, or 
has been dropped.

WARNING 

²7RUHGXFHWKHULVNRIÀUHRUHOHFWULFVKRFNGRQRWH[SRVHWKLVXQLWWR

UDLQRUPRLVWXUH

²%DWWHULHVEDWWHU\SDFNRUEDWWHULHVLQVWDOOHGVKDOOQRWEHH[SRVHGWR

H[FHVVLYHKHDWVXFKDVVXQVKLQHÀUHRUWKHOLNH

The unit is of Class 1 construction and must be connected to a mains 
socket outlet with a protective earthing connection.

The unit must be installed in a manner that makes disconnection of 
the mains plug from the mains socket outlet (or appliance connector 

IURPWKHUHDURIWKHXQLWSRVVLEOH:KHUHWKHPDLQVSOXJLVXVHGDVWKH

disconnect device, the disconnect device shall remain readily operable. 
Only use the mains cord supplied with this unit.

Please ensure there is ample ventilation. We recommend that you do 
not place the unit in an enclosed space; if you wish to place the unit on 
a shelf, use the top shelf to allow maximum ventilation. Do not put any 
objects on top of this unit. Do not situate it on a rug or other soft surface 
and do not obstruct any air inlets or outlet grilles. Do not cover the 
ventilation grilles with items such as newspapers, tablecloths, curtains, 
etc.

This unit must not be used near water or exposed to dripping or splashing 

ZDWHURURWKHUOLTXLGV1RREMHFWVÀOOHGZLWKOLTXLGVXFKDVYDVHVVKDOO

be placed on the unit.

Important safety instructions

0DNHVXUH\RXUHJLVWHU\RXUSXUFKDVH
9LVLWVXSSRUWFDPEULGJHDXGLRFRP
%\UHJLVWHULQJ\RXOOEHWKHÀUVWWR

NQRZDERXW

y


)XWXUHSURGXFWUHOHDVHV

y


6RIWZDUHXSJUDGHV

y


1HZVHYHQWVDQGH[FOXVLYHRIIHUV
SOXVFRPSHWLWLRQV

This guide is designed to make installing and using this 
product as easy as possible. Information in this document has 
been carefully checked for accuracy at the time of printing; 
however, Cambridge Audio's policy is one of continuous 

LPSURYHPHQW WKHUHIRUH GHVLJQ DQG VSHFLÀFDWLRQV DUH

subject to change without prior notice.

This document contains proprietary information protected 
by copyright. All rights are reserved. No part of this manual 
may be reproduced by any mechanical, electronic or other 
means, in any form, without prior written permission of the 
manufacturer. All trademarks and registered trademarks are 
the property of their respective owners.

© Copyright Cambridge Audio Ltd 2013.

Cambridge Audio and the Cambridge Audio logo are 
trademarks of Cambridge Audio.

Other brands mentioned are trademarks of their respective 
owners and are used for reference purposes only.

Important safety instructions .....................................................................2

Limited warranty ..........................................................................................4

Rear panel connections ..............................................................................5

Rear panel connections cont. ....................................................................6

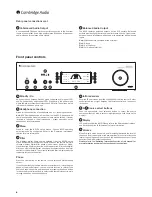
Front panel controls ....................................................................................6

6RXUFHFRQQHFWLRQV

 ....................................................................................8

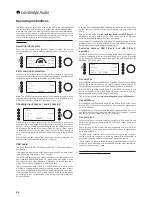
Operating instructions ............................................................................. 10

Bluetooth .................................................................................................. 12

Filters ........................................................................................................ 12

&XVWRPLQVWDOODWLRQ&,XVH

 .................................................................. 14

7HFKQLFDOVSHFLÀFDWLRQV

 ........................................................................... 14

Troubleshooting ........................................................................................ 15

2

Summary of Contents for 851D

Page 1: ...tems Dimarrage rapide Comment conflgurer un systeme simple Guia raipida Como conflgurar un sistema baslco Avvio rapido Come conflgurare II sistema di base Snel starten Hoe u een basis systeem conflgureert Kom hurtigt i gang Sadan konflgureres et almlndeligt system 5biCTpa R ycTaHOBKa KaK CKOH MrypMpOB3Tb OCHOBHYIO KaHanbHYIO CMCTeMy 8 CambridgeAudio ...

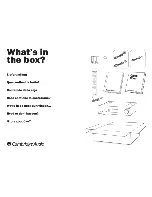
Page 2: ...e contient Ia boite Contenido de Ia caja Cosa contiene Ia confezione Wat u in de doos zult vinden Hvad er der i kassen ITO B KOp06Ke 8 CambridgeAudio oooo oooo oooo oooo oooo 0000 0000 0000 0000 27 Jiodo Ji Quick Start 8 CambridgeAudio ...

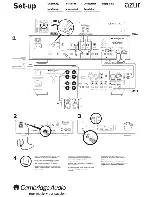
Page 3: ... tning CD DVD Network Player 851DUpaampllntOAC Oiilt IIPf ITOII R oo OOW c mbrld IHiudlo oom 00 00 0 0 0 0 0 L No deje de leer el manual Contiene toda Ia informaciOn necesaria para obtener el maximo rendlmlento de su equipo Azur 8510 Per ottenere le migliori prestazioni dal dispositive Azur 8510 leggere attentamente il manuale perle relative informazioni Om de beste prestaties van uw Azur 8510 te ...

Page 4: ...macion acerca de Cambridge Audio nuestros productos noticias resenas y soporte visite Per maggiori informazioni su Cambridge Audio e i nostri prodotti per notizie articoli e assistenza visitare Voor meer informatie over Cambridge Audio onze producten nieuws beoordelingen en support ondersteuning kunt u onze website bezoeken Du kan finde flere oplysninger om Cambridge Audio vores produkter nyheder ...

Page 5: ...Your music our passion 851D azur Upsampling DAC Digital Pre Amp User s manual 2 ENGLISH ...

Page 6: ...o a mains socket outlet with a protective earthing connection The unit must be installed in a manner that makes disconnection of the mains plug from the mains socket outlet or appliance connector IURP WKH UHDU RI WKH XQLW SRVVLEOH KHUH WKH PDLQV SOXJ LV XVHG DV WKH disconnect device the disconnect device shall remain readily operable Only use the mains cord supplied with this unit Please ensure th...

Page 7: ... not stack multiple units on top of each other Do not place in an enclosed area VXFK DV D ERRNFDVH RU LQ D FDELQHW ZLWKRXW VXIÀFLHQW YHQWLODWLRQ Ensure that small objects do not fall through any ventilation grille If this happens switch off immediately disconnect from the mains supply and contact your dealer for advice 3RVLWLRQLQJ Choose the installation location carefully Avoid placing it in dire...

Page 8: ...W FRYHU SURGXFWV VROG 6 6 RU 7 8 76 5 3 56 25 5 3 0 176 6 3529 81 5 7 6 55 17 5 7 86 9 5 0 2 7 21680 5 0 5 8 2 6 127 25 1 1 17 25 216 48 17 0 6 25 5 2 1 35 66 25 03 55 17 1 7 6 352 8 7 37 72 7 7 17 352 7 7 6 55 17 6 86 9 1 1 8 2 27 5 35 66 1 03 55 17 6 762 9 5 1 8 1 87 127 0 7 72 7 55 17 2 0 5 17 7 1 71 66 25 35 7 385326 6RPH FRXQWULHV DQG 86 VWDWHV GR QRW DOORZ WKH H FOXVLRQ RU OLPLWDWLRQ RI inci...

Page 9: ...mpling is performed on the digital outputs RD LDO To obtain best results use a high quality 75 ohm digital RCA LQWHUFRQQHFW FDEOH QRW RQH GHVLJQHG IRU QRUPDO DXGLR XVH 7RVOLQN 2SWLFDO 8VH D KLJK TXDOLW 726 1 ÀEUH RSWLF LQWHUFRQQHFW FDEOH GHVLJQHG VSHFLÀFDOO IRU DXGLR XVH 10 86 QWHUIDFH 86 W SH VRFNHW LV ÀWWHG WR WKH WR HQDEOH WKH SOD EDFN RI DXGLR from a personal computer running either Microsoft ...

Page 10: ...ssing the Filter ø button on the remote will cycle WKURXJK GLIIHUHQW GLJLWDO ÀOWHU SKDVH PRGHV LQHDU 0LQLPXP 6WHHS LQHDU LQYHUWHG 0LQLPXP LQYHUWHG DQG 6WHHS LQYHUWHG OWHUQDWLYH GLJLWDO ÀOWHUV FDQ RIIHU VXEWO GLIIHUHQW VRXQG TXDOLW FKDUDFWHULVWLFV 6HH ODWHU VHFWLRQ IRU IXUWKHU GHWDLOV 7KH FXUUHQWO VHOHFWHG ÀOWHU LV GLVSOD HG E WKH indicators just above the button Phase Press the Filter button on th...

Page 11: ...ce inputs OXHWRRWK 7 Press to select bluetooth source input using the BT100 dongle To pair devices press and hold for a few seconds to initiate the pairing function Note Disconnect one device before pairing another or turn the Bluetooth function off from the currently connected device before pairing another 86 3 3UHVV WR VHOHFW WKH 86 DXGLR VRXUFH input 6HH ODWHU VHFWLRQV IRU PRUH GHWDLOV 7ULJJHU ...

Page 12: ...ch is in turn connected to the 851A via the Balanced ouput 851A 851D 6WUHDP0DJLF 3 86 FRQQHFWLRQ 7KH GLDJUDP EHORZ VKRZV WKH 86 DXGLR LQSXW FRQQHFWLRQ IURP D SHUVRQDO FRPSXWHU XVLQJ D W SH 86 OHDG WR RXU DQG DQ DPSOLÀHU XVLQJ 6RXUFH DODQFHG Note Unbalanced connection can also be used if preferred 851A 851D 3 0DF Note OZD V XVH D FHUWLÀHG FDEOH IRU 86 XGLR SUHIHUDEO RQH WKDW GLVSOD V DQ RIÀFLDO 86 ...

Page 13: ...the manual Note When connecting to an 851W Unbalanced connection can also be used if preferred 851D 851W RQWURO XV FRQQHFWLRQ Control Bus is the recommended method when using the 851D and other Cambridge Audio equipment with Control Bus In Out 7ULJJHU FRQQHFWLRQ Trigger Out can be useful if the 851D is desired to control other equipment that features trigger connections Custom install and or 0XOWL...

Page 14: ...ut drivers and supports up to 24 bit 96kHz audio simply plug in and play Q WKLV FRQÀJXUDWLRQ WKH LV DEOH WR ZRUN DW XS WR ELW N by declaring to your computer that it can handle any sample rate from 32kHz to 96kHz However in some Windows Mac operating system variants the operating V VWHP LWVHOI PD UHVWULFW RU À WKH RXWSXW VDPSOH UDWH RU UH VDPSOH WKH audio 6HH RXU RQOLQH JXLGH DW ZZZ FDPEULGJH DXGL...

Page 15: ... circumstances where one speaker is further away than the other or the source material itself has a channel imbalance URQW 5 8VHG LQ FRQMXQFWLRQ ZLWK XVWRP QVWDOODWLRQ V VWHPV RU 5 UHSHDWHU systems It may be desirable to disable the front panel IR by setting Front 5 WR RII JR WR 6HWWLQJV PHQX DQG SUHVV WKH URQW 5 EXWWRQ WR WXUQ RII WKH VROLG FLUFOH VKRXOG QRW VKRZ SETTINGS USB 2 Pre Amp Front IR B...

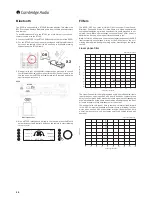
Page 16: ...QWHUQDO IHHG IRUZDUG LQ WKH 63 LWV LPSXOVH UHVSRQVH ZLOO H KLELW VRPH SUH ULQJLQJ Q RWKHU words when excited with a theoretical impulse the output has both a small amount of pre and post spike amplitude ringing albeit well GDPSHG 0 20 40 60 80 100 120 140 160 180 0 Frequency response Frequency response Amplitude Filters Bluetooth The 851D is supplied with a BT100 Bluetooth adaptor This allows the ...

Page 17: ...d attenuation of close in aliasing images Here we have traded a little attenuation of the very highest frequency response 2dB at 20kHz IRU N PDWHULDO DQG D OLWWOH PRUH SUH DQG SRVW ULQJLQJ IRU D YHU VWHHS DWWHQXDWLRQ MXVW RXWVLGH WKH SDVV EDQG 7KH 6WHHS ÀOWHU LV DEOH to attenuate aliasing at 22kHz by some 80dB for 44 1kHz material for instance 0 0 20 40 60 80 100 120 140 160 180 Impulse response 7...

Page 18: ...V NHSW KHOG GRZQ IRU D IXUWKHU VHFRQGV DQ DPSOLÀHU SOD HU 2IIµ command is generated 3UHVV DQG KROG WKH 0XWH EXWWRQ 7KH UHPRWH ÀUVW JHQHUDWHV LW V PXWH WRJJOH FRPPDQG HHS WKH EXWWRQ KHOG GRZQ DIWHU VHFRQGV D Mute on command will be generated If the button is kept held down for a further 12 seconds a Mute off command is generated IXOO FRGH WDEOH DQG 56 SURWRFRO IRU WKLV SURGXFW LV DYDLODEOH RQ WKH C...

Page 19: ...DEOH RPSDWLELOLW 86 24 bit 44 1kHz 48kHz 96kHz 86 16 24 bit 44 1kHz 48kHz 88 2kHz 96kHz 176 4kHz 192kHz 7RVOLQN 16 24 bit 32 192kHz 1 6 3 DQG 6 8 16 24 bit 32 192kHz LQH OHYHO EDODQFHG RXWSXW UHTXHQF UHVSRQVH WR N G 7 K G V 0 0004 7 K G V 0 0004 7 K G V 0 0007 0 N G V 0 0002 LQHDULW G V 0 2dB LQHDULW G 0 4dB 6WRS EDQG UHMHFWLRQ G N 6 1 UDWLR ZHLJKWHG G 7RWDO FRUUHODWHG MLWWHU S6 IRU DOO GLJLWDO LQ...

Page 20: ...ambridge Audio is a brand of Audio Partnership Plc 5HJLVWHUHG 2IÀFH DOOHU RXUW DQNH 3ODFH RQGRQ 6 8QLWHG LQJGRP Registered in England No 2953313 www cambridge audio com 2013 Cambridge Audio Ltd AP32805 1 ...

Reviews: