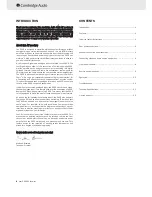
background image

540R

AV receiver

azur 540R AV receiver  

13

Cambridge Audio warrants this product to be free from defects in
materials and workmanship (subject to the terms set forth below).
Cambridge Audio will repair or replace (at Cambridge Audio's option) this
product or any defective parts in this product. Warranty periods may vary
from country to country. If in doubt consult your dealer and ensure that
you retain proof of purchase.

To obtain warranty service, please contact the Cambridge Audio
authorised dealer from which you purchased this product. If your dealer
is not equipped to perform the repair of your Cambridge Audio product,
it can be returned by your dealer to Cambridge Audio or an authorised
Cambridge Audio service agent. You will need to ship this product in
either its original packaging or packaging affording an equal degree of
protection.

Proof of purchase in the form of a bill of sale or receipted invoice, which
is evidence that this product is within the warranty period, must be
presented to obtain warranty service.

This Warranty is invalid if (a) the factory-applied serial number has been
altered or removed from this product or (b) this product was not
purchased from a Cambridge Audio authorised dealer. You may call
Cambridge Audio or your local country Cambridge Audio distributor to
confirm that you have an unaltered serial number and/or you purchased
from a Cambridge Audio authorised dealer.

This Warranty does not cover cosmetic damage or damage due to acts
of God, accident, misuse, abuse, negligence, commercial use, or
modification of, or to any part of, the product. This Warranty does not
cover damage due to improper operation, maintenance or installation,
or attempted repair by anyone other than Cambridge Audio or a
Cambridge Audio dealer, or authorised service agent which is authorised
to do Cambridge Audio warranty work. Any unauthorised repairs will void
this Warranty. This Warranty does not cover products sold AS IS or WITH
ALL FAULTS.

REPAIRS OR REPLACEMENTS AS PROVIDED UNDER THIS WARRANTY
ARE THE EXCLUSIVE REMEDY OF THE CONSUMER. CAMBRIDGE AUDIO
SHALL NOT BE LIABLE FOR ANY INCIDENTAL OR CONSEQUENTIAL
DAMAGES FOR BREACH OF ANY EXPRESS OR IMPLIED WARRANTY IN
THIS PRODUCT. EXCEPT TO THE EXTENT PROHIBITED BY LAW, THIS
WARRANTY IS EXCLUSIVE AND IN LIEU OF ALL OTHER EXPRESS AND
IMPLIED WARRANTIES WHATSOEVER INCLUDING, BUT NOT LIMITED TO,
THE WARRANTY OF MERCHANTABILITY AND FITNESS FOR A PRACTICAL
PURPOSE.

Some countries and US states do not allow the exclusion or limitation of
incidental or consequential damages or implied warranties so the above
exclusions may not apply to you. This Warranty gives you specific legal
rights, and you may have other statutory rights, which vary from state to
state or country to country.

LIMITED WARRANTY

Summary of Contents for Azur 540R

Page 1: ...xperience from a stereo source This ensures sources such as analogue televisions and VCR s can make full use of the 540R s surround capabilities In addition to the stereo analogue input the 540R also carries a seven channel analogue input This feature allows for the connection of a DVD Audio or SACD equipped player to the 540R This means that the 540R is fully equipped to make the most of these ex...

Page 2: ...ate normally after following the operation instructions adjust only those controls that are covered by the operation instructions If the amp has been dropped or damaged in any way When the amp exhibits a distinct negative change in performance Servicing Do not attempt to service the 540R yourself as removing cover may expose you to dangerous voltages or other hazards Refer all servicing through yo...

Page 3: ...hrough the 540R DVD Connect to the corresponding Optical Digital output terminal of a DVD player to play through the 540R It is possible to connect any equipment with an Optical Digital output to these inputs Coax O Out Connect to an external recording device to record selected digital audio source Optical O Out Connect to an external recording device to record selected digital audio source Compon...

Page 4: ...se the sound in a slightly different way and therefore have different positioning requirements ideally they should be mounted to the side of the listener and up to 15 degrees above listening height 4 Surround c centre s speaker Required for enjoying Dolby Digital EX Dolby is a registered trademark of Dolby Laboroatories or DTS ES audio Under license from Digital Theater System In or DTS BVI Limite...

Page 5: ...o c connections There are three basic options for audio connections to the 540R Optical Connect video source equipment s optical digital output socket to the corresponding socket on the rear of the 540R using optical cable OPT OPT Coaxial Connect video source equipment s coaxial digital output socket to the corresponding socket on the rear of the 540R using 75 Ohm phono cable RCA RCA Line l level ...

Page 6: ...in v via phono c cable RCA R RCA To t television S S V Video in v via S S V Video c cable MINIDIN M MINIDIN To t television component v video i in via c component c cable 3RCA 3 3RCA From v video s source audio o out v via phono c cable 2RCA 2 2RCA FIG 1 VIDEO CONNECTIONS FIG 2 AUDIO CONNECTIONS From v video s source coaxial o out v via 7 75 Ohm p phono c cable RCA R RCA From v video s source opti...

Page 7: ...nalogue optical and digital inputs azur 540R Video 3 3 i input s sockets Connect an external VCR Video Camera Recorder etc to these sockets DVD Press to select DVD source equipment for ouput through the 540R Video 1 1 Press to select video source equipment connected to Video 1 on the rear panel for output through the 540R Video 2 2 Press to select video source equipment connected to Video 2 on the...

Page 8: ...hannel Select see page 11 Sub o on off Press to turn the subwoofer on off Volume Press to increase or decrease the master volume Tune Press to increase or decrease the tuner frequency Mute Press to mute audio Press for function adjustments Bass T Treble Press for Bass and treble control Then press key to adjust levels SPK s setup If you are listening to a source in digital or Pro Logic II you can ...

Page 9: ...ng source will be displayed Storing s stations 1 Press the tuner FM AM button 2 Select AM or FM by again pressing the Tuner FM AM button 3 Press the Mode Store button two times to select manual tuning mode then press the Tuning button to select a frequency channel you want to preset 4 Pressing and holding the Mode Store button for 5 seconds will bring up the MEM icon 5 Use the Tuning buttons to se...

Page 10: ...me button The level of each speaker can be adjusted in 1 dB step from 10dB to 10dB Try to ensure that the volume of the tone is the same from every speaker When the setting is finished press the Test Tone button to stop the test tone FINE TUNING SOUND Channel S Select L Loudspeaker l level a adjustment f for 6 6 1 Direct a audio The channel select button can be used to balance volume between speak...

Page 11: ...el b becomes l low Broadcast signals are poor or poor antenna placement Excessive d distortion i in s speaker o output Poor reception area No s sound f from t the r rear s speakers Surround On Off button is set to Off Source being played is not recorded or broadcast in surround sound or stereo Cable not connected securely No s sound f from t the c centre s speaker Surround mode button is not set t...

Page 12: ... distributor to confirm that you have an unaltered serial number and or you purchased from a Cambridge Audio authorised dealer This Warranty does not cover cosmetic damage or damage due to acts of God accident misuse abuse negligence commercial use or modification of or to any part of the product This Warranty does not cover damage due to improper operation maintenance or installation or attempted...

Reviews: