background image

7

Rear panel connections

Last updated: August 9, 2022 05:05. Revision #10019

1. VOLTAGE SELECTOR SWITCH

Note: For use by Cambridge Audio service personnel only!

2. AC POWER SOCKET

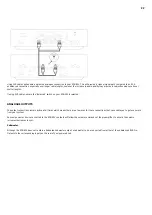
3. SPEAKER TERMINALS

Note: When using a banana plug, make sure the speaker terminals are completely tightened before inserting the plug. 

Connect the wires from your left channel loudspeaker to the left positive and negative terminals and the wires from the right channel loudspeaker
to the right positive and negative terminals.

In each case, the red terminal is the positive output and the black terminal is the negative output.

Summary of Contents for C10974

Page 1: ...1 EDGE W Manual Generated 20 11 2023 17 28...

Page 2: ...Introduction 4 What s included with the EDGE W 5 Front panel 6 Rear panel connections 7 Getting connected 9 Power syncing 13 Protection circuitry 14 Troubleshooting 15 Technical speci cations 16 Frequ...

Page 3: ...3 EDGE W Last updated August 9 2022 05 05 Revision 10013 Users Manual...

Page 4: ...bject to change without prior notice This document contains proprietary information protected by copyright All rights reserved No part of this manual may be reproduced by any mechanical electronic or...

Page 5: ...UK power cord Depending on which country the EDGE W was purchased in 2 EU power cord Depending on which country the EDGE W was purchased in CU power cord Depending on which country the EDGE W was purc...

Page 6: ...ted by dim LED and On indicated by bright LED Standby mode is a low power mode where the power consumption is less than 0 5 Watts AUTO POWER DOWN APD The product will automatically switch to standby m...

Page 7: ...When using a banana plug make sure the speaker terminals are completely tightened before inserting the plug Connect the wires from your left channel loudspeaker to the left positive and negative termi...

Page 8: ...ed 5 BALANCED UNBALANCED SWITCH Select depending on whether a source is connected to the balanced XLR or unbalanced RCA input Note There will be no sound from the amp if the correct input isn t select...

Page 9: ...cause a short circuit Twist the wires tightly together so there are no loose ends Unscrew the speaker terminal insert the speaker cable tighten the terminal and secure the cable Note All connections a...

Page 10: ...Preampli er or Integrated amp The diagrams below show the basic connection from a Preampli er Unbalanced input Using RCA cables will enable an unbalanced analogue connection to your EDGE W If using R...

Page 11: ...s selected ANALOGUE OUTPUTS The output connections remain active at all times which means there are a few uses for these connections that can enable you to get even more from your system Any component...

Page 12: ...e the high and mid frequencies of your speakers from one power amp and the low frequencies of your speakers from a second power amp The diagram below shows how to bi amp a pair of EDGE W s connected t...

Page 13: ...W or EDGE A and EDGE W to synchronise power on standby When you turn the EDGE A or NQ On O the EDGE W will also turn On O TRIGGER IN The EDGE W can also be connected to the trigger control output of...

Page 14: ...ration If the unit has not fully cooled down then the temperature may reach the limit soon after the ampli er is powered up DC EDGE W o ers loudspeaker protection if the output of the ampli er goes to...

Page 15: ...cted Ensure that the correct input has been selected via the Balanced Unbalanced switch If possible use di erent interconnect cables and speaker cables Check your source devices volume control to ensu...

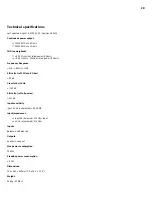
Page 16: ...Frequency Response 3Hz 80kHz 1dB S N ratio ref 1W into 8 Ohm 93 dB Crosstalk 1kHz 100dB S N ratio ref full power 113 dB Input sensitivity Input A1 A2 unbalanced 1 09V RMS Input impedances Input A3 ba...

Page 17: ...What ampli cation class does the EDGE W use The EDGE W uses Class XA ampli cation For Class XA the crossover point is moved so that both sets of transistors are always on until the signal reaches a l...

Reviews: