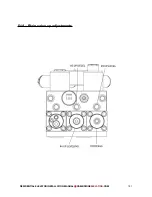
52 -Testing and adjusting down movement
NOTE: if the controls have been drastically altered you may have to reset all settings to
default (refer to section 52A) before proceeding. This procedure and section 52A can
then be followed to fine-tune the settings.
1. Put the system in service mode.
2. Run the elevator from the cartop controls and observe the following.
NOTE: Alternatively, the system could be in installation mode and you could use
the installers remote to move the elevator.
3. Press and hold the enable and down buttons.
4. The elevator should accelerate to 7 to 9 inches per second within 2 seconds:
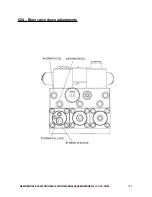
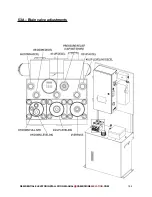
a. This can be adjusted, if the down acceleration is less or more: section 52A –
adjustment 6.
b. If the elevator is faster or slower than 7 to 9 inches per second when traveling at
full speeds:
i. Adjust the down full speed, Refer to section 52A – adjustment 7.
c. If the elevator will not move down:
i. Confirm that the down solenoid on the blain valve is getting power and
become magnetized.
ii. Refer to section D.3 – adjustment 6 and 7 and reset them to the default
setting.
d. If the elevator only reaches a levelling speed of 1
½
to 2 inches per second:
i. Confirm the high-speed switch on the main controller is ON.
ii. Confirm the high-speed solenoid on the blain valve is getting power and
becomes magnetized.
5. If possible, have someone slide the high-speed switch to the OFF position while you are
traveling at full speed. It is located on the main controller board.
6. The elevator should slow to a levelling speed of 1
½
to 2 inches per second:
a. This can be adjusted, refer to section 52A – Adjustment 9.
7. The elevator should slow from full speed to levelling speed quickly and smoothly:
a. This can be adjusted, refer to section 52A – Adjustment 8.
NOTE: If this setting is set for a longer slow down time the elevator may
overshoot the floor and level back up when traveling down to a floor, (coasting
past the floor).
8. You can move the elevator up and down and control the speed via the high-speed
switch while adjusting the valve until you are happy with the settings.
RESIDENTIAL ELEVATOR INSTALLATION MANUAL CAMBRIDGE
ELEVATING
.COM
192
Summary of Contents for BES 3
Page 1: ...BES 3 RESIDENTIAL ELEVATOR INSTALLATION MANUAL OCTOBER 2019...
Page 18: ...3B Overview of rail wall RESIDENTIAL ELEVATOR INSTALLATION MANUAL CAMBRIDGEELEVATING COM 17...
Page 20: ...3D Hydraulic power unit RESIDENTIAL ELEVATOR INSTALLATION MANUAL CAMBRIDGEELEVATING COM 19...
Page 35: ...RESIDENTIAL ELEVATOR INSTALLATION MANUAL CAMBRIDGEELEVATING COM 34...
Page 40: ...7A Sample layout drawing RESIDENTIAL ELEVATOR INSTALLATION MANUAL CAMBRIDGEELEVATING COM 39...
Page 41: ...7B Sample elevation drawing RESIDENTIAL ELEVATOR INSTALLATION MANUAL CAMBRIDGEELEVATING COM 40...
Page 43: ...RESIDENTIAL ELEVATOR INSTALLATION MANUAL CAMBRIDGEELEVATING COM 42...
Page 49: ...RESIDENTIAL ELEVATOR INSTALLATION MANUAL CAMBRIDGEELEVATING COM 48...
Page 57: ...RESIDENTIAL ELEVATOR INSTALLATION MANUAL CAMBRIDGEELEVATING COM 56...
Page 58: ...13A Jack post detail RESIDENTIAL ELEVATOR INSTALLATION MANUAL CAMBRIDGEELEVATING COM 57...
Page 61: ...14A Cylinder detail RESIDENTIAL ELEVATOR INSTALLATION MANUAL CAMBRIDGEELEVATING COM 60...
Page 65: ...16A Sling RESIDENTIAL ELEVATOR INSTALLATION MANUAL CAMBRIDGEELEVATING COM 64...
Page 70: ...RESIDENTIAL ELEVATOR INSTALLATION MANUAL CAMBRIDGEELEVATING COM 69...
Page 74: ...20A Sheave detail RESIDENTIAL ELEVATOR INSTALLATION MANUAL CAMBRIDGEELEVATING COM 73...
Page 76: ...21A Sling roping detail RESIDENTIAL ELEVATOR INSTALLATION MANUAL CAMBRIDGEELEVATING COM 75...
Page 84: ...24A Pre stroke detail RESIDENTIAL ELEVATOR INSTALLATION MANUAL CAMBRIDGEELEVATING COM 83...
Page 87: ...26A Jack post roping detail RESIDENTIAL ELEVATOR INSTALLATION MANUAL CAMBRIDGEELEVATING COM 86...
Page 89: ...27A Sling extensions detail RESIDENTIAL ELEVATOR INSTALLATION MANUAL CAMBRIDGEELEVATING COM 88...
Page 91: ...28A Sling roller detail RESIDENTIAL ELEVATOR INSTALLATION MANUAL CAMBRIDGEELEVATING COM 90...
Page 93: ...29A Cab floor RESIDENTIAL ELEVATOR INSTALLATION MANUAL CAMBRIDGEELEVATING COM 92...
Page 105: ...34A Cab inline RESIDENTIAL ELEVATOR INSTALLATION MANUAL CAMBRIDGEELEVATING COM 104...
Page 106: ...34B Cab through RESIDENTIAL ELEVATOR INSTALLATION MANUAL CAMBRIDGEELEVATING COM 105...
Page 107: ...34C Cab 90 degree RESIDENTIAL ELEVATOR INSTALLATION MANUAL CAMBRIDGEELEVATING COM 106...
Page 112: ...36A Hoistway wiring detail RESIDENTIAL ELEVATOR INSTALLATION MANUAL CAMBRIDGEELEVATING COM 111...
Page 115: ...37A Cartop electrical RESIDENTIAL ELEVATOR INSTALLATION MANUAL CAMBRIDGEELEVATING COM 114...
Page 121: ...39A Sensor head RESIDENTIAL ELEVATOR INSTALLATION MANUAL CAMBRIDGEELEVATING COM 120...
Page 122: ...39B Coded strips RESIDENTIAL ELEVATOR INSTALLATION MANUAL CAMBRIDGEELEVATING COM 121...
Page 127: ...40A TRAVEL CABLE RESIDENTIAL ELEVATOR INSTALLATION MANUAL CAMBRIDGEELEVATING COM 126...
Page 129: ...41A Control panel diagram RESIDENTIAL ELEVATOR INSTALLATION MANUAL CAMBRIDGEELEVATING COM 128...
Page 163: ...RESIDENTIAL ELEVATOR INSTALLATION MANUAL CAMBRIDGEELEVATING COM 162...
Page 164: ...RESIDENTIAL ELEVATOR INSTALLATION MANUAL CAMBRIDGEELEVATING COM 163...
Page 165: ...RESIDENTIAL ELEVATOR INSTALLATION MANUAL CAMBRIDGEELEVATING COM 164...
Page 166: ...RESIDENTIAL ELEVATOR INSTALLATION MANUAL CAMBRIDGEELEVATING COM 165...
Page 167: ...RESIDENTIAL ELEVATOR INSTALLATION MANUAL CAMBRIDGEELEVATING COM 166...
Page 171: ...RESIDENTIAL ELEVATOR INSTALLATION MANUAL CAMBRIDGEELEVATING COM 170...
Page 172: ...RESIDENTIAL ELEVATOR INSTALLATION MANUAL CAMBRIDGEELEVATING COM 171...
Page 173: ...RESIDENTIAL ELEVATOR INSTALLATION MANUAL CAMBRIDGEELEVATING COM 172...
Page 174: ...RESIDENTIAL ELEVATOR INSTALLATION MANUAL CAMBRIDGEELEVATING COM 173...
Page 175: ...RESIDENTIAL ELEVATOR INSTALLATION MANUAL CAMBRIDGEELEVATING COM 174...
Page 187: ...49A Handrail RESIDENTIAL ELEVATOR INSTALLATION MANUAL CAMBRIDGEELEVATING COM 186...
Page 205: ...57A Telephone line detail RESIDENTIAL ELEVATOR INSTALLATION MANUAL CAMBRIDGEELEVATING COM 204...

