23 - Bleeding the cylinder
Considerations:
•
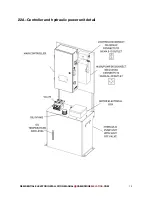
If the power unit (H1) will not run with the pendant (E38), refer to the BES3 service
manual section E
•
The hydraulic power units (H1) are adjusted and tested before shipping, although fine-
tuning may be required (best to wait until the end of the project). The pump will operate
without any adjustments.
Materials required:
•
None
Tools recommended:
•
½
inch wrench
•
A ladder may be required
Procedure:
•
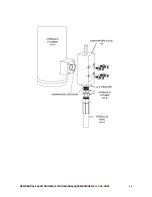
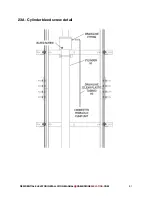
Locate the bleed screw near the top of the cylinder and gain access
•
Turn the bleed screw halfway, the bolt is ground on one side so that it will let the air out.
•
Force the air out of the lines and cylinder
o
Press up on the remote pendant (E38) until the cylinder (H1) moves a few inches
o
Push down on the cylinder to force air out and then repeat above
Tip: stand to one side with a rag ready to go, as oil will come out when the air
stops
•
As the oil moves into the top of the cylinder, the pitch of the sound will increase
•
Sliding the high-speed switch o
ff
as the oil gets closer will limit the amount of oil that
comes out. It is located in the middle of the main controller board.
•
Continue forcing the air out of the cylinder (by running the power unit) until oil starts to
come out, then stop.
•
Tighten the bleed screw.
NOTE: This will remove the majority of the air, but after a few hours of sitting
an air pocket will reform at the top of the cylinder as the air mixed in with the
oil settles out. It is advisable after 30 minutes or more of not running the lift to
turn out the bleed screw half way and release that air. The air can also be bled
before running the elevator the morning of the second day.
RESIDENTIAL ELEVATOR INSTALLATION MANUAL CAMBRIDGE
ELEVATING
.COM
80
Summary of Contents for BES 3
Page 1: ...BES 3 RESIDENTIAL ELEVATOR INSTALLATION MANUAL OCTOBER 2019...
Page 18: ...3B Overview of rail wall RESIDENTIAL ELEVATOR INSTALLATION MANUAL CAMBRIDGEELEVATING COM 17...
Page 20: ...3D Hydraulic power unit RESIDENTIAL ELEVATOR INSTALLATION MANUAL CAMBRIDGEELEVATING COM 19...
Page 35: ...RESIDENTIAL ELEVATOR INSTALLATION MANUAL CAMBRIDGEELEVATING COM 34...
Page 40: ...7A Sample layout drawing RESIDENTIAL ELEVATOR INSTALLATION MANUAL CAMBRIDGEELEVATING COM 39...
Page 41: ...7B Sample elevation drawing RESIDENTIAL ELEVATOR INSTALLATION MANUAL CAMBRIDGEELEVATING COM 40...
Page 43: ...RESIDENTIAL ELEVATOR INSTALLATION MANUAL CAMBRIDGEELEVATING COM 42...
Page 49: ...RESIDENTIAL ELEVATOR INSTALLATION MANUAL CAMBRIDGEELEVATING COM 48...
Page 57: ...RESIDENTIAL ELEVATOR INSTALLATION MANUAL CAMBRIDGEELEVATING COM 56...
Page 58: ...13A Jack post detail RESIDENTIAL ELEVATOR INSTALLATION MANUAL CAMBRIDGEELEVATING COM 57...
Page 61: ...14A Cylinder detail RESIDENTIAL ELEVATOR INSTALLATION MANUAL CAMBRIDGEELEVATING COM 60...
Page 65: ...16A Sling RESIDENTIAL ELEVATOR INSTALLATION MANUAL CAMBRIDGEELEVATING COM 64...
Page 70: ...RESIDENTIAL ELEVATOR INSTALLATION MANUAL CAMBRIDGEELEVATING COM 69...
Page 74: ...20A Sheave detail RESIDENTIAL ELEVATOR INSTALLATION MANUAL CAMBRIDGEELEVATING COM 73...
Page 76: ...21A Sling roping detail RESIDENTIAL ELEVATOR INSTALLATION MANUAL CAMBRIDGEELEVATING COM 75...
Page 84: ...24A Pre stroke detail RESIDENTIAL ELEVATOR INSTALLATION MANUAL CAMBRIDGEELEVATING COM 83...
Page 87: ...26A Jack post roping detail RESIDENTIAL ELEVATOR INSTALLATION MANUAL CAMBRIDGEELEVATING COM 86...
Page 89: ...27A Sling extensions detail RESIDENTIAL ELEVATOR INSTALLATION MANUAL CAMBRIDGEELEVATING COM 88...
Page 91: ...28A Sling roller detail RESIDENTIAL ELEVATOR INSTALLATION MANUAL CAMBRIDGEELEVATING COM 90...
Page 93: ...29A Cab floor RESIDENTIAL ELEVATOR INSTALLATION MANUAL CAMBRIDGEELEVATING COM 92...
Page 105: ...34A Cab inline RESIDENTIAL ELEVATOR INSTALLATION MANUAL CAMBRIDGEELEVATING COM 104...
Page 106: ...34B Cab through RESIDENTIAL ELEVATOR INSTALLATION MANUAL CAMBRIDGEELEVATING COM 105...
Page 107: ...34C Cab 90 degree RESIDENTIAL ELEVATOR INSTALLATION MANUAL CAMBRIDGEELEVATING COM 106...
Page 112: ...36A Hoistway wiring detail RESIDENTIAL ELEVATOR INSTALLATION MANUAL CAMBRIDGEELEVATING COM 111...
Page 115: ...37A Cartop electrical RESIDENTIAL ELEVATOR INSTALLATION MANUAL CAMBRIDGEELEVATING COM 114...
Page 121: ...39A Sensor head RESIDENTIAL ELEVATOR INSTALLATION MANUAL CAMBRIDGEELEVATING COM 120...
Page 122: ...39B Coded strips RESIDENTIAL ELEVATOR INSTALLATION MANUAL CAMBRIDGEELEVATING COM 121...
Page 127: ...40A TRAVEL CABLE RESIDENTIAL ELEVATOR INSTALLATION MANUAL CAMBRIDGEELEVATING COM 126...
Page 129: ...41A Control panel diagram RESIDENTIAL ELEVATOR INSTALLATION MANUAL CAMBRIDGEELEVATING COM 128...
Page 163: ...RESIDENTIAL ELEVATOR INSTALLATION MANUAL CAMBRIDGEELEVATING COM 162...
Page 164: ...RESIDENTIAL ELEVATOR INSTALLATION MANUAL CAMBRIDGEELEVATING COM 163...
Page 165: ...RESIDENTIAL ELEVATOR INSTALLATION MANUAL CAMBRIDGEELEVATING COM 164...
Page 166: ...RESIDENTIAL ELEVATOR INSTALLATION MANUAL CAMBRIDGEELEVATING COM 165...
Page 167: ...RESIDENTIAL ELEVATOR INSTALLATION MANUAL CAMBRIDGEELEVATING COM 166...
Page 171: ...RESIDENTIAL ELEVATOR INSTALLATION MANUAL CAMBRIDGEELEVATING COM 170...
Page 172: ...RESIDENTIAL ELEVATOR INSTALLATION MANUAL CAMBRIDGEELEVATING COM 171...
Page 173: ...RESIDENTIAL ELEVATOR INSTALLATION MANUAL CAMBRIDGEELEVATING COM 172...
Page 174: ...RESIDENTIAL ELEVATOR INSTALLATION MANUAL CAMBRIDGEELEVATING COM 173...
Page 175: ...RESIDENTIAL ELEVATOR INSTALLATION MANUAL CAMBRIDGEELEVATING COM 174...
Page 187: ...49A Handrail RESIDENTIAL ELEVATOR INSTALLATION MANUAL CAMBRIDGEELEVATING COM 186...
Page 205: ...57A Telephone line detail RESIDENTIAL ELEVATOR INSTALLATION MANUAL CAMBRIDGEELEVATING COM 204...

