background image

3

A

C

D

B

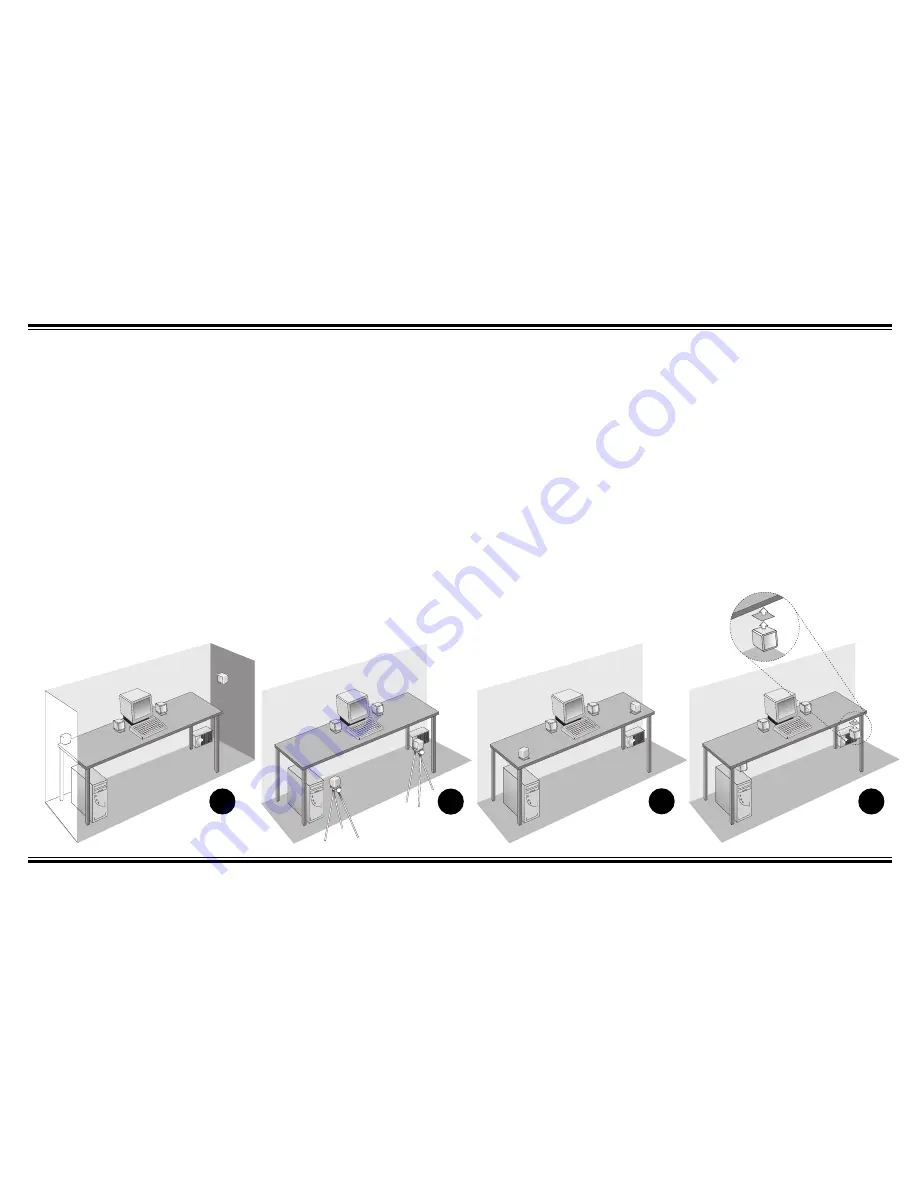
Speaker Placement

The front left and front right
satellites should be placed to the
sides of the monitor. When placing
satellites on the desktop, install
the desktop stands. If you wish to
save desktop space, use the hook
and loop fasteners to attach the
satellites to the sides of the
computer monitor (see page 11).

If your are lucky enough to have

side walls close to your listening
position, excellent placement for the
left rear and right rear satellites is
alongside or behind your listening
position, slightly above ear level
(use the hook and loop fasteners,
see diagram 

A

). Do not be

concerned if this is not practical,
since any rear satellite placement to

front satellites. Try the extreme
corners of a desk using the desktop
stands (

C

) or attach the rear satellites

under a desktop or at the sides of a
desk using the hook and loop
fasteners (

D

).

The subwoofer does not contribute

to directional sound effects. Its
optimum position is on the floor
against the wall. The closer the
subwoofer is to the corner, the
stronger the maximum bass output.
Alternately, it can be placed on a shelf
or other sites, but its maximum
output will be reduced.

the left and right side of the
listening position will provide strong
directional and surround effects.

The rear satellites may be installed

on their convenient floor stands (see
diagram 

B

). When listening, the

stands should be positioned to the
immediate left and right of your
listening position. The stands are
small enough to be stowed
underneath or alongside a desk
when not in use.

The rear satellites may also be

placed in any convenient sites
alongside the listener, including sites
slightly forward of the listening
location. The rear satellites do not
have to be at exactly the same
height, nor at the same height as the

5. Connect the Volume Control to

the subwoofer and then to the
sound card line outputs.

6. Connect the power supply

adapter.

7. Listen to the system and adjust

the Subwoofer Level control for
the most pleasing bass output.

8. You may wish to experiment

with satellite placement briefly
before concealing the connecting
wires and making the installa-
tion more permanent.

Summary of Contents for PCWorks Speaker System

Page 1: ...1998 Cambridge SoundWorks Inc PCWorks FourPointSurround Speaker System Installation and Operating Instructions...

Page 2: ...orks FourPointSurround is located on the subwoofer Please write this number down and keep it in a secure area This is for your security IMPORTANT The lightning flash with arrowhead within an equilater...

Page 3: ...lug having one blade wider than the other This plug will fit into the power outlet only one way This is a safety feature If you are unable to insert the plug fully into the outlet try reversing the pl...

Page 4: ...g The Desktop Stands 6 Attaching The Floor Stands 6 Power Supply Adapter 7 The Volume Control 8 Mounting the Volume Control 9 Adjusting Output Level 9 Subwoofer Level Control 10 Important 10 Optimizin...

Page 5: ...idnight Eastern time 1 PM to 4 AM Greenwich Mean Time In Canada 1 800 525 4434 Outside US or Canada Tel 617 332 5936 Fax 617 332 9229 www hifi com or e mail us at info hifi com T lets you experience t...

Page 6: ...Read through the instructions before installing the speakers The instructions assume you have a 4 channel sound card one that supports DirectSound3D and has front and rear stereo outputs If your soun...

Page 7: ...wall The closer the subwoofer is to the corner the stronger the maximum bass output Alternately it can be placed on a shelf or other sites but its maximum output will be reduced the left and right sid...

Page 8: ...UNDWORKS FRONT LEFT FRONT RIGHT REAR LEFT REAR RIGHT BASS LEVEL AUDIO INPUTS POWER ON OFF CAMBRIDGE SOUNDWORKS NEWTON MASSACHUSETTS USA 12V DC IN REAR FRONT REAR LEFT FRONT LEFT REAR RIGHT FRONT RIGHT...

Page 9: ...ed to identify each satellite To start apply the small square FRONT RIGHT label to the back of a satellite see diagram A Then wrap the remaining longer FRONT RIGHT label around the satellite cable jus...

Page 10: ...r away from the rear leg socket Make sure the stand is securely pressed into the slot see Diagram F 5 At the base of the rear leg gently pull on the satellite cable to remove any unneces sary slack in...

Page 11: ...y Adapter Confirm that the power switch is in the OFF position Insert the power supply s AC plug into the appropriate receptacle Insert the small DC connector into the 12V DC IN receptacle on the back...

Page 12: ...ur sound card Connect the F SUB plug to the Front minijack input on the Subwoofer Connect the R SUB plug to the Rear minijack input on the Subwoofer see diagram H At this point you may now turn the po...

Page 13: ...PCWorks FourPoint Surround s maximum output is still not sufficient at the extreme setting of its Volume Control try increasing one and only one of the software volume controls to increase overall ou...

Page 14: ...layback Levels PCWorks FourPointSurround is intended for individual or small group listening and will achieve surprisingly high output levels However playing the system continuously at overly loud dis...

Page 15: ...ar line of sight from your listening position to the satellites This prevents their higher frequen cies from being blocked It is not necessary for each satellite to be aimed directly at the listener T...

Page 16: ...o reach Creative Technical support via the Internet visit our technical support web site at http www creativehelp com for troubleshooting help For information about this product and other Creative Lab...

Page 17: ...90 43 HST 33 1 39 20 90 47 V 32bis Minitel 3615 CREATIVE and 3617 CREATIVE Germany Tel 49 089 9579081 for central and Fax 49 089 9577453 Eastern Europe BBS 49 089 9577274 Holland Tel 3115578244 Italy...

Page 18: ...Year Limited Warranty o the original purchaser Cambridge SoundWorks Inc will warrant the PCWorks FourPoint Surround system to be free of defects in material and workmanship for a period of one 1 year...

Page 19: ......

Page 20: ...311 Needham Street Newton MA 02464 1 800 367 4434 Fax 617 527 3194 www hifi com or e mail us at info hifi com...

Reviews: