7
CX
U
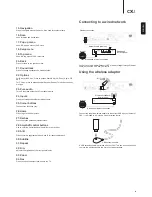
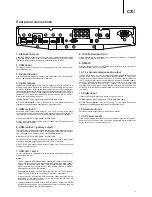
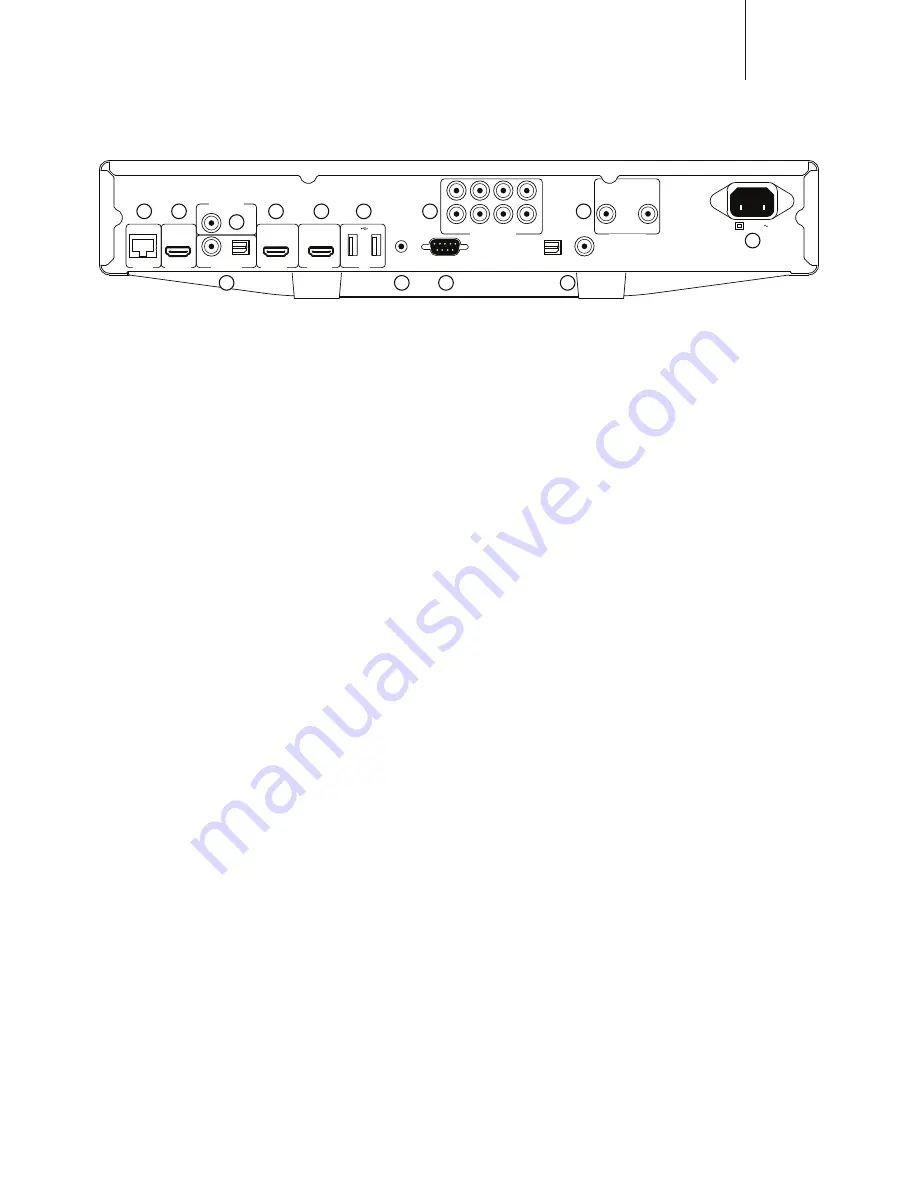
Rear panel connections
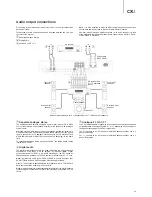
1. Ethernet LAN port
Used for Playback of context from the Internet or Network attached storage
drives and servers, also used for discs supporting BD-Live that provide
interactive features when the player is connected to the Internet.
2. HDMI input
This input is used to connect to a source device such as a set-top box or
other HDMI Source.
3. Diagnostic video
Use for diagnostic purposes. Connect to a TV/Monitor via a 75 ohms RCA/
7OVUVJHISLKLZPNULKZWLJPÄJHSS`MVY]PKLV\ZL
4. Digital outputs
Optical and Coaxial digital audio outputs, optionally used to connect to a
suitable Audio/Video Receiver for surround sound decoding (output must
be set for "Bitstream". Refer to the "Audio setup" section). HDMI is however
the preferred correction to AV Receivers as the latest lossless CODECS are
only supported over HDMI. These outputs can also be used to connect to a
separate DAC or digital recording device (output must be set for "LPCM".
Refer to the "Audio setup" section).
TOSlink Optical
¶<ZLHOPNOX\HSP[`;6:SPURÄIYLVW[PJJHISL
S/P DIF Coaxial Digital
– Use a high quality 75 ohm digital RCA/Phono
PU[LYJVUULJ[JHISLKLZPNULKZWLJPÄJHSS`MVYKPNP[HSH\KPV\ZL
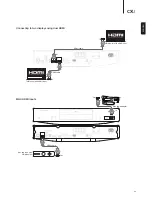
5. HDMI output 2
Secondary HDMI output. Both outputs 1 and 2 can be used at the same
time to send the same audio/video to two displays (with both being 3D TV
compatible) or to send audio over one HDMI link and video over the other.
(S^H`Z\ZLH /+40/PNO:WLLK JLY[PÄLK*HISL
HDMI 1 and 2 both support Audio Return Channel from TVs that have this
function. See later section.
6. HDMI output 1 (primary output)
;OL/+40/PNO+LÄUP[PVU4\S[PTLKPH0U[LYMHJLPZHW\YLS`KPNP[HSJVUULJ[PVU
that can carry both audio and video. Use a dedicated HDMI cable to connect
to a TV/Monitor or AV Receiver with a compatible HDMI input.
(S^H`Z\ZLH /+40/PNO:WLLK JLY[PÄLK*HISL
;OPZ V\[W\[ PZ [OL WYPTHY` V\[W\[ HUK ILULÄ[Z MYVT [OL +HYILL ]PKLV
processor. Both this output and output 2 are 3D TV compatible.
HDMI 1 and 2 both support Audio Return Channel from TVs that have this
function. See later section.
7. USB port 1 and 2
7VY[MVYPU[LYMHJPUN[VHÅHZOTLTVY`JHYKVY4HZZ:[VYHNL+L]PJLZ\JOHZ
a portable hard-drive).
Notes:
– This unit supports USB Mass Storage Class Bulk Transport devices only.
Most USB thumb drives, portable hard disk drives and card readers
conform to this device class. Other USB devices such as MP3 players,
digital cameras, and mobile phones that include their own memory
management may not be compatible.
– Supported USB drives must be formatted with the FAT (File Allocation
;HISL-(;VY5;-:5L^;LJOUVSVN`-PSL:`Z[LTÄSLZ`Z[LT
– In some cases, an incompatible USB device may cause the player to stop
YLZWVUKPUN 0M [OPZ VJJ\YZ ZPTWS` [\YU VɈ [OL WV^LY YLTV]L [OL <:)
device, and turn the player back on.
– The player accesses the USB drive in read-only mode. In order to minimize
the risk of data corruption, it is recommended that you only unplug the USB
device when playback has completely stopped.
8. IR (Infra-Red) emitter in
Allows modulated IR commands from multi-room systems or IR repeater
systems to be received by the unit.
9. RS232C
Used for control of the CXU in Custom Install situations. A full protocol is
available for the CXU on our website.
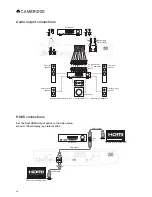
10. 7.1 channel analogue audio output
If Down-mix is set to "7.1 CH" in the Speaker Setup page (Down-mix mode
section) of the CXU's Setup menus, these sockets provide 7.1 output from
the CXU's built in Surround-Sound decoder. This can be used to connect to
[OLH\KPVSPULSL]LSPUW\[ZVMHUHTWSPÄLY(=YLJLP]LYVYHTWSPÄLKZWLHRLY
package if required. Similarly, Down-mix can be set to "5.1 CH" to provide
5.1 output. If Down-mix is set to "LT/RT", "Stereo" or "V.Surround" the Left
and Right outputs only are active and provide a stereo or stereo downmixed
V\[W\[9LMLY[V[OL :WLHRLYJVUÄN\YH[PVU ZLJ[PVUVM[OPZTHU\HSMVYTVYL
information.
11. Digital input
Optical and Coaxial digital audio inputs, used to connect to:
TOSlink Optical
¶<ZLHOPNOX\HSP[`;6:SPURÄIYLVW[PJJHISL
S/P DIF Coaxial Digital
– Use a high quality 75 ohm digital RCA/Phono
PU[LYJVUULJ[JHISLKLZPNULKZWLJPÄJHSS`MVYKPNP[HSH\KPV\ZL
12. Stereo audio out
Permanent stereo outputs for use with Stereo material.
13. AC power socket
Once you have made all audio and video connections, plug the IEC type AC
power cable into the rear of the unit and an appropriate mains socket then
switch on. Your CXU is now ready for use.
7.1 Channel Audio Out
Stereo Audio Out
FL
SL
C
SBL
Right
Left
FR
SR
SW
SBR
Digital Outputs
Diagnostic Video
Digital Inputs
HDMI Input
HDMI Out 2
HDMI Out 1
Ethernet
USB
Coax
RS-232C
Optical
Coax
Composite
Optical
In
2
1
IR Emitter
Power AC
1
2
5
6
7
3
4
8
10
12
13
9
11

