background image


Page | 11 


Always check the rating plate to make sure the gas supply you are hooking up to is the gas type the 

appliance is manufactured for. 

This natural gas appliance is designed to operate on natural gas ONLY, at a pressure regulated at 4

” 

water column (W.C.) when equipped with the correct natural gas orifices on the valves and a natural 

gas regulator on the supply line regulated at the residential meter. 

NOTE:


Supply line must be ½” ID from gas supply to regulator. 

We recommend consulting a local licensed plumber to insure proper gas volume. 

IMPORTANT: 

Never connect the appliance to an unregulated gas supply. 

Natural  gas  connections  must  be  performed  by  a  licensed  contractor  or  local  gas  company 

representative. 

NG Regulator 

IMPORTANT:


NEVER

  use  appliance  without  leak  testing  this 

connection. 

Natural gas regulator model: GR120N / RN1204A / XD07A     


Gas pressure: 4

” Water Column (W.C.)


Maximum rate working pressure: 1/2 PSIG 


Natural Gas Supply Connection and Disconnection 

1. 

Make sure all burner valves are in the “OFF” position.   

2.  To  connect:  Push  back  sleeve  of  socket,  insert  plug,  and  release  sleeve.  Push  plug  until  sleeve 

snaps forward locking plug into socket. (THIS AUTOMATICALLY TURNS ON GAS.) 

3.  To disconnect: Push sleeve back and pull out plug. (THIS AUTOMATICALLY SHUTS OFF GAS.) 

4.  Connected hose assembly shall be of adequate length and capacity for intended application. Final 

assembly must be tested for leaks. 

Natural Gas Hook-up


Summary of Contents for HEAT HTPB1

Page 1: ...nd Natural Gas Side Burners and Power Burner Models HTSB1 LP NG HTSB2 LP NG HTPB1 LP NG For Outdoor Use Only CONTACT INFORMATION HEAT Outdoor Living P O BOX 16262 Philadelphia PA 19114 866 876 9959 or CustomerService Heat OutdoorLiving com www Heat OutdoorLiving com HTPB1 HTSB1 HTSB2 ...

Page 2: ...having read this manual NOTE This appliance is not intended for commercial use DANGER IF YOU SMELL GAS 1 Shut off the gas supply to the appliance at its source 2 Extinguish any open flames 3 If a gas odor persists keep away from your appliance and contact your gas supplier or fire department immediately WARNING 1 Do not store or use gasoline or other flammable liquids or vapor in the vicinity of t...

Page 3: ...els 6 7 Gas Requirements 8 11 Installing the Appliance 12 14 Pre Operation Leak Testing 15 Lighting the Appliance 16 Care and Maintenance 17 18 Troubleshooting Your Appliance 19 20 Parts List and Breakdowns 21 23 Product Registration Information 24 25 Warranty 27 ...

Page 4: ...appliance 8 Keep children and pets away from hot appliance DO NOT allow children to use or play near the appliance 9 Never attempt to repair or replace any part of the appliance yourself unless specifically recommended in this manual All other services should be performed by a qualified service technician 10 Never lean over an open appliance Do not place clothing or other flammable material on or ...

Page 5: ...st of substances which are known by the State of California to cause cancer or reproductive harm California law requires businesses to warn customers of potential exposure to such substances To minimize exposure to these substances always operate this unit according to the Use and Care Manual ensuring you provide good ventilation when cooking with gas 5011443 Conforms to ANSI STD Z21 58 2018 Certi...

Page 6: ...sions 12 1 2 W x 20 D x 5 1 4 H BTU Output 12 000 Total BTU 12 000 Burner 1 Brass Burner Warranty See warranty section for details Model HTSB2 LP HTSB2 NG Dimensions 14 1 2 W x 24 3 4 D x 11 H BTU Output 12 000 per burner X2 Total BTU 24 000 Burner 2 Brass Burners Warranty See warranty section for details ...

Page 7: ...ner HTPB1 LP NG Model HTPB1 LP HTPB1 NG Dimensions 16 1 2 W x 23 3 4 D x 11 H BTU Output 22 000 Outer Ring 12 000 Inner Ring Total BTU 34 000 Burner 1 Cast SUS304 Power Burner Warranty See warranty section for details ...

Page 8: ...cable WARNING Gas valves are preset at the factory to operate on LP or natural gas If you wish to convert be sure to contact your dealer FIRST This propane gas appliance is designed to operate on propane gas ONLY at a pressure regulated at 11 water column W C when equipped with the correct propane orifices on the valves and a propane regulator on the supply line regulated at the residential meter ...

Page 9: ...ded standard with the appliance The Type 1 connection system has the following features The system will not allow gas to flow until a positive connection has been made NOTE The cylinder control valve must be turned off before any connection is made or removed The system has a thermal element that will shut off the flow of gas in the event of a fire The system has a flow limiting device which when ...

Page 10: ...carport garage porch covered patio or other building Never leave a LP tank inside a vehicle which may become overheated by the sun Do not store LP tank in an area where children play LP Propane Tank Filling Use only licensed and experienced dealers LP dealer must purge tank before filling Dealer should NEVER fill LP tank more than 80 of LP tank volume Volume of propane in tank will vary by tempera...

Page 11: ...Natural gas connections must be performed by a licensed contractor or local gas company representative NG Regulator IMPORTANT NEVER use appliance without leak testing this connection Natural gas regulator model GR120N RN1204A XD07A Gas pressure 4 Water Column W C Maximum rate working pressure 1 2 PSIG Natural Gas Supply Connection and Disconnection 1 Make sure all burner valves are in the OFF posi...

Page 12: ...nd Cut Out Dimensions NOTE ALWAYS have equipment measured by a licensed contractor before beginning any project MODEL WIDTH DEPTH HEIGHT HTSB1 LP NG 11 1 4 17 3 4 NA HTSB2 LP NG 11 22 1 16 8 HTPB1 LP NG 14 19 1 2 8 WIDTH DEPTH ...

Page 13: ... cavity could result in an explosion or fire LP Propane Gas LP gas is heavier than air and will settle to the lowest levels of the outdoor kitchen It is imperative to provide adequate cross ventilation for the areas where gas can accumulate at these lower levels of the island cavity Should the propane cylinder be located in the outdoor kitchen itself a plenum wall is required to separate the gas s...

Page 14: ...f valves must be easily accessible Locate the appliance only in a well ventilated area Never locate the appliance in a building garage breezeway shed or other such enclosed areas without an approved ventilation system During heavy use the appliance will produce a lot of smoke Ensure there is adequate area for it to dissipate Required Clearance CLEARANCE FOR NON COMBUSTIBLE CONSTRUCTION 12 clearanc...

Page 15: ...rts mild detergent or liquid soap and water Leak Testing Valves Hose and Regulator 1 Turn all grill control knobs to OFF 2 Be sure hose is tightly connected to LP tank 3 Completely open LP tank valve by turning cylinder valve knob counterclockwise right to left If you hear a rushing sound turn gas off immediately There is a major leak at the connection Correct before proceeding by calling franchis...

Page 16: ...onds turn the control knob to OFF wait 5 minutes to allow gas to dissipate and repeat the lighting procedure 5 To light the other burner press and turn control knob one by one counterclockwise to HIGH position and adjust to desired cooking temperature Power Burner 1 Remove the stainless steel cover 2 Ensuring controls knobs are in OFF position turn on the gas supply valve 3 Press and turn the RIGH...

Page 17: ... of spark electrode STAINLESS STEEL After initial usage areas of the appliance may discolor from the intense heat given off by the burners This is normal Purchase a mild stainless steel cleaner and rub in the direction of the grain of the metal Specks of grease can gather on the surface of the stainless steel and bake on to the surface and give a worn appearance For removal use a non abrasive oven...

Page 18: ...r lifting If any of these conditions exist call our customer service line 5 Clean outdoor cooking gas appliance including special surfaces with recommended cleaning agents if necessary 6 Check and clean appliance for insects and insect nests A clogged tube can lead to a fire beneath the burner WARNING Make sure each burner is properly replaced after cleaning It is very important to ensure the end ...

Page 19: ...ppliance does not reach temperature 3 The burners make popping noises BEFORE CALLING FOR SERVICE If the appliance does not function properly use the chart below before contacting your dealer for service You may save yourself the cost of a service call Troubleshooting is for general purposes only If the problem still exists contact your dealer or the nearest authorized agency for service Problem Po...

Page 20: ...n Appliance is too hot Excess grease build up causing grease fires Damaged or faulty regulator Replace with factory authorized parts Cook on a lower temperature setting Flame behind control panel or control knob area IMMEDIATELY shut off cylinder valve and allow grill to cool Check for spider webs or insect nest Gas is leaking from a faulty connection Tighten connections with an adjustable wrench ...

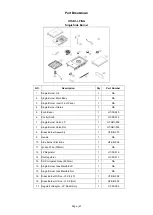
Page 21: ... Valve LP 1 HT SB1 002 7 Single Burner Valve NG 1 HT SB1 003 8 Brass Burner Assembly 1 HT SB 001 9 Handle 1 NA 10 Side Burner Electrode 1 HT SB 004 11 Ignition Wire 300mm 1 NA 12 LP Regulator 1 HT 00 016 13 NG Regulator 1 HT 00 017 14 SS Corrugated Hose 200mm 1 NA 15 Single Burner Gas Manifold LP 1 NA 15 Single Burner Gas Manifold NG 1 NA 16 Brass Burner Orifice φ0 98 LP 1 HT SB 002 16 Brass Burne...

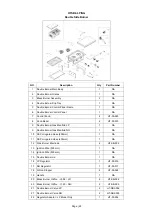
Page 22: ... LP 1 NA 9 Double Burner Gas Manifold NG 1 NA 10 SS Corrugated Hose 200mm 1 NA 11 SS Corrugated Hose 400mm 1 NA 12 Side Burner Electrode 2 HT SB 004 13 Ignition Wire 300mm 1 NA 14 Ignition Wire 500mm 1 NA 15 Double Burner Lid 1 NA 16 LP Regulator 1 HT 00 016 17 NG Regulator 1 HT 00 017 18 Silicon Stopper 4 HT 00 028 19 Handle 1 NA 20 Brass Burner Orifice φ0 98 LP 2 HT SB 002 20 Brass Burner Orific...

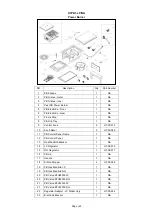
Page 23: ...3 10 Knob Bezel 2 HT 00 020 11 PB Control Panel Frame 1 NA 12 PB Control Panel 1 NA 13 Gas Manifold Bracket 1 NA 14 LP Regulator 1 HT 00 016 15 NG Regulator 1 HT 00 017 16 PB Lid 1 NA 17 Handle 1 NA 18 Silicon Stopper 4 HT 00 028 19 PB Gas Manifold LP 1 NA 19 PB Gas Manifold NG 1 NA 20 PB Valve BTU22000 LP 1 NA 20 PB Valve BTU22000 NG 1 NA 21 PB Valve BTU12000 LP 1 NA 21 PB Valve BTU12000 NG 1 NA ...

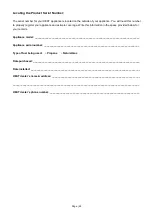
Page 24: ...e serial number ___________________________________________________________________ Type of fuel being used Propane Natural Gas Date purchased ___________________________________________________________________________ Date installed _____________________________________________________________________________ HEAT dealer s name address _____________________________________________________________...

Page 25: ...__________________________________ City _________________________________________ State Province Region ______________________ Zip Postal Code_______________________________ Country ____________________________________ What is the model number of the HEAT Product purchased _________________________________________________________________________________________ What is the serial number on the HEA...

Page 26: ...Page 26 This page left intentionally blank ...

Page 27: ...dental or consequential damages and HEAT liability is limited to the purchase price of the appliance only This warranty gives you specific legal rights and you may also have other rights which may vary from state to state This warranty is applicable in the United States and Canada only No one else is authorized to perform any obligations under this warranty High cooking temperatures improper maint...

Page 28: ...Page 28 CONTACT INFORMATION HEAT Outdoor Living P O BOX 16262 Philadelphia PA 19114 866 876 9959 or CustomerService Heat OutdoorLiving com www Heat OutdoorLiving com ...

Reviews: