

Page 2 of 5
CM-54
i
SURFACE MOUNT ILLUMINATED ENCLOSURE
INSTALLATION INSTRUCTIONS
4. INSTALLATION
NOTE: If you will be including the optional Aura™ signage,
follow that product’s installation instructions before
installing Aura™
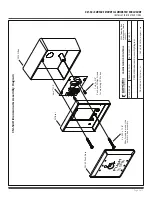
1. Determine the wire access location and drill hole of sufficient
size, or use center knock-out plug. Drill the four required
mounting holes. (11/64” min.) There are four indents
provided on 3” centers for your convenience. (See Diagram 1)
2. Pull wiring through access hole, and mount the box to wall
using 4 screws.
3. Remove circuit board from package and locate into the box.
Pull the wire through the hole in centre of circuit board, and
then secure with the two small self-tapping screws (provided).
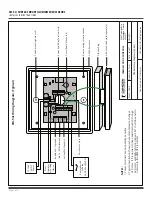
4a. Wire as per diagram 2 (typical installation). Route the switch
wiring through opaque diffuser panel, and install diffuser
panel into box. It should fit snuggly.
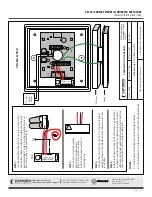
4b. If using a TX-9 transmitter to send the signal to an
RX-91 or RX-92 Receiver, attach the transmitter and wire it
before installing circuit board into the enclosure and fitting
diffuser. See Diagram 3.
5. Screw in two #6-32 Allen-head screws (provided with switch)
into the threaded center inserts, then attach wires to switch
and install switch over screws. Using the Allen key (provided),
locate the screws and tighten (by hand only).
6. Connect power and test for proper operation.
5. WARRANTY
Camden Door Controls guarantees the Aura™ (CM-54i series)
to be free from manufacturing defects for 3 years from date
of sale.
If, during the first 3 years, the Aura™ fails to perform correctly,
it may be returned to our factory where it will be repaired or
replaced (at our discretion) without charge. Except as stated
herein, Camden extends no warranties expressed or implied
regarding function, performance or service.


