Call: 1.877.226.3369 / 905.366.3377
Visit: www.camdencontrols.com
Opening New Doors to
Innovation, Quality and Support!
Page 5 of 5
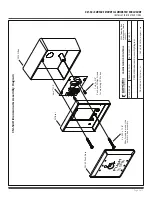
CM-54
i
SURFACE MOUNT ILLUMINATED ENCLOSURE
INSTALLATION INSTRUCTIONS
File: CM-54i Manual_R3.indd
Rev.: 01/14/21
Part No.: #40-82B208
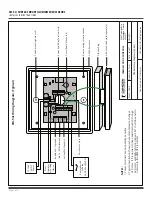
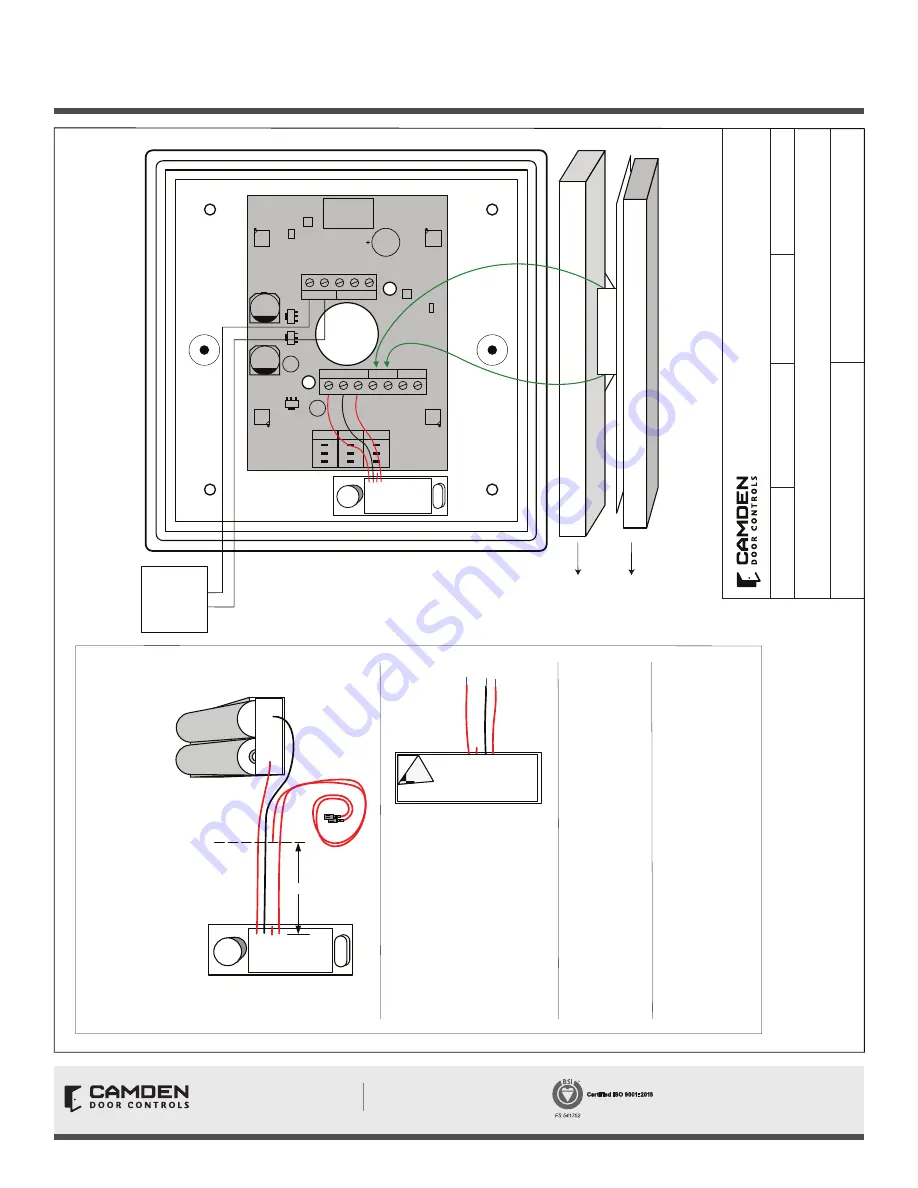
Wiring Diagram for CM-54i & TX-9
CAMDEN DOOR CONTROLS
SCALE: NONE
DRAWING No: DRG-CM-54i_03
FILE NAME: CM_54i Diagram3.vsd
DRAWN BY: DGW
DATE: 04/26/17
REVISED:
5502 Timberlea Blvd. Mississauga, Ontario L4W 2T7
CM-54i & TX-
9
ACTIV
E
NC
CO
MNO
PWR A
C/D
C
ID
LE
CO
L
ENABLE
1 2 3
O
N
D
P
1 2 3
O
N
D
P
1 2 3
O
N
D
P
-REM +
-PBTN +
ENRF/T
X -
PWR +
Switch
Diffuser
NOTE
S
:
1. 12/24 Power terminals are not polarity sensitive.
2. This installation is intended for 2-wire retrofit applications.
RED
GREEN
BLUE
12
/
24
V
AC/DC
Power
REM/LOC
RELAY
SPEAKER
+
-
+
-
+
-
LAZERPOINT
CAMDEN CM-TX-9
2”
TX
-9
<<
Cut this lead to ¼”
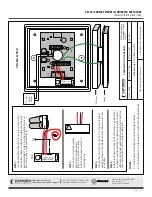
STEP 1:
Cut the middle red lead to 1/4” as it is not used. Cut
both battery leads and the remaining switch lead to
approximately 2” long. Strip the insulation back on
the 3 long ends to approximately 1/4”.
STEP 2:
Turn over and remove release
paper from double-sided
tape. Line up and carefully
install TX-9 on back surface of
mounting box.
STEP 3:
Connect the 3 wires from the TX-9 to the circuit board
exac
tly as shown. The middle red wire tha
t was cut short
is not used.
STEP 4:
Install circuit board in
box and connect the 2 power wires
as shown. Set dipswitches for desired operation. Install
diffuser and connect push switch wires to terminal strip
then install switch. Test for proper operation.
LAZERPOINT
CAMDEN
CM-TX-9


