background image

Page 28 of 28

FI

LE

N

A

M

E

:C

X-

33

_D

ia

gr

am

_0

15

b.

vs

d

D

R

A

W

IN

G

 N

o:

 D

R

G

-C

X

-3

3-

15

b

SC

AL

E:

  N

O

N

E

D

RA

W

N

 B

Y

: D

G

W

R

EV

IS

ED

D

AT

E:

  0

8/

13

/1

3

C

am

de

D

oo

C

on

tr

o

ls

55

02

 Ti

m

be

rle

B

lv

d

M

is

sis

sa

ug

a,

 O

nt

ar

io

L4

W

 2

T7

12

 - 

24

 V

AC

/D

C

 P

ow

er

Ac

tiv

at

in

g

Sw

itc

h,

D

oo

r 1

(s

eq

ue

nc

es

re

la

ys 2 to 3)

LE

D

 1

LE

D

 2

LE

D

 3

D

IS

P

LA

Y

R

el

ay

 1

R

el

ay

 2

R

el

ay

 3

N/C

N/O

CO

M

N/C

N/O

CO

M

N/C

N/O

CO

M

PO

WER

12/

24V

AC

/D

C

DR

Y 1

DR

Y 2

DR

Y 3

DR

Y 4

+ W

ET

IN

PU

T

IN

PU

T

IN

PU

T

IN

PU

T

- IN

PU

T

M

EN

U

U

P

D

O

W

N

El

ec

tri

c

Lo

ck

D

oo

r #

1

Po

w

er

fo

r S

tri

ke

Ac

tiv

at

in

g

Sw

itc

h

D

oo

r 2

(s

eq

ue

nc

es

re

la

ys

to

 1

 to

 2

)

D

oo

r #

1

O

pe

ra

to

r

D

oo

r #

2

O

pe

ra

to

r

Sw

itc

h

Se

qu

en

ce

s

R

el

ay

2

on

ly

Sw

itc

h

ac

tiv

at

es

R

el

ay

 3

on

ly

O

pt

io

na

l

S

w

itc

he

s

Page 13 of 22

W

he

Ac

ce

ss

 s

ys

te

m

or

 T

im

cl

oc

se

nd

s

m

ai

nt

ai

ne

dr

si

gn

al

.

M

O

V

N

O

TE

S:

1.

  W

et

 In

pu

t i

m

ai

nt

ai

ne

d,

 w

hi

le

re

m

ai

nd

er

 a

re

 m

om

en

ta

ry

.

2.

  A

cc

es

co

nt

ro

l s

ig

na

l m

ay

 b

dr

co

nt

ac

t c

lo

su

re

or

 w

et

 (p

ow

er

ed

) s

ig

na

l (

se

D

W

G

D

RG

-C

X-

33

-1

5)

3.

  E

xt

er

io

r s

w

itc

is

 o

nl

´a

ct

iv

w

he

th

e

st

rik

is

 e

ne

rg

iz

ed

.

4.

  I

ns

id

sw

itc

al

w

ay

un

lo

ck

an

op

en

do

or

CX-33

0.

1

.

5

(M

od

15

) 3

 R

el

ay

 B

i-

di

re

ct

io

na

l D

oo

r S

eq

ue

nc

er

 w

ith

 A

cc

es

C

on

tro

W

iri

ng

 D

ia

gr

am

Summary of Contents for CX-33

Page 1: ...read the instructions fully and made the required adjustments Mounting The CX 33 should be mounted in a clean dry location out of direct contact with the elements Suitable locations include inside a m...

Page 2: ...contact N O or N C 3 Set Dry Input 3 to activate on normally open or normally closed contact N O or N C 4 Set Dry Input 4 to activate on normally open or normally closed contact N O or N C 5 Set Wet...

Page 3: ...ergy S A M w switching network Mode 10 Proceed to section 3K on Page 7 Mag lock with N O Fire Alarm input Mode 11 Proceed to section 3L on Page 7 Mag lock with N C Fire Alarm input Mode 12 Proceed to...

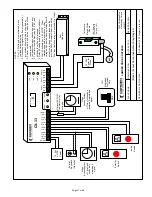
Page 4: ...tive adjustable timers If the time is set to zero then this feature is disabled Refer to Diagram 3 Page 13 for the following connections Wire the activating device s for Door 1 to DRY 1 terminals Wire...

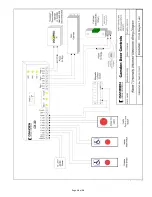
Page 5: ...nlock and open the door Refer to Diagram 6 Page 17 for the following connections The CX 33 allows for dry and or powered maintained connections to the Access System time clock DRY 1 and or WET inputs...

Page 6: ...s are made program the unit according to the General Programming Instructions on page 1 and walk test the installation Timing adjustments may need to be made It is NOT recommended to add the Delay on...

Page 7: ...1 2 Input 2 sequences Relays 2 3 Input 3 sequences Relays Section 3K Low Energy SAM Plus Mode 10 This mode combines a Low Energy Secondary Activation Module SAM with a switching network aka make break...

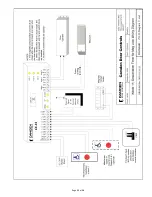
Page 8: ...am 7a page 26 for connections The all active switches and Lock down Switch are all normally open switches The RESET switch is normally closed Connect as shown A fail safe electric strike or mag lock s...

Page 9: ...y 320 mA max Inputs 4 x dry contacts and 1 x wet contact 4 5 120 V AC DC Optically isolated non polarity sensitive Response time 0 5 seconds Relay Output 3 x Form C SPDT Relay contact rating 3 amps 24...

Page 10: ...Page 10 of 28...

Page 11: ...Page 11 of 28...

Page 12: ...Page 12 of 28...

Page 13: ...Page 13 of 28...

Page 14: ...Page 14 of 28...

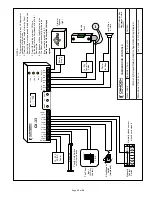
Page 15: ...Activating Switch Door 1 sequences relays 1 to 2 to 3 LED 1 LED 2 LED 3 DISPLAY Relay 1 Relay 2 Relay 3 N C N O COM N C N O COM N C N O COM POWER 12 24V AC DC DRY 1 DRY 2 DRY 3 DRY 4 WET INPUT INPUT I...

Page 16: ...ut 4 fires relay s 2 3 and holds both until input is released 6 Relay 3 can be used for a status indicator 7 Wet I P activates on 4 5V AC DC Older interphone panels may produce a stray voltage when in...

Page 17: ...relay or if available Dry 1 Input LED 1 CX 33 LED 2 LED 3 DISPLAY Relay 1 Relay 2 Relay 3 N C N C N O N O N O N C COM COM COM POWER 12 24V AC DC DRY 1 DRY 2 DRY 3 DRY 4 WET INPUT INPUT INPUT INPUT IN...

Page 18: ...Page 18 of 28...

Page 19: ...Page 19 of 28...

Page 20: ...Page 20 of 28...

Page 21: ...Page 21 of 28...

Page 22: ...Page 22 of 28...

Page 23: ...Page 23 of 28...

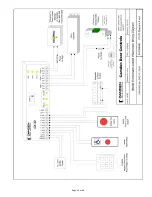
Page 24: ...ea Blvd Mississauga Ontario L4W 2T7 Door 3 Operator Door 2 Operator Door 1 Operator LED 1 CX 33 LED 2 LED 3 Relay 1 Relay 2 Relay 3 N C N C N O N O N O N C COM COM COM POWER 12 24V AC DC DRY 1 DRY 2 D...

Page 25: ...UL Approval or certification for this mode 2 Timer H1 sets the length of time the Push Panic switch must be pressed held before the door unlocks 3 Timer H2 sets the minimum ON time for the electric lo...

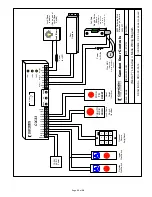
Page 26: ...2 24V AC DC DRY 1 DRY 2 DRY 3 DRY 4 WET INPUT INPUT INPUT INPUT INPUT MENU UP DOWN 1 2 3 4 5 6 7 8 9 Lock Down PUSH TO LOCK DOWN PUSH TO RESET Lock Down Indicator Can be part of Lock Down Switch Fail...

Page 27: ...DC DRY 1 DRY 2 DRY 3 DRY 4 WET INPUT INPUT INPUT INPUT INPUT MENU UP DOWN Electric Lock Door 1 Power for Strike Activating Switch Door 2 sequences relays 3 to 1 to 2 Door 1 Operator Door 2 Operator S...

Page 28: ...ric Lock Door 1 Power for Strike Activating Switch Door 2 sequences relays 3 to 1 to 2 Door 1 Operator Door 2 Operator Switch Sequences Relays 1 2 only Switch activates Relay 3 only Optional Switches...

Reviews: