CX-ED1079L/DL ‘Universal’ Electric Strike
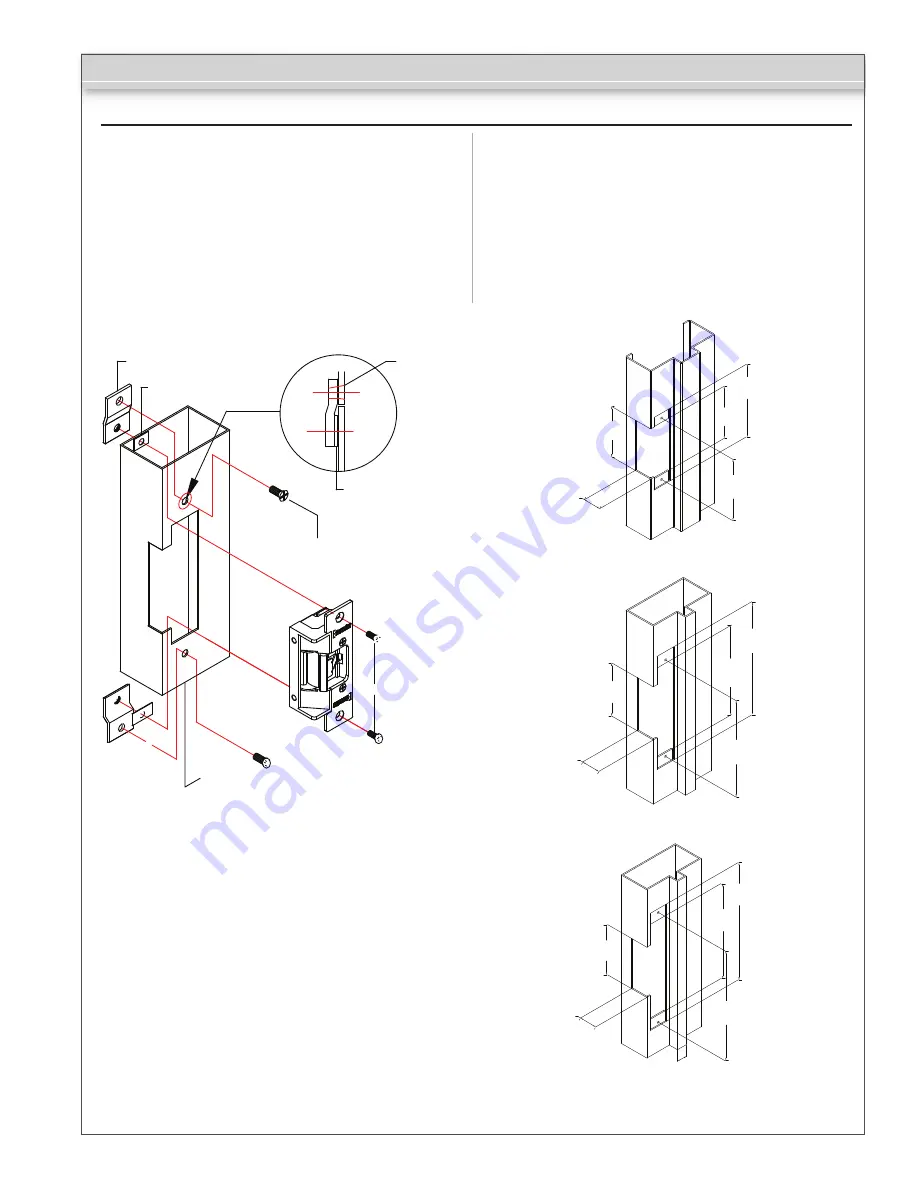
1. Prepare the door jamb as per the appropriate drawing.
2. Install mounting brackets to jamb using M5x12 screws
and pressed metal nuts. Do not tighten.
3. Spacers are used to assure flush final assembly of
faceplate into jamb. Add one or more spacers between
jamb and mounting bracket when face plate extends
beyond the jamb. When the faceplate sits inside the
jamb, spacers must be added between the mounting
bracket & the lip bracket. Make sure the clearance hole in
the spacer aligns with the hole in mounting bracket.
4. Connect wires coming from the low voltage side of the
transformer to wires (black) from strike.
5. Install electric strike jamb by attaching with # 10-32
screws and lockwashers.
6. Tighten secure M5x12 screws holding mounting brackets
to jamb.
(86mm)
3 3/8”
(187mm)
7 3/8”
(35mm)
1 3/8”
(200mm)
7 7/8”
(86mm)
3 3/8”
(86mm)
3 3/8”
(168mm)
6 3/8”
(31mm)
1 7/32”
(105mm)
4 1/8”
(124mm)
4 7/8”
(89mm)
3 1/2”
(155mm)
6 1/8”
L:
(35mm)
1 3/8”
DL:
(31mm)
1 7/32”
L:
(35mm)
1 3/8”
DL:
(31mm)
1 7/32”
L:
(35mm)
1 3/8”
DL:
(173mm)
6 7/8”
(144mm)
5 11/16”
4. Installation
ESP4B
ESP3B
ESP1B + ESP2B
Mounting Bracket
Spacer
Spacer (Option)
Spacer
M5x12 Flat-Head Screw (2pcs)
Jamp
M5x12 Screw
Vertical Centerline
Page 2 of 3
Note: The products are intended to be installed in accordance
with the installation wiring diagram, mechanical assembly
drawings provided with each product, the local authority having
jurisdiction (AHJ) and the National Electric Code, NFPA 70.
When installed in fail secure mode, the local authority shall be
consulted with regard to the use of possible panic hardware to
allow emergency exit from the secure area.
The electric door strike shall be installed in such a way and
in such a location so as to not impair the operation of an
emergency exit device or panic hardware mounted on the door.


