Page 4 of 9
WC17PS SERIES RESTROOM CONTROL
INSTALLATION INSTRUCTIONS
Page 3 of 9
WC17PS SERIES RESTROOM CONTROL
INSTALLATION INSTRUCTIONS
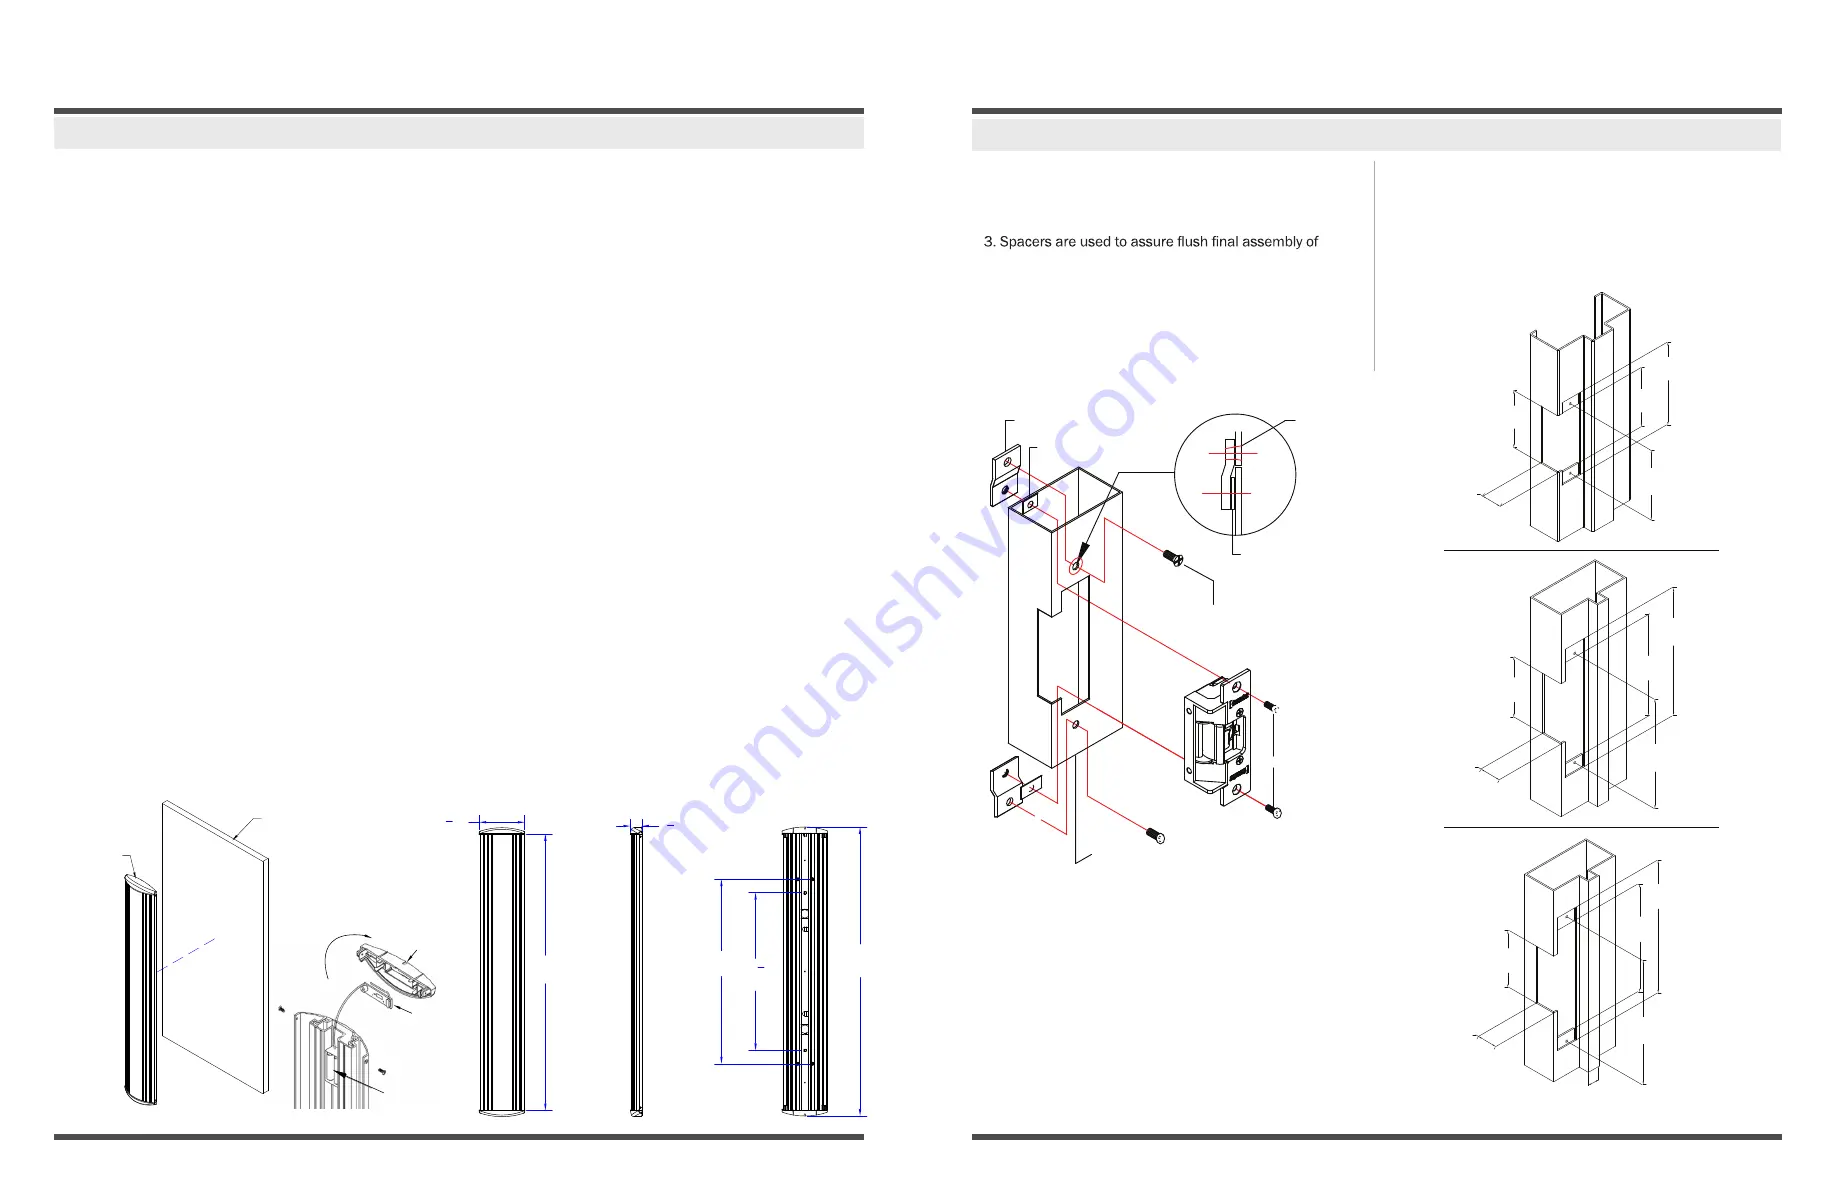
5. CX-ED2079 'UNIVERSAL' ELECTRIC STRIKE INSTALLATION
CX-ED2079 ‘Universal’ Electric Strike
1. Prepare the door jamb as per the appropriate drawing.
2. Install mounting brackets to jamb using M5x12 screws
and pressed metal nuts. Do not tighten.
faceplate into jamb. Add one of more spacers between
jamb and mounting bracket when face plate extends
beyond the jamb. When the faceplate sits inside the
jamb, spacers must be added between the mounting
bracket & the lip bracket. Make sure clearance hole in
spacer aligns with hole in mounting bracket.
4. Connect wires coming from the low voltage side of the
transformer to wires (black) from strike.
5. Install electric strike jamb by attaching with # 10-32
screws and lockwashers.
6. Secure M5x12 screws holding mounting brackets to jamb.
4. Installation
Mounting Bracket
Spacer
Spacer (Option)
Spacer
M5x12 Flat-Head Screw (2pcs)
Jamp
M5x12 Screw
Vertical Centerline
Note: The products are intended to be installed in accordance
with the installation wiring diagram, mechanical assembly
drawings provided with each product, the local authority having
jurisdiction (AHJ) and the National Electric Code, NFPA 70.
When installed in fail secure mode, the local authority shall be
consulted with regard to the use of possible panic hardware to
allow emergency exit from the secure area.
The electric door strike shall be installed in such a way and
in such a location so as to not impair the operation of an
emergency exit device or panic hardware mounted on the door.
(86mm)
3-3/8”
(187mm)
7-3/8”
(36mm)
1-3/8”
(200mm)
7-7/8”
(86mm)
3-3/8”
(86mm)
3-3/8”
(168mm)
6-3/8”
(31mm)
1-7/32”
(31mm)
1-7/32”
(31mm)
1-7/32”
(105mm)
ESP1B + ESP2B
ESP3B
ESP4B
4-1/8”
(124mm)
4-7/8”
(89mm)
3-1/2”
(155mm)
6-1/8”
(173mm)
6-7/8”
(144mm)
5-11/16”
Code Requirements: If installed according to these instructions
the CM-7536 Column switch will meet the requirements of the
California Building Code (Section 1117B.6, Date: 2009), and
Section 3.8.3.3.17(b) of the Ontario Building Code.
Installation Steps:
1. Remove the assembled unit from packaging. The unit must be
disassembled to be installed. To do this, remove the two small
Phillips screws holding the top cap in place.
Remove the cap. Then, grasping the center (metal) actuation bar,
pull vertically until the entire actuation bar is removed
from the base unit. Set the actuation bar aside and protect
from surface damage.
2. Determine the optimum height from the finished floor. See
illustration (above) for common height. If utilizing an in-wall
electrical box, center the backplate over the box, while lining up
the top edge with your mark.
3. Using a level, ensure the base unit is plumb and level, and
mark the 4 mounting locations through the adjustable nylon inset
screws onto the wall surface (if on drywall use a pencil, and if on
concrete a narrow Sharpie or similar).
4. a) Drill the wall at the 4 marked locations, and tap in the
appropriate wall plugs. We supply both drywall and concrete
anchors for the included #14 screws.
4. b) If mounting the Column Switch to an aluminum post or
framing section, drill and tap 4 holes for 1/4”-20 Stainless Steel
Machine screws (also provided).
5. a) If hardwiring: Use the supplied wirenuts to make your
wire connections. Push excess wire into the back box and ensure
cable is not exposed to the moving parts of the switch, or pinched
between the back of the base unit and wall surface.
4) nylon inset screws may be turned in or out to help plump up
Column switch and adjust for wall irregularities. Check with a level.
When satisfied, install the 4 mounting screws and tighten.
Batteries
CM-TX9
End Cap
5. a) If using Lazerpoint RF: The cap includes a snap-in
compartment for our TX-9 transmitter. Place transmitter in the cap,
with the wires hanging down and to the front of the cap. Using the
supplied wirenuts, connect the two activating wires to the Column
switch lead wires. Slide the battery and the extra wiring into the
center (rear) channel provided. Do not slide all of the wire into the
channel, so that the cap can hang off to one side while you perform
the next step.
Using the supplied wirenuts, connect the two activating wires to
the Column switch lead wires. Then, slide the battery and the extra
wiring into the center (rear) channel provided. Do not slide all of the
wire into the channel, so that the cap can hang off to one side while
you perform the next step.
5. b) If using other RF: Using the supplied wirenuts, make your
wire connections to the RF transmitter and tuck the transmitter and
excess wire into the back box (or wall cavity). Ensure cable is not
exposed to the moving parts of the switch, or pinched between
the back of the base unit and the surface of the wall.
6. Reassemble the (center) actuation bar into base unit. This is done
by holding the hanger (located at the top center) vertically ‘up’ – then
carefully sliding actuation bar down the length of the base unit,
being careful not to bend or break the springs or internal switches.
When the bottom edge of the actuation bar reaches the height of
the springs, use your free hand to tuck in the spring and switches
under the actuation bar as it slides over them. When activation bar
is approx 2” from bottom, position hanger so it falls into the slots
provided at the top of the base unit. Slide actuation bar down until
it rests on the hanger. Actuation bar should now move freely within
the base unit. Test the operation of the switch before mounting the
cap.
7. When satisfied with the switch operation, place cap back on top,
and screw in the two small self-tapping Phillips screws.
4. CM-7536 MOUNT INSTALLATION
Wall
CM-7536 Series
With Kinetic Switch
36''
[914mm]
112''
[38mm]
37 1/2''
[955mm]
5 78''
[150mm]
2012''
[521mm]
24''
[610mm]


