background image

A

A

a

a

A

b

b

Page 

4 - Manual 

FB00942-EN

 - ver

. 1

 - 11/2017 - © C

AME S.p.A. - The cont

ents of this manual ar

e subject t

o change at any time without prior notice.

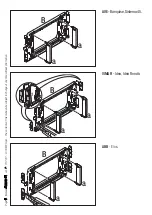
How to pair/adapt the subframes to the wiring systems

GEWISS

 - Playbus, Playbus 

Young.

BTICINO

 - Matix.

BTICINO

 - Light, Light Tech, 

Living International.

VIMAR

 - Plana, Eikon.

LEGRAND

 - Vela Quadra, 

Vela Tonda, Serie Cross.

Summary of Contents for 69400010

Page 1: ...Termostato digitale TA 350 MANUALE DI INSTALLAZIONE ED USO IT Italiano EN English FR Fran ais DE Deutsch FB00942M04...

Page 2: ...e destinati unicamente all uso per il quali sono stati espressamente concepiti Il costruttore non pu comunque essere considerato responsabile per eventuali danni derivanti da usi impropri erronei ed i...

Page 3: ...e abbinati permettono di adattare il dispositivo alle maggior parte delle serie civili in commercio seguendo le indicazioni delle pagine seguenti NOTA I marchi System Playbus Playbus Young Chorus sono...

Page 4: ...da ritenersi suscettibili di modifica in qualsiasi momento senza obbligo di preavviso GEWISS Playbus Playbus Young BTICINO Matix BTICINO Light Light Tech Living International VIMAR Plana Eikon LEGRAN...

Page 5: ...Pag 5 Manuale FB00942 IT ver 1 11 2017 CAME S p A I contenuti del manuale sono da ritenersi suscettibili di modifica in qualsiasi momento senza obbligo di preavviso VIMAR Idea Idea Rond ABB Elos AVE B...

Page 6: ...17 CAME S p A I contenuti del manuale sono da ritenersi suscettibili di modifica in qualsiasi momento senza obbligo di preavviso BTICINO Livinglight Qua dre VIMAR Arch BTICINO LivinglightTonde GEWISS...

Page 7: ...00942 IT ver 1 11 2017 CAME S p A I contenuti del manuale sono da ritenersi suscettibili di modifica in qualsiasi momento senza obbligo di preavviso AVE Serie 44 BTICINO Livinglight AIR VIMAR Eikon Ev...

Page 8: ...ssibilmente in una parete interna evitando l installazione in nicchie dietro a porte a tende o vicino a sorgenti di calore Estrarre la linguetta L e quindi il corpo dell apparecchio dal telaio fino al...

Page 9: ...l cronotermostato LEGENDA Conduttori di alimentazione da rete N neutro L fase Contatti del rel C comune NA contatto normalmente aperto NC contatto normalmente chiuso Carichi U1 bruciatore pompa di cir...

Page 10: ...del manuale sono da ritenersi suscettibili di modifica in qualsiasi momento senza obbligo di preavviso Una volta assemblati telaio e controtelaio scelti ed avere eseguito i collegamenti elettrici asse...

Page 11: ...ttivazione da remoto Temperatura antigelo Modalit raffrescamento attiva Icona animata raffrescamento in corso Modalit riscaldamento attiva Icona animata riscaldamento in corso Temperatura rilevata Pul...

Page 12: ...t Impostazione dell orologio Impostazione parametri di funzionamento Selezione della modalit di funzionamento RAFFRESCAMENTO di RISCALDAMENTO o di OFF Selezione del profilo utente Selezione contatto f...

Page 13: ...obbligo di preavviso Estrarre il corpo dell apparecchio Premere il pulsante per visualizzare l orologio Premere il pulsante A Le cifre dei minuti lampeggiano Uso del dispositivo Impostazione dell orol...

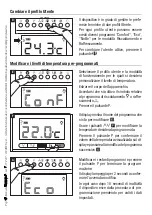
Page 14: ...sione sui pulsanti le cifre sul display diminuiscono o aumentano di una unit mantenendoli premuti le cifre sul display si susseguono lentamente per i primi 5 secondi poi pi velocemente Scegliere un pr...

Page 15: ...er le quali si desidera personalizzare il livello di temperatura Estrarre il corpo dell apparecchio Accertarsi che sia attivo il simbolo relativo al programma di riscaldamento o raffre scamento Premer...

Page 16: ...tuale icona del programma attivo e quella dell utente attivo spariscono per indicare che stata modificata la programmazione Dopo il timeout del video riappare la temperatura rilevata Nota La forzatura...

Page 17: ...eratura programmata max 16 C Premere il pulsante per uscire e memo rizzare il dato impostato Modificare la calibrazione della sonda di rilevamento della temperatura Se la collocazione del dispositivo...

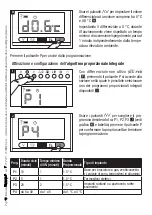
Page 18: ...tivazione e configurazione dell algoritmo differenziale Temperatura Set point differenziale Set point differenziale Set point Tempo Questo sistema di regolazione consigliato in impianti particolar men...

Page 19: ...ione e configurazione dell algoritmo proporzionale integrale Con differenziale non attivo F premendo il pulsante P si accede alla sezione nella quale possibile selezionare uno dei programmi proporzion...

Page 20: ...ingoli parametri che compongono il programma P4 manuale Il grafico K pu aiutare a decidere il valore dei parametri da inserire Il primo parametro riguarda la durata dei cicli di accensione L Usare i p...

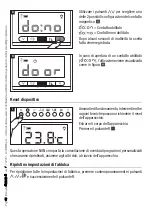
Page 21: ...i gestione termica vengono salvati nella memoria permanente del dispositivo Blocco sblocco dei pulsanti del dispositivo Per proteggere il dispositivo da modifiche alla programmazione impostata premere...

Page 22: ...la funzione del contatto magnetico Collegando un contatto magnetico ai morsetti 1 2 generalmente un contatto finestra possibile fare in modo che l apertura del contatto provochi lo spegnimento della...

Page 23: ...a la cancellazione di eventuali programmi personalizzati che saranno ripristinati assieme agli altri dati al riavvio dell apparecchio Ripristino impostazioni di fabbrica Per ripristinare tutte le impo...

Page 24: ...sione 0 3 C Software di classe A Grado d inquinamento 2 Tensione impulsiva 4 kV Temperatura massima della testa di comando 40 C Grado di protezione IP30 Isolamento elettrico classe II Temperatura di f...

Page 25: ...Digital thermostat TA 350 INSTALLATION AND USE MANUAL EN English FB00942 EN...

Page 26: ...devices The units must only be used for the purpose for which they were explicitly designed The manufacturer declines all liability for any damage as a result of improper incorrect or unreasonable us...

Page 27: ...ages N B The System Playbus Playbus Young Chorus brands are owned by GEWISS S p A The Light Light Tech Living International Axolute Luna Livinglight Quadre Matix Livin glight Tonde Livinglight AIR Axo...

Page 28: ...s of this manual are subject to change at any time without prior notice How to pair adapt the subframes to the wiring systems GEWISS Playbus Playbus Young BTICINO Matix BTICINO Light Light Tech Living...

Page 29: ...a a B a a B a a Page 5 Manual FB00942 EN ver 1 11 2017 CAME S p A The contents of this manual are subject to change at any time without prior notice VIMAR Idea Idea Rond ABB Elos AVE Banquise Sistema...

Page 30: ...2 EN ver 1 11 2017 CAME S p A The contents of this manual are subject to change at any time without prior notice BTICINO Livinglight Qua dre VIMAR Arch BTICINO LivinglightTonde GEWISS Chorus GEWISS Sy...

Page 31: ...Page 7 Manual FB00942 EN ver 1 11 2017 CAME S p A The contents of this manual are subject to change at any time without prior notice AVE Serie 44 BTICINO Livinglight AIR VIMAR Eikon Evo BTICINO Axolut...

Page 32: ...emperature possibly in an internal wall avoiding installation in niches behind doors curtains or near heat sources Pull out the tab L and then pull the unit body out from the frame as far as it will g...

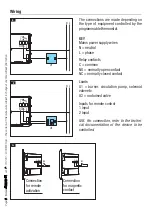
Page 33: ...nt controlled by the programmable thermostat KEY Mains power supply wires N neutral L phase Relay contacts C common NO normally open contact NC normally closed contact Loads U1 burner circulation pump...

Page 34: ...S p A The contents of this manual are subject to change at any time without prior notice Once the chosen frame and subframe have been assembled and wiring has taken place assemble the programmable th...

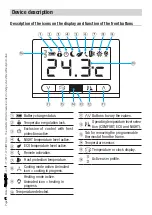
Page 35: ...tive Remote activation Frost protection temperature Cooling mode active Animated icon cooling in progress Heating mode active Animated icon heating in progress Temperature detected Buttons to vary the...

Page 36: ...er Reset button Setting the clock Setting the operating parameters Selecting the operating mode COOLING HEATING or OFF Selecting the user profile Selecting window contact or remote operation Setting t...

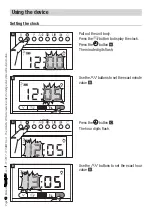
Page 37: ...change at any time without prior notice Pull out the unit body Press the button to display the clock Press the button A The minute digits flash Using the device Setting the clock Use the buttons to se...

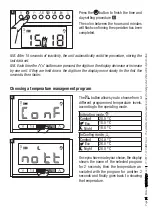
Page 38: ...ssed the digits on the display decrease or increase by one unit If they are held down the digits on the display move slowly for the first five seconds then faster Choosing a temperature management pro...

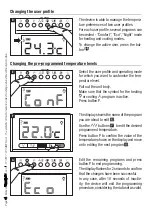
Page 39: ...rating mode for which you want to customise the tem perature level Pull out the unit body Make sure that the symbol for the heating or cooling program is active Press button P The display shows the na...

Page 40: ...ature Any icon of the active program and the active user disappear to indicate that the programming has been edited After the screen timeout the detected temperature reappears N B Forcing remains vali...

Page 41: ...he pro grammed temperature max 16 C Press the button to exit and save the set data Changing the temperature sensor calibration If the device is in a position that means that it is difficult for it to...

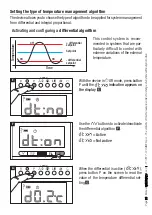
Page 42: ...vating and configuring a differential algorithm Temperature differential setpoint differential setpoint Setpoint Time This control system is recom mended in systems that are par ticularly difficult to...

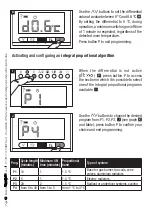
Page 43: ...iguring an integral proportional algorithm When the differential is not active F press button P to access the section in which it is possible to select one of the integral proportional programs availa...

Page 44: ...arameters that make up the manual P4 program The graph K can help you decide the value of the parameters to be entered The first parameter concerns the duration of the power on cycles L Use the button...

Page 45: ...orithm are saved in the permanent memory of the device Locking unlocking the device buttons To protect the device from changes to the set programming press buttons P and A at the same time for at leas...

Page 46: ...ontact function By connecting a magnetic contact to terminals 1 2 usually a window contact you can make sure that the opening of the contact causes the power off of the thermal zone The thermal zone r...

Page 47: ...I This operation does NOT erase any customised programs which will be restored along with the other data when the device is restarted Factory reset To restore all the factory settings press the button...

Page 48: ...0 1 C Accuracy 0 3 C Class A software Pollution rating 2 Pulse voltage 4 kV Maximum control head temperature 40 C Protection rating IP30 Class II electrical insulation Operating temperature from 0 C t...

Page 49: ...Thermostat num rique TA 350 MANUEL D INSTALLATION ET D UTILISATION FR Fran ais FB00942 FR...

Page 50: ...Les appareils ne devront tre destin s qu l utilisation pour laquelle ils ont t expres s ment con us Le fabricant d cline toute responsabilit en cas d ventuels dommages provoqu s par des utilisations...

Page 51: ...ttent d adapter le dispositif la plupart des s ries domestiques disponibles sur le march en suivant les indications fournies ci apr s REMARQUE Les marques System Playbus Playbus Young Chorus sont la p...

Page 52: ...st susceptible de subir des modifications tout moment et sans aucun pr avis Comment combiner adapter les pr cadres aux s ries domestiques GEWISS Playbus Playbus Young BTICINO Matix BTICINO Light Light...

Page 53: ...a B a a Page 5 Manuel FB00942 FR vers 1 11 2017 CAME S p A Le contenu du manuel est susceptible de subir des modifications tout moment et sans aucun pr avis VIMAR Idea Idea Rond ABB Elos AVE Banquise...

Page 54: ...s 1 11 2017 CAME S p A Le contenu du manuel est susceptible de subir des modifications tout moment et sans aucun pr avis BTICINO Livinglight Qua dre VIMAR Arch BTICINO LivinglightTonde GEWISS Chorus G...

Page 55: ...anuel FB00942 FR vers 1 11 2017 CAME S p A Le contenu du manuel est susceptible de subir des modifications tout moment et sans aucun pr avis AVE Serie 44 BTICINO Livinglight AIR VIMAR Eikon Evo BTICIN...

Page 56: ...nte si possible dans un mur interne en vitant l installation dans des ouvertures derri re des portes des rideaux ou pr s de sources de chaleur Extraire du cadre la languette L puis le corps de l appar...

Page 57: ...r le thermostat programmable L GENDE Conducteurs d alimentation r seau N neutre L phase Contacts du relais C commun NO contact normalement ouvert NF contact normalement ferm Charges U1 br leur pompe d...

Page 58: ...enu du manuel est susceptible de subir des modifications tout moment et sans aucun pr avis Apr s avoir assembl le cadre et le pr cadre choisis et effectu les branchements lectriques assembler le therm...

Page 59: ...nce Temp rature antigel Modalit rafra chissement activ e Ic ne anim e rafra chissement en cours Modalit chauffage activ e Ic ne anim e chauffage en cours Temp rature d tect e Boutons pour la modificat...

Page 60: ...loge Configuration des param tres de fonctionnement S lection de la modalit de fonctionnement RAFRA CHISSEMENT CHAUFFAGE ou OFF S lection du profil utilisateur S lection contact fen tre ou fonctionnem...

Page 61: ...raire le corps de l appareil Appuyer sur le bouton pour visualiser l horloge Appuyer sur le bouton A Les chiffres des minutes clignotent Utilisation du dispositif Configuration de l horloge Se servir...

Page 62: ...haque enfoncement des boutons les chiffres l cran diminuent ou augmentent d une unit en maintenant ces boutons enfonc s les chiffres en question se succ dent lentement les 5 premi res secondes puis pl...

Page 63: ...ement desquels personna liser le niveau de temp rature Extraire le corps de l appareil S assurer de l activation effective du symbole correspondant au programme de chauffage ou de rafra chissement App...

Page 64: ...lle de l utilisateur activ disparaissent pour signaler que la programmation a t modifi e Au terme du d lai d inactivit de l cran la temp rature d tect e r appara t Remarque Le for age reste valable ju...

Page 65: ...x 16 C Appuyer sur le bouton pour sortir et m moriser la donn e configur e Modifier le calibrage de la sonde de d tection de la temp rature Si le positionnement du dispositif ne permet pas une bonne d...

Page 66: ...guration de l algorithme diff rentiel Temp rature Point de consigne diff rentiel Point de consigne diff rentiel Point de consigne Temps Ce syst me de r glage est conseil l sur des installations partic...

Page 67: ...ration de l algorithme proportionnel int gral Avec diff rentiel d sactiv F appuyer sur le bouton P pour acc der la section permettant de s lectionner un des programmes proportionnels int graux disponi...

Page 68: ...mposant le programme P4 manuel Le graphique K peut faciliter le choix de la valeur des param tres saisir Le premier param tre concerne la dur e des cycles d allumage L Se servir des boutons pour chois...

Page 69: ...gard s dans la m moire permanente du dispositif Blocage d blocage des boutons du dispositif Pour prot ger le dispositif contre toute modi fication de la programmation configur e appuyer en m me temps...

Page 70: ...agn tique Par le biais de la connexion d un contact magn tique aux bornes 1 2 g n ralement un contact fen tre il est possible de faire en sorte que l ouverture du contact provoque l extinction de la z...

Page 71: ...op ration NE comporte PAS l limination d ventuels programmes personnalis s qui seront r tablis avec d autres donn es la remise en marche de l appareil Restauration des configurations d usine Pour r i...

Page 72: ...el classe A Degr de pollution 2 Tension d impulsion 4 kV Temp rature maximum de la t te de commande 40 C Degr de protection IP30 Isolation lectrique classe II Temp rature de fonctionnement de 0 C 40 C...

Page 73: ...Digital Thermostat TA 350 MONTAGE UND BETRIEBSANLEITUNG DE Deutsch FB00942 DE...

Page 74: ...nnen Die Ger te d rfen ausschlie lich f r den Zweck verwendet werden f r den sie ausdr cklich bestimmt sind Der Hersteller haftet nicht f r Sch den die durch unsachgem en falschen oder unver n nftigen...

Page 75: ...HINWEIS Die Marken System Playbus Playbus Young Chorus sind Eigentum der GEWISS S p A Die Marken Light Light Tech Living International Axolute Luna Livinglight Quadre Matix Livinglight Tonde Livingli...

Page 76: ...lt der Anleitung kann jederzeit ohne Vorank ndigung ge ndert werden Kombination Anpassung der Hilfsrahmen an bliche Rahmen GEWISS Playbus Playbus Young BTICINO Matix BTICINO Light Light Tech Living In...

Page 77: ...B a a B a a B a a S 5 Anleitung FB00942 DE Ver 1 11 2017 CAME S p A Der Inhalt der Anleitung kann jederzeit ohne Vorank ndigung ge ndert werden VIMAR Idea Idea Rond ABB Elos AVE Banquise Sistema 45...

Page 78: ...00942 DE Ver 1 11 2017 CAME S p A Der Inhalt der Anleitung kann jederzeit ohne Vorank ndigung ge ndert werden BTICINO Livinglight Qua dre VIMAR Arch BTICINO LivinglightTonde GEWISS Chorus GEWISS Syste...

Page 79: ...E D S 7 Anleitung FB00942 DE Ver 1 11 2017 CAME S p A Der Inhalt der Anleitung kann jederzeit ohne Vorank ndigung ge ndert werden AVE Serie 44 BTICINO Livinglight AIR VIMAR Eikon Evo BTICINO Axolute A...

Page 80: ...tieren m glichst an einer Innenwand nicht in Nischen hinter T ren oder Gardinen oder in der N he von W rmequellen anbringen Die Lasche L und anschlie end das Ger t herausziehen bis es nicht mehr weite...

Page 81: ...Ger ten ab ZEICHENERKL RUNG Netzstromleiter N Neutralleiter L Leiter Relaiskontakte C allgemeiner NO normalerweise offener Kontakt NC normalerweise geschlossener Kontakt Stromverbraucher U1 Brenner Um...

Page 82: ...r Inhalt der Anleitung kann jederzeit ohne Vorank ndigung ge ndert werden Zun chst den gew hlten Rahmen und den Hilfsrahmen zusammenbauen und dieAnschl sse vornehmen danach den programmierbaren Thermo...

Page 83: ...peratur wird einge schaltet Fernsteuerung Frostschutztemperatur K hlbetrieb eingeschaltet Animiertes Symbol K hlung l uft Heizbetrieb eingeschaltet Animiertes Symbol Heizung l uft Ist Temperatur Taste...

Page 84: ...iche T cher verwenden Reset Taster Uhrzeit einstellen Betriebsparameter einstellen Betriebsart w hlen K HLEN HEIZEN OFF Benutzerprofil w hlen Fensterkontakt oder ferngesteuerten Betrieb w hlen Frostsc...

Page 85: ...digung ge ndert werden Das Ger t herausziehen Auf den Taster dr cken um die Uhr anzuzeigen Auf den Taster A dr cken Die Minuten blinken Verwendung des Ger ts Uhrzeit einstellen Mit den Tastern die gen...

Page 86: ...inweis Nach jedem Druck auf die Taster verringert erh ht sich die Zahl auf dem Display um eine Eineit durch st ndigen Druck wechseln die Zahlen auf dem Display 5 Sekunden lang langsam und anschlie end...

Page 87: ...utzerprofil und die Betriebsart w hlen deren Soll Temperatur individuell ge ndert werden soll Das Ger t herausziehen Darauf achten ob das Heiz oder das K hlsymbol leuchtet Den Taster P dr cken Auf dem...

Page 88: ...aktivierten Benutzers werden nicht mehr angezeigt Dies bedeutet dass die Programmierung ge ndert wurde Nach der Auszeit des Bildschirms wird erneut die Ist Temperatur angezeigt Hinweis Die erzwungene...

Page 89: ...Temperatur ndern max 16 C Auf denTaster dr cken um denVorgang zu beenden und die Eingaben zu speichern Kalibrierung des Temperaturf hlers ndern Wenn die ordnungsgem e Tempera turerfassung wegen dem S...

Page 90: ...tivieren und konfigurieren Temperatur Set point Differential Set point Differential Set point Dauer Dieses System eignet sich bei schwer zu regelnden Anlagen und extremen Schwankungen der Au entempera...

Page 91: ...er aktivieren und konfigurieren Bei ausgeschaltetem Differentialregler F kann man durch Druck auf den Taster P die Men seite ffnen in der die verf gbaren PI Programme ausgew hlt werden k nnen I Mit de...

Page 92: ...ell eingestellt werden k nnen Das Diagramm K ist bei der Wahl der einzugebenden Parameter von Nutzen Der erste Parameter betrifft die Dauer der Einschaltyzklen L Mit den Tastern kann man eine Ein scha...

Page 93: ...erden im Permanentspeicher des Ger ts gespeichert Die Taster sperren freigeben Damit die eingestellten Daten nicht ver ndert werden gleichzeitig mindestens 3 Sekunden lang auf P und A dr cken Mit den...

Page 94: ...rieren Mit einem an den Klemmen 1 2 angeschlossenen Magnetkontakt blicherweise ein Fensterkontakt wird bei offenem Kontakt die Temperaturzone ausgeschaltet bei erneut geschlossenem Kontakt wird die Te...

Page 95: ...NICHT gel scht Diese werden nach dem Neustart des Ger ts mit den anderen Daten wieder hergestellt Werkseinstellung zur cksetzen Um alle Werkseinstellungen zur ckzusetzen gleichzeitig die Taster und an...

Page 96: ...asse A Verschmutzungsgrad 2 Impulsspannung 4 kV H chsttemperatur Steuerkopf 40 C Schutzart IP30 Schutzklasse II Betriebstemperatur 0 C bis 40 C Batterien wechseln Wenn das Zeichen auf dem Display blin...

Reviews: