background image

- .

%.#

,

.

- .

%.#

- .

%.#

- .

%.#

Pa

g.


99

  - 

Ma

n

u

al

 c

od

e: 

11

9

D

U

2

0

E

N

11

9

D

U

2

0

E

N

 ve

r.


2


2  

02

/2

0

15

  © C

A

M

E S

.p.

A

. - 

Th

e d

ata a

n

d i

nf

or

m

ati

on r

ep

orte

d i

n th

is

 in

sta

lla

tio

n m

an

u

al

 a

re s

u

sc

ep

tib

le to c

h

an

g

e at a

ny ti

m

e a

n

d w

ith

ou

t o

b

lig

ati

on

 o

n C

A

M

E S

.p.

A

. to n

otify u

se

rs.

ENGLISH

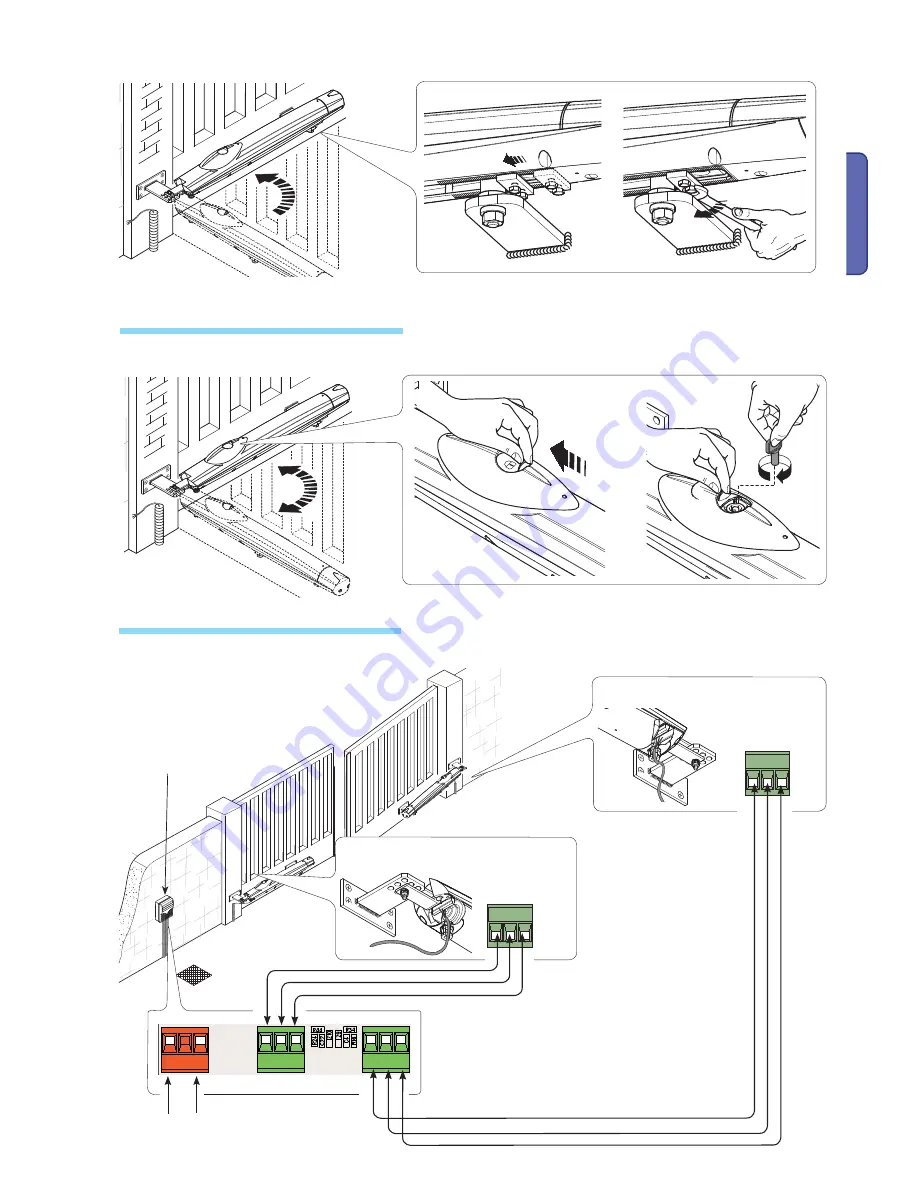
Slide open the small door that protects the release, insert the tri-lobed key and turn it.

5.6 Manual release of the gearmotor

For the electrical connection procedures, use the junction box and branching boxes.

5.7 Connecting to the control panel

Power 

230V a.c. - 50/60 Hz

Connecting the 24V d.c. delayed 

closing gearmotor

Connecting the 24V d.c. delayed 

opening gearmotor

ZL90 Control panel

Close the gate leaf, loosen the nuts on the closing mechanical stop, place it up against the attachment pin, then secure it.

Summary of Contents for AMICO Series A1824

Page 1: ...INSTALLATION MANUAL A1824 AUTOMATION FOR SWING GATES English EN 119DU20EN ...

Page 2: ... free of any obstructions Make sure that the photocells are free of any overgrown vegetation and that the operator s area of operation is free of any obstructions Do not allow children to play with fixed commands or to loiter in the gate s maneuvering area Keep any remote control transmitters or any other command device away from children to prevent the operator from being accidentally activated Th...

Page 3: ...s engineered and manufactured by CAME S p A and complies with current safety regulations Guaranteed 24 months if not tampered with The gearmotor is made up of two aluminium alloy half shells housing the Encoder gearmotor which features an electric blocking mechanism and an epicyclical reduction system with endless screw 4 2 Technical features Control board power supply 230V A C 50 60Hz Motor power...

Page 4: ...ure you have suitable tubing and conduits for the electrical cables to pass through and be protected against mechanical damage Fit tubing to drain away any water leaks which may cause oxidation Make sure that any connections inside the case that provide continuance to the protective circuit be fitted with extra insulation as compared to the other conductive parts inside Make sure the structure of ...

Page 5: ...ven on the table must be re evaluated based on actual power draw and distances When connecting products that are not specified in this manual please follow the documentation provided with said products 5 3 Cable list and minimum thickness Connections Type of cable Length of cable 1 10 m Length of cable 10 20 m Length of cable 20 30 m Control panel power supply 230V FROR CEI 20 22 CEI EN 50267 2 1 ...

Page 6: ... the gearmotor thrust is increased By increasing the measure A the opening angle and gate speed are increases while the gearmotor thrust is decreased Opening A mm B mm C mm 90 130 130 60 120 130 110 50 Ideal securing point Gate bracket Pillar bracket Lay the corrugated tubing needed for the connections deriving from the junction box N B the number of tubes depends on the type of system and accesso...

Page 7: ...osen with proper plugs and screws or if the pillar is made of metal weld it on Weld the gate bracket to the gate leaf making sure the quotas shown in the table are met Note on non metal gate leaves assemble and weld the two parts of the bracket and secure them with proper screws Secure the tail joint to the bracket Tail joint Screw M8 x 35 Insert the bushing lubricated into the pillar bracket s ho...

Page 8: ... the pin attachment and fix it in place Slotted hole Slotted hole Open the gate leaf insert the faceted anchoring lug into the slotted hole in the head bracket and tighten it using the 1 issued washer and nut or alternatively release the gearmotor see manual release paragraph remove the head cover and move the faceted anchoring lug using a screwdriver until it lines up with the slotted hole then se...

Page 9: ...ts the release insert the tri lobed key and turn it 5 6 Manual release of the gearmotor For the electrical connection procedures use the junction box and branching boxes 5 7 Connecting to the control panel Power 230V a c 50 60 Hz Connecting the 24V d c delayed closing gearmotor Connecting the 24V d c delayed opening gearmotor ZL90 Control panel Close the gate leaf loosen the nuts on the closing me...

Page 10: ...0 130 130 720 Weld the extra bracket to that of the pillar secure the extra bracket to the pillar making sure the A and B quotas are met as shown in the table Open the gate to a 90 arc weld or secure using proper screws the gate bracket making sure the E quota is met Secure the gearmotor to the brackets Connect the gearmotors to the panel as shown in the diagram Pillar bracket Extra bracket Gate b...

Page 11: ..._____________________________________________________________________ _________________________________________________________________________________________________ _________________________________________________________________________________________________ Installer s stamp Product name Date of job Technician s signature Customer s signature Job carried out _______________________________...

Page 12: ... operations strategies by simply following these brief guidelines when disposing DISPOSING THE PACKING MATERIALS The packing components cardboard plastic etc are solid urban waste and may be disposed of without any particular difficulty by simply separating them so that they can be recycled Before actions it is always advisable to check the pertinent legislation where installation will take place ...

Reviews: