TITLE
11
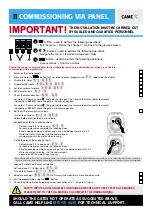
commissioning via panel
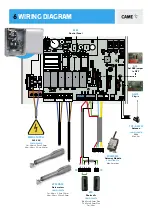
Ensure the wiring is complete (refer to the wiring diagram) & any required physical stops are set before
commencing with programming
Tick
1. Power on the control panel.
2. Press and hold the
button for 2 seconds to access programming,
F
1
appears on the display.
3. Disable total stop –
F
1
-
O
F
F
4. Disable safety inputs –
F
2
&
F
3
–
O
F
F
5. Set the number of motors –
F
4
6
–
O
F
F
6. Set the motor type –
A
1
–
4
7. Check the motor direction –
A
2
–
O
N
For motor 2, Press and hold
.
The gate should open, if not reverse the motor cables for motor 2
(Connections
M2
,
N2
). Leave the gate in the halfway position.
For motor 1, Press and hold
. The gate should open, if not reverse the motor cables for motor 1
(Connections
M1
,
N1
). Leave the gate in the halfway position.
8. Set the ATS microswitch end stops.
Turn off the encoder –
F
1
1
–
O
F
F
Unlock both motors on the manual release
Set both gates to their closed positions
Set command 2-7 to close only -
F
7
–
3
For each gate motor complete the following steps
Send a closing command pulse using a link wire between terminal 2 & 7.
While the motor is running, turn the rod marked C
anticlockwise until the motor stops running.
Set both gates to their open positions
Set command 2-7 to open only -
F
7
–
2
For each gate motor complete the following steps
Send an opening command pulse using a link wire between terminal 2 & 7.
While the motor is running, turn the rod marked A
clockwise until the motor stops running.
Note. 20 complete turns of the rod is equal to 10mm of movement of the micro switch. By default the motor run time is set to 120s, if the motor times out before
the micro switch has been reached an additional command will need to be sent to start the motor running again so that the micro switch setup can be completed.
Lock both motors on the manual release
Set command 2-7 to step-step -
F
7
–
0
Turn on the encoder –
F
1
1
–
O
N
9. Setup the encoder –
A
3
–
O
N
The Gates will now perform a close and open cycle.
10. Exit the programming using the
button.
11. Check the gate operation by pulsing across connections 2 & 7, the gate will close.
Important!
The installation must be carried out
by skilled and qualified personnel
Should the gates not operate as suggested above,
call CAME helpline
0115 921 0430
for technical support.
Safety inputs should now be configured and the gate force tested as required.
Please refer to the full manual to complete the commissioning.
button - used to perform the following operations:
• Exit the menu • Delete the changes • Go back to the previous screen
buttons - used to perform the following operations:
• Navigate the menu • Increase or decrease values
button - used to perform the following operations
• Access menus • Confi rm a choice
1
2
3
1
2
3
11
commissioning
via panel
Should the transmitter not operate as suggested above,
call CAME helpline
0115 921 0430
for technical support.
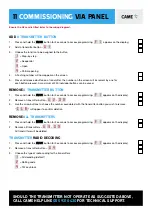
add
a transmitter button
1.
Press and hold the
button for 2 seconds to access programming. (
F
1
appears on the display).
2.
Add a transmitter button -
U
1
3.
Choose the function to be assigned to the button
1
= Step-by-step
2
= Sequential
3
= Open
4
= Partial opening
4.
A fl ashing number will now appear on the screen.
5.
Press and release a button on a transmitter, the number on the screen will increment by one for
each button pressed. A maximum of 250 individual buttons can be saved.
remove
a transmitter button
1.
Press and hold the
button for 2 seconds to access programming. (
F
1
appears on the display).
2.
Remove a transmitter button -
U
2
–
O
N
3.
Use the arrow buttons to choose the number associated with the transmitter button you wish to remove.
“
C
L
R
” will appear to confi rm deletion
remove
all transmitters
1.
Press and hold the
button for 2 seconds to access programming. (
F
1
appears on the display).
2.
Remove all transmitters –
U
3
–
O
N
All transmitters will be deleted.
transmitter
radio decoding
1.
Press and hold the
button for 2 seconds to access programming. (
F
1
appears on the display).
2.
Remove a transmitter button –
U
4
3.
Choose the type of radio coding for the transmitters
1
= All decoding (default)
2
= Rolling code
4
= TW key block
Ensure the AF card is fi tted (refer to the wiring diagram).

