background image

ON   

OFF 


/.

ON

2

1

3

4

5

6

7

8

9 10

ORIES

F

+

 RUN S. 

-

+

 SLOW S. 

-

+

 RUN V. 

-

+

 SLOW V. 

-

+

 A.C.T. 

-

+

 PAR.OP. 

-

ZN

ON

2

1

3

4

5

6

7

8

9 10

+

 RUN S. 

-

+

 SLOW S. 

-

V. 

-

+

 A.C.T. 

-

+

 PAR.OP. 

-

2

3

4

5

6

7

8

9 10

PROG.

RIES

F

C. BOARD

FUSE

1A-F

ZN

CONTROL BO

ON

2

1

3

4

5

6

7

8

9 10

PROG

p. 

1717

 - 

M

an

u

al

 c

od

e:  

11

9

B

F

0

3

11

9

B

F

0

3

 ve

r.


2

 04/2

0

14

 © 0

9

/2

0

10 © C

A

M

E c

an

ce

lli

 A

uto

m

ati

ci

 S

.p.

A

. - T

h

e d

ata a

n

d i

nf

or

m

ati

on i

n th

is

 m

an

u

al

 m

ay b

e c

h

an

g

ed at a

ny ti

m

e a

n

d w

ith

ou

t o

b

lig

ati

on o

n th

e p

art of C

am

e C

an

ce

lli

 A

uto

m

ati

ci

 S

.p.a. to n

otify s

ai

d c

h

an

g

es.

ENGLISH

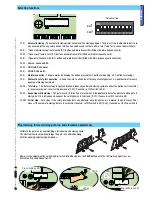
1 ON - 

Automatic closing  

- The automatic closing timer activates at the closing endpoint.  The pre-set time is adjustable, but it's in 

any case subject to any safety device intervention and does not activate after a total "stop" or in case of power failure.

2 ON -  "Open-stop-close-stop"feature with (2-7) button and radio transmitter (fi tted with radio frequency card).

2 OFF -  "Open-close"feature with (2-7) button and radio transmitter (fi tted with radio frequency card).

3 ON -  "Open-only" 

feature 

 with (2-7) button and radio transmitter (fi tted with radio frequency card activated). 

4 OFF -  Unused. 

Leave on OFF. 

.

5 OFF -  With the

BX-243 motor 

.

5 ON -  With 

BX-246 motor

.

6 ON - 

Maintained action

 - The gate works by keeping the button pressed(a 2-3 button for opening, a 2-7 button for closing). 

7 ON - 

Photocells safety-test operation 

 - Allows the card to check the efficiency of safety devices (i.e. photocells) after every 

opening or closing command .

8 OFF - 

Total stop

 - - This feature stops the gate and then excludes any automatic closing cycle; use either the buttons or transmitter 

to resume movement. Insert safety device on [1-C2]; if unused, set DIP switch to ON.

9 OFF - 

Reopening while closing

 - The gate inverts its direction of movement, if the photocells detect an obstacle when gate is 

closing, until it is fully opened; connect the safety device to terminals [2-C1] ; if unused, set DIP switch to ON.

10 OFF - 

Partial stop

 - Gate stops if the safety device detects any obstacle; once the obstacle is removed, the gate stays still or 

closes if the automatic closing feature is activated. if unused, set DIP switch to ON [2-C3]; if unused, set the Dip-switch to 
.

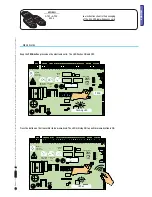
Default setting

Calibrate the gate run by commanding a full opening and closing cycle. 
The electronic card automatically logs the gate run calibration along 
with the opening and closing slowdowns. 

Memorise the adjustment by switching Dip-switch 

6 to ON

and press the 

PROG button 

until the LED warning light stays on. 

Switch the Dip-switch back to OFF.

LED on

Dip-switch 6 on ON

Dip-switch 6 on OFF

Selecting functions

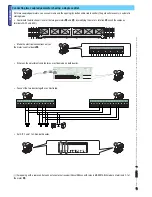
Programming for memorising gate-run and slowdown adjustments 

Summary of Contents for BX-246V

Page 1: ...INSTALLATION MANUAL BX 246V SLIDING GATES OPERATORS English EN 119BF03EN ...

Page 2: ... no vegetation in the area of operation of the photocells and that there are no obstacles in the area of operation of the operator Do not allow children to play with the fixed command devices or in the gate s area of operation Keep any remote control devices i e transmitters or any control devices away from children as well to prevent the operator from being activated accidentally The operator is n...

Page 3: ...s built partly with cast aluminium inside of which operates an irreversible electro mechanical gearmotor and partly with an ABS plastic coating inside of which there is an electronic card with a transformerand the two emergency batteries housing bracket Came Cancelli Automatici employs an ISO 9001 certified quality management system and an ISO 14001 environmental management system Came engineers a...

Page 4: ...stall do the following Make sure the gate is stable and that the castor wheels are properly greased and in good working order The floor guide must be well fastened to the ground completely on the surface and free of any irregularities that may obstruct the gate movement The upper guide sleds must not cause friction Make sure there are opening and closing strike plates Make sure that the point wher...

Page 5: ...al ones the dimensions shown on the table must be reconsidered according to the total draw and actual distances When connecting products not featured in this manual only refer to the literature accompanying such products 5 3 Cable types and minimum thickness Connection for Cable type Cable length 1 10 m Cable length 10 20 m Cable length 20 30 m 230 V power supply to control panel FROR CEI 20 22 CE...

Page 6: ... space for securing the operator and accessories varies depending on the overall measurements It is up to the installer to choose the most suited solution Junction pit box Fastening the plate and fitting the operator Tubes for electrical cables to pass through Set up the anchoring plate by threading the bolts and tightening them with the supplied nuts and washers Extract the pre shaped brackets usi...

Page 7: ...late with respect to the rack see and follow the instructions in the drawing Fill the wooden form with concrete and wait at least 24 hrs for it to solidify Remove the wooden frame use earth to fill the pit around the cement block Unscrew the washers and nuts from the bolts The anchoring plate must be free of any debris perfectly level and with the bolt threads completely emerged from the surface In...

Page 8: ...anchoring base by between 5 and 10 mm by turning the threaded steel feet to allow room any later adjustments between pinion and rack The following illustrations for fastening the rack are just applicative examples It is up to the installer to choose the most suitable solution Release the gearmotor see paragraph on manual release Rest the rack onto the gearmotor pinion Either weld or fasten the rac...

Page 9: ...close the gate and adjust the distance of the pinion rack coupling by acting on the threaded steel feet vertical adjustments and the slots horizontal adjustments This helps prevent the weight of the gate from bearing down on the operator Once adjustments are complete fasten the assembly with nuts an bolts Add and fasten the cover after adjustments and electronic settings on card are both complete ...

Page 10: ...armotor Insert the key into the lock and turn it clockwise Fastening the endstop strips Position the endstop tabs onto the rack and fasten them with the 3 mm Allen wrench key Their position marks the limit of the gate runs Note avoid that the gate strikes the mechanical stop whether when closing or opening Mechanical stop WARNING opening the release door prevents the motor from working Trilobed ke...

Page 11: ...uded for movement to resume press the command button or use the transmitter All connections are protected by quick fuses see table The card handles the following functions automatic closing after an opening command obstacle detections when gate is not moving at any point constantly checks proper photocell operation opening closing opening closing with maintained action Partial opening total stop A...

Page 12: ... changes Electrical connections Gearmotor endstop and encoder 1 Power source terminals 2 Endstop terminals 3 Motor terminals 4 Encoder terminals 5 Accessories fuse 6 Card fuse 7 radio code memorisation button 8 Radio code notification LED light 9 120V power supply LED warning light 10 Control and notification LED warning light 11 Features selector switch 12 Radio frequency card connector 13 Termin...

Page 13: ...ontact Gate stop button Excludes automatic closing To resume movement press the command button or transmitter key Key switch selector and or command button N O contact Gate opening and closing command Pressing the button or turning the key switch selector the gate inverts its movement or stops depending on selection made on the DIP switches see selecting functions DIP switches 2 3 Key switch selec...

Page 14: ... while closing N C Contact Input for safety devices like photocells compliant with law EN 12978 While the gate is closing opening the contact will invert movement until it is fully opened N C partial stop contact Input for safety devices like photocells compliant with law EN 12978 Stops gate if it is moving and then automatically closes it if this function is selected DIR DELTAS photocells DIR DEL...

Page 15: ...2978 law While the gate is opening opening the contact will invert movement until it is fully closed if unused short circuit contact 2 C8 DF with control card for DFI con nections With each opening and closing command the card checks the efficiency of the photocells Any anomalies in the photocells are notified by the flashing PROG LED on the control panel and cancels any other command from the radio...

Page 16: ...orce exceeds the adjusted level the system intervenes and inverts the direction of travel SLOW V Adjusts the gate s endpoint slowdown speed when closing and opening RUN V Adjusts the gate s moving speed when opening and closing Function of the LED control warning light and command and safety devices 1 Red LED Normally not lit up Warns that the TOTAL STOP button has been engaged C1 Yellow LED warni...

Page 17: ...on pressed a 2 3 button for opening a 2 7 button for closing 7 ON Photocells safety test operation Allows the card to check the efficiency of safety devices i e photocells after every opening or closing command 8 OFF Total stop This feature stops the gate and then excludes any automatic closing cycle use either the buttons or transmitter to resume movement Insert safety device on 1 C2 if unused se...

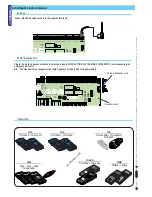
Page 18: ...432 T434 T438 TAM 432SA CAME CAME CAME TOUCH TCH 4024 TCH 4048 TWIN TWIN2 TWIN4 ENGLISH p 18 18 Manual code 119BF03 119BF03 ver 2 04 2014 09 2010 CAME cancelli Automatici S p A The data and information in this manual may be changed at any time and without obligation on the part of Came Cancelli Automatici S p a to notify said changes Connect the RG58 antenna cable to the apposite terminals Antenna...

Page 19: ... RUN V SLOW V A C T PAR OP ZN5 CONTROL BOARD PWR 1 C1 C3 C6 C7 ON 2 1 3 4 5 6 7 8 9 10 PROG M N L2T L1T L N 0 17 26 10 11 E1 1 2 3P 5 7 2 C1 C3 C7 C8 TS E FC FA F PROG ATOMO AT01 AT02 AT04 CAME CAME CAME p 19 19 Manual code 119BF03 119BF03 ver 2 04 2014 09 2010 CAME cancelli Automatici S p A The data and information in this manual may be changed at any time and without obligation on the part of Ca...

Page 20: ...l close only in automatic closing mode Coordinate the direction of travel of the two gearmotors and by modifying the motor s rotation invert the cables on terminals FA FC and M N Make the electrical connections only on the motor s control board Connecting two coupled gearmotors having a single control Whereas the adjustments and features must be made on both boards Connect the two boards together ...

Page 21: ...wrongful or unreasonable use Work well away from the gate hinges or mechanical moving parts Stay out of the working range of the moving operator Do not oppose the movement of the operator as this may result in danger Do not allow children to play to loiter within the working range of the operator Keep transmitters and any other command devices away from children to prevent the operator from being ...

Page 22: ...tly damp cloth and do not use any solvents or other chemical products that may ruin the device Lubricate all joints with grease any time strange vibrations or noises are manifested as shown below Check that there is not vegetation within range of the photocells and that no objects interfere with the operation of the automated device PROBLEMS POSSIBLE CAUSES CHECKS AND FIXES The gate neither opens ...

Page 23: ...pliance with the UNI EN ISO 14001 standard to ensure environmental protection Please help us to safeguard the environment At CAME we believe this to be one of the fundamentals of ours market operations and development strategies Just follow these short disposal instructions DISPOSING OF THE PACKAGING The components of the packaging i e cardboard plastic etc are solid urban waste and may be dispose...

Page 24: ...matie over het bedrijf de producten en hulp in uw eigen taal PT Para toda e qualquer informação acerca da empresa de produtos e assistência técnica em sua língua PL Wszystkie inne informacje dotyczące firmy produktów oraz usług i pomocy technicznej w Waszym języku znajdują się na stronie RU Для получения дополнительной информации о компании продукции и сервисной поддержке на вашем языке HU A vállal...

Reviews: