background image

Pa

g.


55

  - 

Ma

nu

al

FA

0

1

1

9

8

M

0

6

 - 0

6

/2

0

18 - © C

A

M

E S

.p

.A

. -  I co

nt

enut

i d

el manu

ale s

on

o d

a r

itener

si su

sc

et

tibili di mo

di

fica in q

u

alsiasi momen

to sen

za

 o

b

b

lig

o di p

rea

vv

is

o. - 

Tr

adu

zio

ne d

elle ist

ru

zio

ni o

riginali

1

2

3

512

128

165

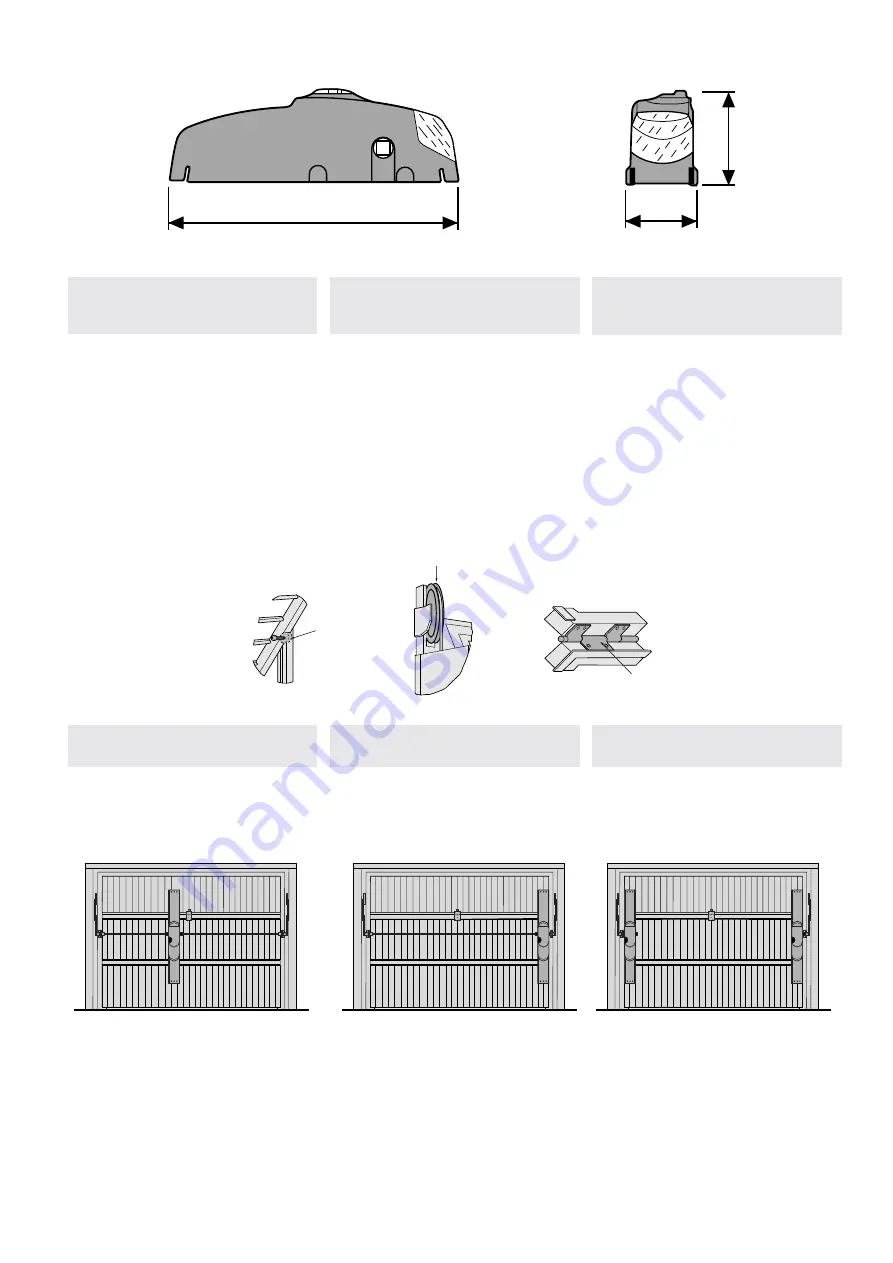
MISURE D’INGOMBRO

OVERALL DIMENSIONS

DIMENSIONES MÁXIMAS

TIPOS DE APLICACIÓN

APPLICATION TYPES

TIPI DI APPLICAZIONE

A

PPLICAZIONE


CENTRALE

C

ENTRAL


APPLICATION

A

PLICATIÓN


CENTRAL

A

PPLICAZIONE


LATERALE

L

ATERAL


APPLICATION

A

PLICATIÓN


LATERAL

A

PPLICAZIONE


LATERALE


CON


DUE


MOTORI

L

ATERAL


APPLICATION


WITH


TWO


MOTORS

A

PLICATIÓN


LATERAL


CON


DOS


MOTORES

PRIMA DI PROCEDERE

 ALL’INSTALLAZIONE, CONTROLLARE:

- che il movimento della porta sia uniforme lungo tutta 
la corsa evitando attriti o giochi tra cuscinetti di scor-
rimento (1) e carrucole (2);
- che la struttura della porta basculante sia ade-
guatamente robusta e le cerniere (3) siano effi

  cienti

(basculante snodata);
- il percorso dei cavi elettrici, secondo le disposizioni di 
comando e sicurezza (vedi Impianto tipo).

BEFORE  INSTALLING, CHECK:

- the movement of the door is smooth from the fully-
open to the fully closed positions, with no friction or play 
between the bearings (1) and pulleys (2);
- the door itself must be suffi

  ciently solid and the hinges 

(3) must be effi

  cient (articulated overhead door);

- the electrical wiring path according to the position
of the control and safety instructions (see Standard
installation)

ANTES DE COMENZAR LA INSTALACIÓN CONTROLE:

- que el movimiento de la puerta sea uniforme a lo largo 
de toda la carrera, evitando roces o juegos entre los
cojinetes de deslizamiento (1) y las poleas (2);
- que la estructura de la puerta basculante sea sufi cien-
temente fuerte y que las bisagras (3) sean adecuadas
(basculante articulada);
- que el recorrido de los cables eléctricos responda a
las disposiciones de mando y seguridad (véase Insta-
lación estándar).

L

A


SEGUENTE


PROCEDURA


DI


MONTAGGIO


RIGUARDA


UNA


PORTA


BA

-

SCULANTE


A


CONTRAPPESI

 (H 

FINO


A

 2,4 

M

AVENTE


SPAZIO


UTILE


TRA


BRACCIO


PORTA


E


CARTER


DEL


CONTRAPPESO


DI


ALMENO

 15 

MM

CON


MOTORE


APPLICATO


CENTRALMENTE


E


BRACCIO

 E785A. 

P

ER


ALTRI


TIPI


DI


PORTE

VEDERE


ANCHE


ALLE


PAGINE


DA

 17 

A

 21

L

A


SE

T

HE


FOLLOWING


ASSEMBLY


PROCEDURE


REGARDS


A


COUN

-

TERWEIGHTED


MOBILE


DOOR

 (H 

UP


TO

 2.4 

M

WITH


USEFUL


SPACE


BETWEEN


DOOR


ARM


AND


COUNTERWEIGHT


CASING


OF


AT

LEAST

 15 

MM

WITH


CENTRALLY

-

APPLIED


MOTOR


AND

 E785A 

ARM

. F

OR


OTHER


TYPES


OF


DOORS

PLEASE


ALSO


REFER


TO


PAGES


FROM

 17 

TO

 21

E

L


SIGUIENTE


PROCEDIMIENTO


DE


MONTAJE


SE


REFIERE


A


UNA


PUERTA


BASCULANTE


CON


CONTRAPESOS

 (H 

HASTA

 2,4 

M

CON


ESPACIO


ÚTIL


ENTRE


BRAZO


PUERTA


Y


CÁRTER


DEL


CONTRAPESO

DE

 15 

MM


COMO


MÍNIMO

CON


MOTOR


APLICADO


EN


POSICIÓN


CENTRAL


Y


BRAZO

 E785A. P

ARA


OTROS


TIPOS


DE


PUERTAS

VÉANSE


LAS


PÁGINAS


DESDE

 17 

A

 21

Pa

g.


55

  - 

Ma

nu

al

FA

0

1

1

9

8

M

0

6

 - 0

6

/2

0

18 - © C

A

M

E S

.p

.A

. -  I co

nt

enut

i d

el manu

ale s

on

o d

a r

itener

si su

sc

et

tibili di mo

di

fica in q

u

alsiasi momen

to sen

za

 o

b

b

lig

o di p

rea

vv

is

o. - I

st

ru

zio

ni o

riginali

Summary of Contents for EMEGA E306

Page 1: ...FA01198M06 IT Italiano EN English ES Espa ol Automatizaciones para puertas de garaje Automazioni per porte garage Operators for garage doors E306 E456 E1024...

Page 2: ...alimentazione motore 2x1 5 mm2 no a 20 m 2x2 5 mm2 no a 30 m 1 EMEGA unit 2 Control panel 3 Radio receiver 4 Key operated selector switch 5 Internal pushbutton array 6 Antenna 7 Flashing light indicat...

Page 3: ...ata con fori di predisposizione per il ssaggio del gruppo motore e del quadro ZE5 per il passaggio del cordino di sblocco V121 e dei cavi di alimentazione Confezione di accessori per rinvio laterale C...

Page 4: ...x del cable de conexi n 5 m Cuadro de mandos para E1024 contado en posici n central o lateral Cuadro de mandos para dos E1024 monta dos en posici n lateral Caracter sticas t cnicas Motorreductor alim...

Page 5: ...nstructions see Standard installation ANTES DE COMENZAR LA INSTALACI N CONTROLE que el movimiento de la puerta sea uniforme a lo largo de toda la carrera evitando roces o juegos entre los cojinetes de...

Page 6: ...th bolts or rivets and saw off any excess length Baje completamente la hoja hasta que la distancia entre el eje inferior del brazo de la puerta y la hoja sea de 110 mm Coloque la base gu a con la echa...

Page 7: ...o the door arm and fasten with screw or by welding see g 5 Application of the E 787A long tube for doors with heights of 2400 to 2700 mm For installation of the long tube too the tube should be trimme...

Page 8: ...10 mm shorter than the distances L 1 and L2 i e the distance between the face of the bushing and the edge of the motor drive shaft Lubricate the arm and insert into the tube Connect the tube to the bu...

Page 9: ...i grani di ssaggio g 9 ed estrarre la manopola di sblocco Remove the screw and washer from the shaft and t the release knob Rotate the release knob in order to release the motor as shown in g 8 this f...

Page 10: ...STALLAZIONE LATERALE DI DUE MOTORI NOTA PARA LA INSTALACI N LATERAL DE DOS MOTORES Le fasi sono uguali a quelle descritte per l installazione centrale con le sole differenze seguenti applicare le due...

Page 11: ...nd Tierra 10 E3 Lampada illuminazione ambiente Area illumination light L mpara de alumbrado ambiente M N Collegamento motori Motors connection Conexi n motores R RC Microinterruttori di rallentamento...

Page 12: ...ointerruptor Microinteruttore Microswicht Microinterruptor Camma esterna per il rallentamento External aecerelation Leva exterior para a la decelerati n Camma per lo stop in apertura Cam for stop cuti...

Page 13: ...applicato lateralmente il peso del motore viene ripartito in circa 1 3 sul contrappeso del lato motore e 2 3 su quello opposto due motori applicati lateralmente incrementare un contrappeso del peso d...

Page 14: ...he wiring and perform the necessary adjustments Note for lateral installation with one or two motors refer to page 11 Instale la base gu a E001 y el estribo de anclaje tal como muestra la g 1 respetan...

Page 15: ...G GUIDE OF AT LEAST 25 MM AND CENTRALLY MOUNTED MOTOR Instale la base gu a E001 y el estribo de anclaje tal como muestra la g 1 respetando las medidas de la tab 1 Instale el motor y las transmisiones...

Page 16: ...re e i rinvii come da pag 7 e i bracci telescopici curvi E786A Installare gli accessori di rinvio E781A il tubo di tra smissione E782A e procedere ai collegamenti elettrici e alle regolazioni Nota per...

Page 17: ...aight telescopic arms E785A Fit the E781A and E782A Connect up the wiring and perform the necessary adjustments Note for lateral installation with one or two motors refer to page 11 Instale la base gu...

Page 18: ...motor and the transmission system as shown on page 7 and t the straight telescopic arms E785A Connect up the wiring and perform the necessary adjustments Note for lateral installation with two motors...

Page 19: ...R ckstellfeder Resorte de retorno Manopola di sblocco Release knob Bouton de d blocage Entriegelungshebel Pomo de desbloqueo Vite fissaggio cavo sblocco Release cable anchor bolt Vis de fixation du c...

Page 20: ...rectivas y con las partes aplicables de las Normativas de referencia que se indican a continuaci n DIRECTIVA DE M QUINAS 98 37 CE 98 79 CE DIRECTIVA DE BAJA TENSI N 73 23 CEE 93 68 CEE DIRECTIVA DE CO...

Page 21: ...FA01198M06 FR Fran ais DE Deutsch NL Automatismes pour portes de garage Schiebetor antriebe E306 E456 E1024 Automatiseringen voor garagepoorten Nederlands...

Page 22: ...sselschalter 5 Schalteinheit f r Innenmontage 6 Antenne 7 Blinkleuchte Tor in Bewegung 8 Lichtschranken 9 Entriegelungssystem 10 Infrarot Sicherheitsleiste F r E1024 Anschlu kabel Mikroschalter 4x1 m...

Page 23: ...Befestigung der Motoreinheit und der Steuerung ZE5 zum Durchf hren vom Entriegelungsseilzug V121 und der Stromkabel Zubeh rpaket f r seitliche Vorgelege Bei zentral montiertem Motor sind 2 Montageset...

Page 24: ...orte longueur max du c ble de branchement 5 m Tableau de commande pour E1024 mont au centre ou sur le c t Tableau de commande pour deux E1024 mont s sur le c t Caract ristiques techniques Motor ducteu...

Page 25: ...A POUR LES AUTRES TYPES DE PORTE VOIR GALEMENT DE LA PAGE 17 LA PAGE 21 IM FOLGENDEN WIRD DIE MONTAGE EINES SCHWINGTORS MIT GEGENGEWICHTEN H BIS ZU 2 4 M BESCHRIEBEN DER NUTZ BARE RAUM ZWISCHEN DEM TO...

Page 26: ...ge plaat F hrungsschienen Basis Axe inf bras de la porte Center van de poort Untere Achse Toram Exc dent Overtollig berma APPLICATION DE LA BASE DE GUIDAGE E001 MONTAGE DER F HRUNGSSCHIENEN BASIS E001...

Page 27: ...festigen oder fest anschwei en Abb 5 Montage des Verl ngerungsrohres E 787A f r Tore mit einer H he zwischen 2400 und 2700 mm F r die Montage ebenfalls das Ma B abmessen und das Rohr um 30 mm k rzen M...

Page 28: ...chmieren und in die Vorgelege einsetzen Das Antriebsrohr so abschneiden da es 10 mm k r zer als die Abst nde L1 und L2 ist Abstand zwischen Buchsenpro l und Motorwellenpro l Arm schmieren und in das R...

Page 29: ...die an der Welle be ndliche Schraube entfernen Den Entriegelungsgriff einsetzen und dazu den Motor wie auf Abb 8 durch Drehen ent riegeln erleichtert den Anschlu von Vierkantwelle Transmissionsrohr Ar...

Page 30: ...proc dure est la m me que celle d crite plus haut sauf en ce qui concerne les op rations suivantes monter la base de guidage en la superposant au montant vertical du vantail utiliser un kit E781A et l...

Page 31: ...RMOIRE ZL170 ZL19A ELEKTRISCHE ANSCHL SSE AN DIE STEUERUNG ZL170 ZL19A ELEKTRISCHE AANSLUITING OP DE STUURKASTEN ZL170 ZL19A F Fa Branchement interrupteur de n de course Aansluiting eindeloop Anschlu...

Page 32: ...p in ffnungsphase R GLAGE DU MICROINTERRUPTEUR D ARR T EN FERMETURE EINSTELLUNG DES MIKROSCHALTERS F R DEN STOP BEIM SCHLIESSEN REGELING VAN DE MICROSWITCH BIJ OPENEN REGELING VAN DE EINDELOOP BIJ SLU...

Page 33: ...i de la fa on suivante peu pr s 1 3 sur le contre poids du c t moteur et 2 3 sur l autre contrepoids Deux moteurs mont s sur le c t ajouter le poids d un moteur un contrepoids m me chose pour le secon...

Page 34: ...bei seitlicher Installation von ein oder zwei Motoren siehe Seite 11 Wenn Z 800 mu E784 auf 400 mm verk rzt werden Si Z 800 E784 doit tre raccourci 400 mm Charniere Scharnier Oberes Scharnier Etrier d...

Page 35: ...oder zwei Motoren siehe Seite 11 SCHWINGTOR MIT GEGENGEWICHTEN ODER FEDERN MIT LAGERSCHIENE VON MINDESTENS 25 MM UND ZENTRAL INSTALLIERTEM MOTOR Tav 1 Etrier de xation Bevestigingsbeugel Verenkerungs...

Page 36: ...insi que les r glages N B voir la page 11 pour le montage lat ral d un ou de deux moteurs Die F hrungsschienen Basis E001 gem Abb 1 montieren und dabei die auf Tafel 1 angegebenen Ma e beachten Den Mo...

Page 37: ...ingtor mit Gegengewichten und zentral installiertem Motor Die F hrungsschienen Basis E001 gem Abb 1 montieren und dabei die aus Tafel 1 angegebenen Ma e beachten Den Motor und die Vorgelege wie auf Se...

Page 38: ...comme indiqu plus haut pour le montage lat ral de deux moteurs Die F hrungsschienen Basis E001 gem Abb 1 montieren und dabei die auf Tafel 1 angegebenen Ma e beachten Den Motor und die Vorgelege wie a...

Page 39: ...eo VER EMEGA Molla di ritorno Retun spring Ressort de retour R ckstellfeder Resorte de retorno Manopola di sblocco Release knob Bouton de d blocage Entriegelungshebel Pomo de desbloqueo Vite fissaggio...

Page 40: ...orm de essenti le vereisten en de pertinente voorschriften zijn vastgesteld door onderstaande Richtlijnen en door de toepasbare delen van het verwijzend Normenstelsel die vervolgens worden vermeld MAC...

Reviews: