background image

45

DMX

DEUTSCH

FRANCAIS

ESP

AÑOL

ENGLISH

IT

ALIANO

POLSKI

5

6

RÉGLAGE DE LA LAMPE

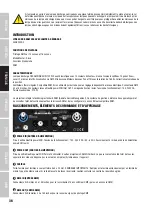
Remarques importantes : 

Le réglage de la lampe ne peut être réalisé que par un professionnel qualifié. Sans la qualification requise, n’essayez pas de 

régler vous-même la lampe mais faites appel à une entreprise professionnelle.

Une lampe à décharge chaude est soumise à une pression élevée et peut donc exploser spontanément. Laissez refroidir le 

projecteur au moins 30 minutes avant de l’ouvrir.

Lors du réglage de la lampe, portez des lunettes de protection ainsi que des gants de protection ; n’utilisez jamais le projecteur 

sans le cache de protection de la lampe ni le cache de protection de la tête.

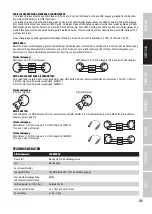
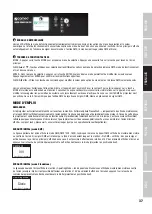
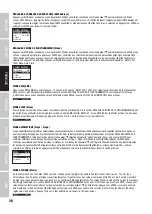
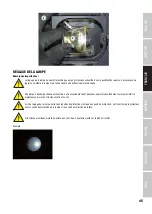
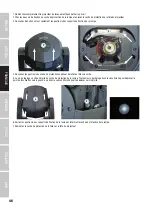
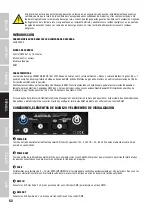
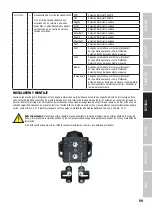
Si le faisceau lumineux projeté ne pointe pas au milieu, il peut être ajusté sur le plan horizontal.

Exemple :

Summary of Contents for AURO BEAM 200 DC

Page 1: ...USER S MANUAL BEDIENUNGSANLEITUNG MANUEL D UTILISATION MANUAL DE USUARIO INSTRUKCJA OBSŁUGI MANUALE D USO AURO BEAM 200 DC BEAM MOVING HEAD WITH OSRAM SIRIUS 132 W DISCHARGE LAMP CLAB200DC ...

Page 2: ...DE LA LAMPE 44 45 RÉGLAGE DE LA LAMPE 45 46 TECHNOLOGIE DMX 47 CARACTÉRISTIQUES TECHNIQUES 48 DÉCLARATIONS DU FABRICANT 49 ESPAÑOL MEDIDAS DE SEGURIDAD 50 52 INTRODUCCIÓN 52 CONEXIONES ELEMENTOS DE MANEJO Y ELEMENTOS DE VISUALIZACIÓN 52 53 FUNCIONAMIENTO 53 59 INSTALACIÓN Y MONTAJE 59 CAMBIO DE LA LÁMPARA 60 61 AJUSTE DE LA LÁMPARA 61 62 TECNOLOGÍA DMX 63 DATOS TÉCNICOS 64 65 DECLARACIONES DEL FAB...

Page 3: ...tive ground of a power cord 23 If the equipment has been exposed to strong fluctuations in temperature for example after transport do not switch it on immediately Moisture and condensation could damage the equipment Do not switch on the equipment until it has reached room temperature 24 Before connecting the equipment to the power outlet first verify that the mains voltage and frequency match the ...

Page 4: ...ensitive people People with epilepsy should definitely avoid places where strobes are used SAFETY INSTRUCTIONS FOR DISCHARGE LAMPS An exposed discharge lamp can cause eye and skin damage Discharge lamps emit infrared and UV radiation which is not visible to the eye but is harmful Do not expose eyes and skin to discharge lamps Do not aim the spotlight at people or animals Do not use the spotlight i...

Page 5: ...t features the RDM standard remote device management Remote device management allows the user to view status and configuration of RDM terminals via an RDM capable controller CONNECTIONS OPERATING AND DISPLAY ELEMENTS 1 POWER IN Neutrik powerCON mains input socket Operating voltage 100 240 V AC 50 60Hz Connection via the supplied PowerCON mains coble 2 POWER OUT Neutrik powerCON mains output socket...

Page 6: ...reason even if a DMX signal is present at the DMX input the display shows that no DMX signal is present OPERATION TIPS When the spotlight is correctly connected to the mains the following message is displayed during the boot process and the motor reset process Software Update Please Wait only for service purposes and the Cameo logo appears in the display After this process the spotlight is ready f...

Page 7: ...aster unit same model with a DMX cable Master DMX OUT Slave DMX IN and enable one of the standalone modes on the master unit Auto or Static Now the slave unit will follow the master unit Mode Slave AUTO MODE Prog 1 Prog 4 Each of the 2 available auto programmes consist of a sequence of pre configured colour change gobo change and motion sequences Selection of Auto mode is as described previously i...

Page 8: ...Colour colour wheel 000 005 Open 006 011 Open Deep Red 012 017 Deep Red 018 023 Deep Red Medium Blue 024 029 Medium Blue 030 035 Medium Blue Yellow 036 041 Yellow 042 047 Yellow Magenta 048 053 Magenta 054 059 Magenta Deep Green 060 065 Deep Green 066 071 Deep Green Lavender 072 077 Lavender 078 083 Lavender Peacock 084 089 Peacock 090 095 Peacock Orange 096 101 Orange 102 107 Orange Lime 108 113 ...

Page 9: ...slow fast 138 143 Gobo 8 shake slow fast 144 149 Gobo 9 shake slow fast 150 155 Gobo 10 shake slow fast 156 161 Gobo 11 shake slow fast 162 167 Gobo 12 shake slow fast 168 173 Gobo 13 shake slow fast 174 179 Gobo 14 shake slow fast 180 192 Open 193 223 Gobo wheel rot Slow Fast CW 224 224 Gobo wheel rot Stop 225 255 Gobo wheel rot Fast Slow CCW Focus 000 255 0 to 100 Prism 1 linear 000 005 Prism 1 ...

Page 10: ...amp default Operating status of the discharge lamp after restart of spotlight On Discharge lamp switched on Last Returns to status prior to restart Off Discharge lamp switched off Display Rev Flip display On Rotate display by 180 e g for overhead installation Off No display rotation Display Display lighting On On permanently Off Deactivation after approximately 1 minute of inactivity DMX Fail Oper...

Page 11: ...erating time of spotlight and operating time of lamp plus reset Operating Displays the operating time of the spotlight in hours Xxh Lamp Displays the operating time of the lamp in hours Xxh Lamp Reset Resets the operating time to zero hours after replace ment of the lamp on ENTER Error Info Function error display If a fault is not corrected by a reset or restart the defective unit must be re paire...

Page 12: ...ot have these qualifications do not attempt to perform an installation yourself Refer instead to a qualified professional REPLACING THE LAMP Important Replacement of the lamp may be carried out by qualified personnel only If you do not have these qualifications do not attempt to replace a lamp yourself Refer instead to a qualified professional A hot discharge lamp is under high pressure and can th...

Page 13: ...nd can therefore spontaneously explode Let the lamp cool for at least 30 minutes before opening it When calibrating the light use protective glasses and protective gloves and do not operate the spotlight without the lamp cover and head cover If the hotspot is not in the centre of the projection of the light beam it can be calibrated on the horizontal plane 6 Loosen and remove the two screws on the...

Page 14: ... the four screws of the lamp holder only about one turn 2 3 4 Loosen the four bolts on the upper head cover and remove the cover 5 The calibration screw is located to the right of the lamp cover Turn the calibrating screw clockwise to move the hotspot to the left counter clockwise to move it to the right 4 5 6 Securely tighten the four screws of the lamp holder and close the lamp cover 7 Re instal...

Page 15: ...t DMX device e g DMX Controller 2 Connect the female 3 pin XLR connector of the DMX cable connected to the first projector to the DMX input male 3 pin socket of the next DMX device In the same way connect the DMX output of this device to the DMX input of the next device and repeat until all devices have been connected Please note that as a rule DMX devices are connected in series and connections c...

Page 16: ...programmes 1 4 static mode master slave operation System settings Lamp on off lamp default display reverse display lighting on off DMX fail pan angle pan reverse tilt reverse feedback movement blackout test reset Control DMX512 RDM enabled PAN angle 540 630 TILT angle 270 Operating controls Mode Enter Up Down Left Right Display elements Illuminated colour LC display battery powered for mains indep...

Page 17: ...sustainable economic activity Household users should contact either the retailer where they purchased this product or their local government office for details on where and how they can recycle this item in an environmentally friendly manner Business users should contact their supplier and check the terms and conditions of the purchase contract This product should not be mixed with other commercia...

Page 18: ...ng bitte Kunststoff und Papier bzw Kartonagen voneinander 21 Kunststoffbeutel müssen außer Reichweite von Kindern aufbewahrt werden BEI GERÄTEN MIT NETZANSCHLUSS 22 ACHTUNG Wenn das Netzkabel des Geräts mit einem Schutzkontakt ausgestattet ist muss es an einer Steckdose mit Schutzleiter angeschlossen werden Deaktivieren Sie niemals den Schutzleiter eines Netzkabels 23 Schalten Sie das Gerät nicht ...

Page 19: ...hädigung Nicht in die Lichtquelle blicken VORSICHT WICHTIGE HINWEISE IN BEZUG AUF LICHT PRODUKTE 1 Das Produkt ist für den professionellen Einsatz im Bereich der Veranstaltungstechnik entwickelt worden und ist nicht für die Raumbeleuchtung in Haushalten geeignet 2 Blicken Sie niemals auch nicht kurzzeitig direkt in den Lichtstrahl 3 Blicken Sie niemals mit optischen Geräten wie Vergrößerungsgläser...

Page 20: ...etzkabel 2 POWER OUT Neutrik powerCON Netzausgangsbuchse Dient der Netzversorgung weiterer CAMEO Scheinwerfer Achten Sie darauf dass die gesamte Stromaufnahme aller angeschlossenen Geräte den auf dem Gerät in Ampere A angegebenen Wert nicht überschreitet 3 FUSE Sicherungshalter für 5 x 20mm Feinsicherungen WICHTIGER HINWEIS Ersetzen Sie die Sicherung ausschließlich durch eine Sicherung des gleiche...

Page 21: ...nd wird auch wenn ein DMX Signal am DMX Eingang anliegt im Display angezeigt dass kein DMX Signal anliegt 7 6 BEDIENUNG HINWEISE Sobald der Scheinwerfer korrekt am Stromnetz angeschlossen ist werden während des Startvorgangs und des Motoren Resets nachein ander Software Update Please Wait nur für Servicezwecke und das CAMEO Logo im Display angezeigt Nach diesem Vorgang ist der Scheinwerfer betrieb...

Page 22: ...t Hilfe eines DMX Kabels Master DMX OUT Slave DMX IN und aktivieren in der Master Einheit eine der Standalone Betriebsarten Auto oder Static Nun folgt die Slave Einheit der Master Einheit Mode Slave AUTO BETRIEBSART Prog1 Prog4 Die vier verschiedenen Auto Programme bestehen jeweils aus einer Abfolge fest programmierter Farbwechsel Gobowechsel und Bewegungsabläufen Die Auswahl der Auto Betriebsart ...

Page 23: ...n Colour ColourWheel 000 005 Open 006 011 Open Deep Red 012 017 Deep Red 018 023 Deep Red Medium Blue 024 029 Medium Blue 030 035 Medium Blue Yellow 036 041 Yellow 042 047 Yellow Magenta 048 053 Magenta 054 059 Magenta Deep Green 060 065 Deep Green 066 071 Deep Green Lavender 072 077 Lavender 078 083 Lavender Peacock 084 089 Peacock 090 095 Peackock Orange 096 101 Orange 102 107 Orange Lime 108 11...

Page 24: ... slow fast 138 143 Gobo 8 shake slow fast 144 149 Gobo 9 shake slow fast 150 155 Gobo 10 shake slow fast 156 161 Gobo 11 shake slow fast 162 167 Gobo 12 shake slow fast 168 173 Gobo 13 shake slow fast 174 179 Gobo 14 shake slow fast 180 192 Open 193 223 Gobo Wheel rot Slow Fast CW 224 224 Gobo Wheel rot Stop 225 255 Gobo Wheel rot Fast Slow CCW Focus 000 255 0 to 100 Prism1 linear 000 005 Prism 1 ...

Page 25: ...ine Drehung der Display Anzeige Display Display Beleuchtung On permanent an Off Deaktivierung nach ca 1 Minute Inaktivität DMX Fail Betriebszustand bei DMX Signal Unter brechung Hold letzter Befehl wird gehalten Auto aktiviert Auto Modus Blackout aktiviert Blackout Pan Angle Pan Winkel 630 Pan Winkel 630 540 Pan Winkel 540 Pan Rev Pan Reverse On Umkehrung der Pan Bewegungsrichtung Off keine Umkehr...

Page 26: ... xx 3U01 V1 xx Temperature Temperaturanzeige der Leuchtmit tel Einheit Lamp Temp xxC xxF Temp Unit Celsius Anzeige in Grad Celsius Fahrenheit Anzeige in Grad Fahrenheit Time Info Betriebsdaueranzeige des Scheinwerfers und Betriebsdaueranzeige des Leuchtmittels plus Reset Operating Anzeige der Betriebsdauer des Scheinwerfers in Stunden xxh Lamp Anzeige der Betriebsdauer des Leuchtmittels in Stunden...

Page 27: ...smaterialien und Scheinwerfer Wenn Sie diese Qualifikationen nicht haben versuchen Sie nicht eine Installation selbst durchzuführen sondern nutzen Sie die Hilfe von professionellen Unternehmen B B A A Error Info Funktionsfehleranzeige Falls sich ein Funktionsfehler durch einen Reset oder Neustart nicht beheben lässt muss die defekte Einheit von einem autorisierten Servicezentrum repariert werden P...

Page 28: ...kühlen bevor Sie ihn öffnen Verwenden Sie als Ersatzleuchtmittel ausschließlich das im Datenblatt angegebene Modell Berühren Sie den Glaskolben des Leuchtmittels nicht mit bloßen Fingern die Lampe muss tadellos sauber sein Verwenden Sie beim Austauschen des Leuchtmittels Schutzbrille und Schutzhandschuhe 1 Trennen Sie den Scheinwerfer allpolig vom Stromnetz Stecker ziehen 2 Entfernen Sie die beide...

Page 29: ... Minuten abkühlen bevor Sie ihn öffnen Verwenden Sie beim Justieren des Leuchtmittels Schutzbrille und Schutzhandschuhe und betreiben Sie den Scheinwerfer nicht ohne Lampenabdeckung und Kopfabdeckung Falls der Hotspot in der Projektion des Lichtstrahls nicht in der Mitte liegt kann auf der horizontalen Ebene nachjustiert werden Beispiel 5 6 5 Die Lampe kann nun aus der Halterung genommen werden 6 ...

Page 30: ...e DMX Datenübertragung erfolgt stets als serieller Datenstrom der über die an jedem DMX fähigen Gerät vorhandenen DMX IN und DMX OUT Anschlüsse XLR Steckverbinder von einem angeschlossenen Gerät an das nächste weitergeleitet wird wobei die maximale Anzahl der Geräte 32 nicht überschreiten darf Das letzte Gerät der Kette ist mit einem Abschlussstecker Terminator zu bestücken DMX VERBINDUNG DMX ist ...

Page 31: ...it dem XLR Steckergehäuse in Kontakt kommt Hat die Abschirmung Massekontakt kann dies zu Systemfehlern führen Steckerbelegung DMX Kabel mit 3 Pol XLR Steckern DMX Kabel mit 5 Pol XLR Steckern Pin 4 und 5 sind nicht belegt Shield 2 3 1 2 3 1 1 2 3 4 5 1 2 3 4 5 Shield DMX ABSCHLUSSSTECKER TERMINATOR Um Systemfehler zu vermeiden ist das letzte Gerät einer DMX Kette mit einem Abschlusswiderstand zu b...

Page 32: ... Dieses Produkt darf nicht zusammen mit anderen gewerblichen Abfällen entsorgt werden Abstrahlwinkel 3 DMX Eingang 3 Pol XLR männlich 5 Pol XLR männlich DMX Ausgang 3 Pol XLR weiblich 5 Pol XLR weiblich DMX Modus 13 Kanal 16 Kanal DMX Funktionen Pan Tilt Pan Tilt fein Dimmer Auto Programm 1 4 Stroboskop Farbrad Farbrad Rotation Goborad Goborad Rotation Gobo Shake Prisma 1 Prisma 2 Fokus Frost Bewe...

Page 33: ...dukt folgenden Richtlinien entspricht soweit zutreffend R TTE 1999 5 EG bzw RED 2014 53 EU ab Juni 2017 Niederspannungsrichtlinie 2014 35 EU EMV Richtlinie 2014 30 EU RoHS 2011 65 EU Die vollständige Konformitätserklärung finden Sie unter www adamhall com Des Weiteren können Sie diese auch unter info adamhall com anfragen ...

Page 34: ...ous jetez l emballage de l appareil veuillez séparer plastique papier et carton 21 Les films plastique doivent être mis hors de portée des enfants APPAREILS RELIÉS AU SECTEUR 22 ATTENTION Si le câble de l appareil est muni d un fil de terre il doit être relié à une prise murale avec terre Ne désactivez jamais la mise à la terre d un appareil 23 N allumez pas l appareil immédiatement s il a subi un...

Page 35: ...ale de 2000 m au dessus du niveau de la mer Attention Ce produit ne convient pas à une utilisation dans les climats tropicaux Attention Source lumineuse LED intense Risque de lésions oculaires Ne pas regarder directement la source lumineuse ATTENTION CONSEILS IMPORTANTS POUR LES PRODUITS D ÉCLAIRAGE 1 Ce produit est conçu pour une utilisation professionnelle dans le domaine du spectacle vivant il ...

Page 36: ... un réglage indépendant du réseau électrique Connecteurs DMX à 3 et 5 broches Connecteurs réseau Neutrik powerCON IN et OUT 2 omégas de fixation inclus Tension de fonctionnement 100 240 V CA Puissance absorbée 270 W Le projecteur intègre la technologie standard RDM Remote Device Management Ce système de gestion à distance des appareils permet de consulter l état de fonctionnement des terminaux RDM...

Page 37: ...MX ne reçoit aucun signal DMX même en présence d un signal DMX MODE D EMPLOI REMARQUES Si le projecteur est correctement branché sur le secteur la mention Software Update Please Wait uniquement à des fins de maintenance et le logo CAMEO s affichent successivement à l écran pendant la phase de démarrage et de réinitialisation du moteur À l issue de cette phase le projecteur est opérationnel et le m...

Page 38: ...e DMX Master DMX OUT Slave DMX IN Sur le Master activez l un des deux modes de fonctionnement Standalone proposés Auto ou Static L unité Slave suit alors l unité Master Mode Slave MODE AUTOMATIQUE Prog1 Prog4 Les quatre différents programmes automatiques se composent chacun d une succession de séquences de changement de couleur de gobo et de mouvement préconfigurées Pour sélectionner le mode Auto ...

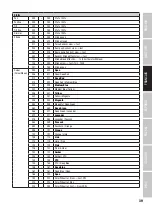
Page 39: ...n Colour ColourWheel 000 005 Open 006 011 Open Deep Red 012 017 Deep Red 018 023 Deep Red Medium Blue 024 029 Medium Blue 030 035 Medium Blue Yellow 036 041 Yellow 042 047 Yellow Magenta 048 053 Magenta 054 059 Magenta Deep Green 060 065 Deep Green 066 071 Deep Green Lavender 072 077 Lavender 078 083 Lavender Peacock 084 089 Peacock 090 095 Peackock Orange 096 101 Orange 102 107 Orange Lime 108 11...

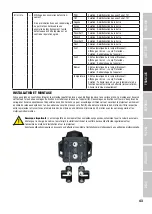
Page 40: ... slow fast 138 143 Gobo 8 shake slow fast 144 149 Gobo 9 shake slow fast 150 155 Gobo 10 shake slow fast 156 161 Gobo 11 shake slow fast 162 167 Gobo 12 shake slow fast 168 173 Gobo 13 shake slow fast 174 179 Gobo 14 shake slow fast 180 192 Open 193 223 Gobo Wheel rot Slow Fast CW 224 224 Gobo Wheel rot Stop 225 255 Gobo Wheel rot Fast Slow CCW Focus 000 255 0 to 100 Prism1 linear 000 005 Prism 1 ...

Page 41: ...n Lampe à décharge en marche Last État d avant redémarrage rétabli Off Lampe à décharge à l arrêt Display Rev Inversion de l écran On Rotation à 180 des éléments affichés à l écran par ex en cas de montage tête en bas Off Pas de rotation des éléments affichés à l écran Display Éclairage de l écran On Allumé en permanence Off Désactivation au bout d env 1 minute d inactivité DMX Fail État de foncti...

Page 42: ...1 Mode DMX 16CH Settings System Info Vous accédez alors au sous menu affichant les informations sur l appareil Utilisez de nouveau les touches fléchées pour sélectionner le paramètre souhaité et appuyez sur ENTER pour confirmer ou procéder au réglage System Info Firmware Affichage du firmware de l appareil 1U01 V1 xx 2U01 V1 xx 3U01 V1 xx Temperature Affichage de la température de l unité de la la...

Page 43: ...p Protected Solution Patienter jusqu à ce que la température de fonctionnement normale soit atteinte laisser refroidir Allumer la lampe manuellement B B A A INSTALLATION ET MONTAGE Grâce aux pieds en caoutchouc intégrés le projecteur peut être placé à un endroit approprié sur une surface plane Le montage sur traverse s effectue à l aide de deux omégas de fixation à installer sous la base de l appa...

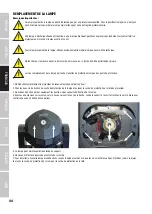
Page 44: ...de la lampe portez des lunettes de protection ainsi que des gants de protection 1 Débranchez complètement le projecteur du réseau électrique retirer la prise 2 Ôtez les deux vis de fixation du cache de protection de la lampe et enlevez le cache de protection de la tête du projecteur 3 Desserrez d environ un tour seulement les quatre vis des supports de fixation de la lampe 4 Exercez une pression s...

Page 45: ...ofessionnelle Une lampe à décharge chaude est soumise à une pression élevée et peut donc exploser spontanément Laissez refroidir le projecteur au moins 30 minutes avant de l ouvrir Lors du réglage de la lampe portez des lunettes de protection ainsi que des gants de protection n utilisez jamais le projecteur sans le cache de protection de la lampe ni le cache de protection de la tête Si le faisceau...

Page 46: ...e fixation de la lampe 2 3 4 Desserrez les quatre vis du cache de protection supérieur de la tête et ôtez ce cache 5 La vis de réglage se situe à droite du cache de protection de la lampe Tournez la vis de réglage dans le sens horaire pour déplacer le point de focalisation vers la gauche ou dans le sens antihoraire pour le déplacer vers la droite 4 5 6 Serrez les quatre vis des supports de fixatio...

Page 47: ...r projecteur à l entrée DMX connecteur XLR mâle de l appareil DMX suivant Reliez la sortie DMX de cet appareil selon le même méthode à l entrée DMX de l appareil DMX suivant et ainsi de suite Veillez à ce que tous les appareils DMX soient reliés en série et n oubliez pas que les liaisons ne peuvent être partagées sans utiliser de splitter actif Ne pas dépasser le nombre maximal d appareils par cha...

Page 48: ...Programme Auto 1 4 mode statique mode Master Slave Paramètres du système Lamp On Off Lamp Default Display Reverse Éclairage de l écran On Off DMX Fail Pan Angle Pan Reverse Tilt Reverse Feedback Movement Blackout Test Reset Pilotage DMX512 compatible RDM Angle PAN 540 630 Angle TILT 270 Éléments de commande Mode Enter Up Down Left Right Éléments d affichage Écran couleur LCD rétroéclairé alimentat...

Page 49: ...ination non contrôlée des déchets Séparez le des aut res types de déchets et recyclez le afin de promouvoir la réutilisation durable des ressources naturelles Nous conseillons aux utilisateurs non professionnels de contacter le revendeur chez qui ils ont acheté le produit ou un représentant gouvernemental local pour plus de détails sur le lieu de collecte et la façon de recycler cet appareil dans ...

Page 50: ...guir las normas vigentes en su país sobre reciclaje de desechos Separe los componentes de plástico papel y cartón del paquete para reciclarlos en sus contenedores respectivos 21 No deje las bolsas de plástico al alcance de los niños PARA LOS EQUIPOS CON TOMA ELÉCTRICA 22 ADVERTENCIA Si el cable eléctrico está provisto de un contacto de protección debe conectarse a una toma eléctrica con conexión a...

Page 51: ...cia Este equipo está diseñado para ser utilizado a una altura que no supere los 2000 metros sobre el nivel del mar Advertencia Este equipo no está diseñado para funcionar en climas tropicales Precaución Fuente de luz LED intensiva Peligro de lesiones oculares No mirar directamente la fuente de luz ATENCIÓN INFORMACIÓN IMPORTANTE SOBRE LOS PRODUCTOS DE ILUMINACIÓN 1 Este producto ha sido desarrolla...

Page 52: ... RDM Pantalla alimentada con baterías para poder efectuar ajustes independien temente de la red eléctrica Conexiones DMX de 3 y 5 pines Entrada y salida con conexiones Neutrik powerCON Incluidas dos perchas de montaje Omega Tensión operativa 100 240 V CA Consumo de potencia 270W El foco dispone del protocolo RDM Remote Device Management administración remota de dispositivos Este sistema de adminis...

Page 53: ... la pantalla se muestra que no hay una señal DMX FUNCIONAMIENTO INSTRUCCIONES En cuanto el foco esté correctamente conectado a la red eléctrica durante el proceso de arranque y reinicio de los motores aparecerán consecutivamente en pantalla el mensaje Software Update Please Wait Actualización del software espere por favor solo con fines de servicio técnico y el logotipo de CAMEO Tras este procedim...

Page 54: ...n cable DMX maestra DMX OUT esclava DMX IN y active en la unidad maestra uno de los modos autónomos Auto o Static A partir de ese momento la unidad esclava estará sincronizada con la unidad maestra Mode Slave MODO AUTO Prog1 Prog4 Los cuatro programas automáticos disponibles consisten en una serie de secuencias de movimientos cambios de color y cambios de gobos programadas fijas La selección del m...

Page 55: ...or ColourWheel 000 005 Open 006 011 Open Deep Red 012 017 Deep Red 018 023 Deep Red Medium Blue 024 029 Medium Blue 030 035 Medium Blue Yellow 036 041 Yellow 042 047 Yellow Magenta 048 053 Magenta 054 059 Magenta Deep Green 060 065 Deep Green 066 071 Deep Green Lavender 072 077 Lavender 078 083 Lavender Peacock 084 089 Peacock 090 095 Peacock Orange 096 101 Orange 102 107 Orange Lime 108 113 Lime ...

Page 56: ... 150 155 Gobo 10 con sacudida lento rápido 156 161 Gobo 11 con sacudida lento rápido 162 167 Gobo 12 con sacudida lento rápido 168 173 Gobo 13 con sacudida lento rápido 174 179 Gobo 14 con sacudida lento rápido 180 192 Open 193 223 Giro de la rueda de gobos Lento rápido giro hacia la derecha 224 224 Giro de la rueda de gobos Parar 225 255 Giro de la rueda de gobos Rápido lento giro hacia la izquie...

Page 57: ...t Se restablece el estado de la lámpara antes de encender nueva mente el foco Off Apagado de la lámpara de descarga Display Rev Dar la vuelta a la pantalla On Giro de 180 de la imagen en pantalla por ejemplo para montajes en altura Off Giro de la imagen en pantalla desactivado Display Retroiluminación de la pantalla On permanentemente activada Off Desactivación tras aproximadamente 1 minuto sin ac...

Page 58: ...gs System Info Seguidamente se accede al submenú en el que se puede ver la información del equipo Utilice nuevamente los botones de flecha para seleccionar los parámetros deseados y ábralos y ajústelos después pulsando ENTER System Info Firmware Visualización de la versión del firmware del dispositivo 1U01 V1 xx 2U01 V1 xx 3U01 V1 xx Temperature Visualización de la temperatura de la unidad de lámp...

Page 59: ...ra Blackout En la pantalla aparecerá Lamp Protected Solución Esperar hasta que se alcance la temperatura de funcionamiento normal dejar enfriar Encender la lámpara manualmente B B A A INSTALACIÓN Y MONTAJE Gracias a los pies de goma integrados el foco puede instalarse en un lugar adecuado sobre una superficie nivelada El montaje en trave saño se realiza fijando dos perchas de montaje Omega en la c...

Page 60: ...tar impecablemente limpia Para cambiar la lámpara utilice gafas de seguridad y guantes protectores 1 Desconecte totalmente el foco de la red eléctrica desconecte el enchufe 2 Retire los dos tornillos de fijación de la cubierta de la lámpara y extraiga esta cubierta de la cabeza del foco 3 Afloje los cuatro tornillos de soporte de la lámpara solo una vuelta aproximadamente 4 Presione la lámpara hac...

Page 61: ...empresa profesional Una lámpara de descarga caliente está bajo fuerte presión y por tanto puede explotar espontáneamente Antes de abrirlo permita que el foco se enfríe como mínimo durante 30 minutos Al ajustar la lámpara utilice gafas de seguridad y guantes protectores y no ponga a funcionar el foco sin la cubierta de la lámpara y la cubierta de la cabeza del foco En caso de que el punto central e...

Page 62: ... de la cubierta superior de la cabeza del foco y retire esta cubierta 5 A la derecha de la cubierta de la lámpara encontrará el tornillo de ajuste Gire el tornillo de ajuste en el sentido de las agujas del reloj para desplazar el punto central del haz de luz hacia la izquierda o en sentido contrario a las agujas del reloj para desplazar el punto central del haz de luz hacia la derecha 4 5 6 Apriet...

Page 63: ...DMX 2 Conecte ahora el conector XLR hembra del cable DMX del primer foco a la entrada DMX del equipo siguiente conector de chasis macho Conecte la salida DMX de este último equipo a la entrada DMX del equipo siguiente y así sucesivamente Tenga en cuenta que los dispositivos DMX están conectados en serie y que las conexiones no se pueden dividir sin un splitter activo El número máximo de equipos DM...

Page 64: ... Programas automáticos 1 4 modo Estático modo Maestro Esclavo Configuración del sistema Encendido apagado de lámpara valor predeterminado de lámpara inversión de pantalla encen dido apagado de iluminación de la pantalla DMX Fail ángulo de giro horizontal inversión de giro horizontal inversión de giro vertical feedback blackout de movimiento test reinicio Control DMX 512 habilitado para RDM Ángulo ...

Page 65: ...ue al final de la vida útil del equipo no deberá desecharlo con los demás residuos domésticos con el fin de evitar posibles efectos negativos en el medio ambiente y en la salud humana debidos al vertido incontrolado de desechos La recogida selectiva ayuda a su posterior reciclaje y fomenta la reutilización sostenible de los componentes de este equipo Si es un particular póngase en contacto con el ...

Page 66: ...łączyć i odłączyć od gniazda sieciowego jeśli urządzenie jest aktywne Naprawę takiego urządzenia może wykonać tylko autoryzowany personel specjalistyczny 19 Do czyszczenia urządzenia stosować suchą ściereczkę 20 Przestrzegać obowiązujących w danym kraju przepisów dotyczących usuwania odpadów Podczas utylizacji opakowania oddzielić tworzywo sztuczne od papieru i tektury 21 Worki z tworzywa sztuczne...

Page 67: ...konserwacyjnymi ładowaniem itp należy zawsze poczekać aż reflektor ostygnie Ostrzeżenie To urządzenie przeznaczone jest do użytku do maksymalnej wysokości 2000 m n p m Ostrzeżenie To urządzenie nie jest przewidziane do użytku w tropikalnych strefach klimatycznych Uwaga Intensywne źródło światła LED Niebezpieczeństwo uszkodzenia wzroku Nie spoglądaj na źródło światła OSTROŻNIE WAŻNE WSKAZÓWKI DOTYC...

Page 68: ...oziomie i pionie rozdzielczość 16 bitowa Automatyczna korekta pozycji Wentylatory sterowane temperaturą Możliwość pracy w standardzie RDM Wyświetlacz zasilany baterią umożliwiający wprowadzanie ustawień niezależnie od zasilania sieciowego 3 i 5 stykowe złącza DMX Złącza wejściowe i wyjściowe Neutrik powerCON W zestawie 2 uchwyty montażowe Omega Napięcie robocze 100 240 V AC pobór mocy 270W Reflekt...

Page 69: ...nia systemowe W tym trybie jednostka DMX reflektora nie zostanie włączona Dlatego nawet jeśli na wejściu DMX będzie sygnał wyświetlacz będzie informował braku sygnału OBSŁUGA WSKAZÓWKI Po prawidłowym podłączeniu reflektora do zasilania podczas uruchamiania urządzenia i resetowania silników na wyświetlaczu wyświetli się komunikat Software Update Please Wait tylko do celów serwisowych a następnie po...

Page 70: ... master tego samego modelu kablem DMX master DMX OUT slave DMX IN i włącz w urządzeniu master jeden z trybów standalone Auto lub Static Praca urządzenia slave jest teraz dostosowana do pracy urządzenia master Mode Slave TRYB PRACY AUTO Prog1 Prog4 Dostępne są 4 różne programy automatyczne które składają się z zaprogramowanych sekwencji kolorów gobo i ruchów Aby wybrać tryb auto postępuj zgodnie z ...

Page 71: ...n Colour ColourWheel 000 005 Open 006 011 Open Deep Red 012 017 Deep Red 018 023 Deep Red Medium Blue 024 029 Medium Blue 030 035 Medium Blue Yellow 036 041 Yellow 042 047 Yellow Magenta 048 053 Magenta 054 059 Magenta Deep Green 060 065 Deep Green 066 071 Deep Green Lavender 072 077 Lavender 078 083 Lavender Peacock 084 089 Peacock 090 095 Peackock Orange 096 101 Orange 102 107 Orange Lime 108 11...

Page 72: ... slow fast 138 143 Gobo 8 shake slow fast 144 149 Gobo 9 shake slow fast 150 155 Gobo 10 shake slow fast 156 161 Gobo 11 shake slow fast 162 167 Gobo 12 shake slow fast 168 173 Gobo 13 shake slow fast 174 179 Gobo 14 shake slow fast 180 192 Open 193 223 Gobo Wheel rot Slow Fast CW 224 224 Gobo Wheel rot Stop 225 255 Gobo Wheel rot Fast Slow CCW Focus 000 255 0 to 100 Prism1 linear 000 005 Prism 1 ...

Page 73: ...ące opcje zmiana ustawień przyciskami i potwierdzenie przyciskiem ENTER Settings Lamp włączenie wyłączenie lampy wyładowczej On włącz lampę wyładowczą Off wyłącz lampę wyładowczą Lamp Default stan lampy wyład owczej po włączeniu reflektora On lampa wyładowcza włączona Last przywrócenie stanu sprzed ponownego włączenia reflektora Off lampa wyładowcza wyłączona Display Rev Flip Display On obrócenie ...

Page 74: ...ników głowicy koło barw tarcza gobo pryzmat All reset wszystkich silników INFORMACJE O URZĄDZENIU System Info Naciśnięcie przycisku MODE spowoduje przejście do menu wyboru Przyciskami i wybierz opcję System Info na ciemnym tle i potwierdź wybór przyciskiem ENTER System Settings DMX Address 001 Mode DMX 16CH Settings System Info Spowoduje to przejście do podmenu w którym są wyświetlane informacje o...

Page 75: ...światła blackout Komunikat na wyświetlaczu Lamp Protected Rozwiązanie poczekaj aż lampa się schłodzi do prawidłowej temperatury włącz lampę ręcznie B B A A USTAWIANIE I MONTAŻ Do ustawienia reflektora w odpowiednim miejscu na płaskiej powierzchni służą zintegrowane gumowe nóżki Do montażu reflektora na tra wersie służą dwa uchwyty Omega które należy przymocować od dołu do podstawy urządzenia A Uch...

Page 76: ...rcie charakterystyki Nie dotykaj szklanej bańki źródła światła gołymi rękami aby jej nie zabrudzić Przystępując do wymiany źródła światła załóż okulary i rękawiczki ochronne 1 Odłącz wszystkie bieguny od sieci zasilania wyjmij wtyczkę 2 Wykręć dwie śruby mocujące pokrywę lampy i zdejmij pokrywę głowicy 3 Poluzuj cztery śruby oprawek lampy o około jeden obrót 4 Wciśnij lampę w dół zgodnie z kierunk...

Page 77: ...py lecz skorzystać z pomocy profesjonalnych firm W rozgrzanej lampie rozładowczej panuje wysokie ciśnienie dlatego może dojść do eksplozji Przed otwarciem reflektora odczekaj przynajmniej 30 minut aby ostygł Przystępując do regulacji źródła światła załóż okulary i rękawiczki ochronne Nigdy nie używaj reflektora gdy pokrywa lampy i pokrywa głowicy są zdjęte Jeśli najjaśniejszy punkt strumienia świa...

Page 78: ...lampy o około jeden obrót 2 3 4 Odkręć cztery śruby górnej pokrywy głowicy i zdejmij ją 5 Po prawej od pokrywy lampy znajduje się śruba regulacyjna Przekręć śrubę regulacyjną zgodnie z ruchem wskazówek zegara aby przesunąć najjaśniejszy punkt w lewo lub w stronę przeciwną do ruchu wskazówek zegara aby przesunąć go w prawo 4 5 6 Przykręć cztery śruby oprawek i zamocuj pokrywę lampy 7 Ponownie zamoc...

Page 79: ...enia DMX np kontrolera DMX 2 Żeńską wtyczkę XLR kabla DMX podłączonego do pierwszego reflektora podłączyć do wejścia DMX męskie gniazdo XLR następnego urządzenia DMX Wyjście DMX tego urządzenia podłączyć w taki sam sposób do wejścia DMX następnego urządzenia i tak dalej Należy pamiętać że urządzenia DMX podłącza się szeregowo a połączeń nie można rozdzielać bez aktywnego rozdzielacza Maksymalna li...

Page 80: ...czne 1 4 tryb statyczny tryb master slave Ustawienia systemu włączanie wyłączanie lampy domyślne ustawienie lampy display reverse włączanie wyłączanie podświetlenia wyświetlacza stan pracy po przerwaniu sygnału DMX kąt obrotu w poziomie zmia na kierunku obrotu w poziomie zmiana kierunku obrotu w pionie korekta pozycji automatyczne wygaszenie podczas ruchu głowicy test działania reset silników Ster...

Page 81: ...innych odpadów i przekazać do punktu recyklingu w celu ponownego wykorzystania użytych w nim materiałów w ramach idei zrównoważonego rozwoju Klienci prywatni otrzymują informacje w zakresie przyja znych dla środowiska możliwości usuwania odpadów od sprzedawcy u którego produkt został zakupiony lub w odpowiednich placówkach regionalnych Użytkownicy będący przedsiębiorcami proszeni są o kontakt ze s...

Page 82: ... 20 Rispettare le leggi sullo smaltimento in vigore nel Paese di installazione Al momento di smaltire l imballo separare la plastica dalla carta e dal cartone 21 I sacchetti di plastica devono essere tenuti lontani dalla portata dei bambini DISPOSITIVI CON ALLACCIAMENTO DI RETE 22 ATTENZIONE se il cavo di rete è dotato di contatto di protezione deve essere collegato a una presa di rete con messa a...

Page 83: ...zzo a un altitudine non superiore ai 2 000 metri sul livello del mare Avvertimento Questo dispositivo non è destinato all uso nei climi tropicali Attenzione Sorgente luminosa a LED di elevata intensità Pericolo di lesioni oculari Non guardare la sorgente luminosa ATTENZIONE INDICAZIONI IMPORTANTI RELATIVE AI PRODOTTI DI ILLUMINAZIONE 1 Il prodotto è stato sviluppato per un uso professionale nel se...

Page 84: ... indipendente dalla rete elettrica Connettori DMX a 3 e 5 poli Connettori di rete Neutrik powerCON di ingresso e uscita 2 staffe di montaggio Omega in dotazione Tensione di esercizio 100 V 240 V AC Potenza assorbita 270 W Il proiettore si avvale dello standard RDM Remote Device Management Questo sistema di gestione remota dei dispositivi consente di verificare lo stato e configurare i terminali RD...

Page 85: ...X sull ingresso DMX il display mostra che non è presente alcun segnale DMX UTILIZZO NOTE Non appena il proiettore viene correttamente allacciato alla rete elettrica durante la procedura di avvio e il reset dei motori sul display vengono visualizzati in successione Software Update Please Wait solo per scopi di assistenza e il logo CAMEO Al termine della procedura il proiet tore è pronto per l utili...

Page 86: ... stesso modello utilizzando un cavo DMX Master DMX OUT Slave DMX IN e sull unità master attivare una delle modalità stand alone Auto o Static Ora l unità slave segue l unità master Mode Slave MODALITÀ DI FUNZIONAMENTO AUTO Prog1 Prog4 Ciascuno dei quattro diversi programmi auto consiste in una sequenza predefinita di cambi di colore di gobo e di movimenti La selezione della modalità di funzionamen...

Page 87: ...n Colour ColourWheel 000 005 Open 006 011 Open Deep Red 012 017 Deep Red 018 023 Deep Red Medium Blue 024 029 Medium Blue 030 035 Medium Blue Yellow 036 041 Yellow 042 047 Yellow Magenta 048 053 Magenta 054 059 Magenta Deep Green 060 065 Deep Green 066 071 Deep Green Lavender 072 077 Lavender 078 083 Lavender Peacock 084 089 Peacock 090 095 Peackock Orange 096 101 Orange 102 107 Orange Lime 108 11...

Page 88: ... slow fast 138 143 Gobo 8 shake slow fast 144 149 Gobo 9 shake slow fast 150 155 Gobo 10 shake slow fast 156 161 Gobo 11 shake slow fast 162 167 Gobo 12 shake slow fast 168 173 Gobo 13 shake slow fast 174 179 Gobo 14 shake slow fast 180 192 Open 193 223 Gobo Wheel rot Slow Fast CW 224 224 Gobo Wheel rot Stop 225 255 Gobo Wheel rot Fast Slow CCW Focus 000 255 0 to 100 Prism1 linear 000 005 Prism 1 ...

Page 89: ...gni mento della lampada a scarica On Accensione della lampada a scarica Off Spegnimento della lampada a scarica Lamp Default Stato di funzionamen to della lampada a scarica dopo il riavvio del proiettore On Lampada a scarica accesa Last Stato prima del ripristino Off Lampada a scarica spenta Display Rev Flip Display On Rotazione del display di 180 ad es montaggio sopratesta Off Nessuna rotazione d...

Page 90: ...mendo MODE si accede al menu di selezione Con i tasti e selezionare la voce di menu System Info evidenziata e confermare con ENTER System Settings DMX Address 001 Mode DMX 16CH Settings System Info In seguito si accede al sottomenu per la visualizzazione delle seguenti informazioni del sistema Utilizzare di nuovo i tasti freccia per selezio nare il parametro desiderato quindi premere ENTER per ric...

Page 91: ...zione Attendere il raggiungimento della normale temperatura di esercizio lasciare raffreddare Accen dere la lampada manualmente B B A A INSTALLAZIONE E MONTAGGIO Grazie ai piedini in gomma integrati il proiettore può essere collocato in un punto adatto su una superficie piana Il montaggio a una traversa viene effettuato tramite due staffe a Omega fissate alla parte inferiore della base del disposi...

Page 92: ...ada deve essere perfettamente pulita Utilizzare occhiali e guanti protettivi per sostituire la lampada 1 Scollegare tutti i poli del proiettore dalla rete elettrica estrarre la spina 2 Rimuovere le due viti di fissaggio del coprilampada ed estrarre il coperchio protettivo dal proiettore 3 Allentare le quattro viti dei portalampada di circa un giro 4 Premere la lampada contro il supporto a molla ve...

Page 93: ...io di aziende professionali Una lampada a scarica calda è sottoposta ad alta pressione e può quindi esplodere spontaneamente Lasciare raffreddare il proiettore per almeno 30 minuti prima di aprirlo Durante la regolazione della lampada utilizzare occhiali e guanti di sicurezza e non azionare il proiettore senza il coprilampada e il coperchio protettivo Se l hotspot non si trova al centro della proi...

Page 94: ...ttro viti dei portalampada di circa un giro 2 3 4 Allentare le quattro viti del coperchio protettivo superiore e rimuoverlo 5 La vite di regolazione si trova a destra del coprilampada Ruotare la vite di regolazione in senso orario per spostare l hotspot verso sinistra e in senso antiorario per spostarlo verso destra 4 5 6 Serrare le quattro viti dei portalampada e richiudere il coprilampada 7 Ripo...

Page 95: ... femmina del cavo DMX connesso al primo proiettore DMX con l ingresso DMX presa XLR maschio del successivo dispositivo DMX Analogamente collegare l uscita DMX di questo dispositivo con l ingresso DMX del dispositivo seguente e così via Tenere presente che in linea di principio i dispositivi DMX sono collegati in serie e i collegamenti non si possono condividere senza uno splitter attivo In una cat...

Page 96: ...rogramma Auto 1 4 modalità statica funzionamento master slave Impostazioni di sistema Lamp On Off Lamp Default Display Reverse illuminazione display On Off DMX Fail Pan Angle Pan Reverse Tilt Reverse Feedback Movement Blackout Test Reset Controllo DMX512 compatibile con RDM Angolo del giro orizzontale PAN 540 630 Angolo del giro verticale TILT 270 Elementi di comando Mode Enter Up Down Left Right ...

Page 97: ...e del suo ciclo di vita l apparecchio non deve essere smaltito insieme ai normali rifiuti domestici Il prodotto deve quindi essere smaltito separatamente da altri rifiuti e riciclato nell ottica dell incentivazione di cicli economici sostenibili I clienti privati possono richiedere informazioni sulle possibilità di smaltimento ecosostenibile al rivenditore presso il quale è stato acquistato il pro...

Page 98: ...1s Short burst with break 128 250 Strobe slow fast 1Hz 13Hz 251 255 Strobe open 7 Colour Wheel 000 005 Open Colour Wheel 006 011 Open Deep Red 012 017 Deep Red 018 023 Deep Red Medium Blue 024 029 Medium Blue 030 035 Medium Blue Yellow 036 041 Yellow 042 047 Yellow Magenta 048 053 Magenta 054 059 Magenta Deep Green 060 065 Deep Green 066 071 Deep Green Lavender 072 077 Lavender 078 083 Lavender Pe...

Page 99: ...8 143 Gobo 8 shake slow fast 144 149 Gobo 9 shake slow fast 150 155 Gobo 10 shake slow fast 156 161 Gobo 11 shake slow fast 162 167 Gobo 12 shake slow fast 168 173 Gobo 13 shake slow fast 174 179 Gobo 14 shake slow fast 180 192 Open 193 223 Gobo Wheel rot Slow Fast CW 224 224 Gobo Wheel rot Stop 225 255 Gobo Wheel rot Fast Slow CCW 9 Focus 000 255 0 to 100 Focus 10 Prism Linear 000 005 Prism 1 off...

Page 100: ...Tilt Hold 3s 141 155 Reset only Head Hold 3s 156 170 Reset All Functions Hold 3s 171 255 no function 16 CH Mode Ch Function Values Sub Group 1 Pan 000 255 0 to 100 Pan 2 Pan fine 000 255 0 to 100 3 Tilt 000 255 0 to 100 Tilt 4 Tilt fine 000 255 0 to 100 5 Dimmer 000 255 0 to 100 Dimmer 6 Strobe 000 005 Strobe open Multifunctional Strobe 006 010 Strobe closed 011 033 Pulse Random slow fast 034 056 ...

Page 101: ...059 Magenta Deep Green 060 065 Deep Green 066 071 Deep Green Lavender 072 077 Lavender 078 083 Lavender Peacock 084 089 Peacock 090 095 Peackock Orange 096 101 Orange 102 107 Orange Lime 108 113 Lime 114 119 Lime Pink 120 125 Pink 126 131 Pink Amber 132 137 Amber 138 143 Amber CTO 144 149 CTO 150 155 CTO Deep Blue 156 161 Deep Blue 162 167 Deep Blue Open 168 192 Open 193 223 Color Wheel rot Slow F...

Page 102: ...bo 10 shake slow fast 156 161 Gobo 11 shake slow fast 162 167 Gobo 12 shake slow fast 168 173 Gobo 13 shake slow fast 174 179 Gobo 14 shake slow fast 180 192 Open 193 223 Gobo Wheel rot Slow Fast CW 224 224 Gobo Wheel rot Stop 225 255 Gobo Wheel rot Fast Slow CCW 9 Focus 000 255 0 to 100 Focus 10 Prism Linear 000 005 Prism 1 off Prism 006 127 Prism Position 0 540 128 191 Prism Rotation Slow Fast C...

Page 103: ...Hold 5s 126 140 Reset Pan Tilt Hold 3s 141 155 Reset only Head Hold 3s 156 170 Reset All Functions Hold 3s 171 255 no function EN 1 After the adjustments have been made set the value to 000 to avoid disturbance by endless function call DE 1 Nachdem die Einstellungen vorgenommen wurden stellen Sie den Wert auf 000 ein um Störungen durch endlosen Funktionsaufruf zu vermeiden FR 1 Une fois les ajuste...

Page 104: ...CAMEOLIGHT COM Adam Hall GmbH Adam Hall Str 1 61267 Neu Anspach Germany Tel 49 0 6081 9419 0 Fax 49 0 6081 9419 1000 web www adamhall com e mail mail adamhall com REV 01 ...

Reviews: