background image

14

OPERATION / BEDIENUNG / UTILISATION / OPERACIÓN / OBSŁUGA / UTILIZZO

EN

After connecting to the mains, the device is immediately ready for operation. The buttons light up automatically when pressed and the light 

automatically switches off after 15 seconds of inactivity. If a DMX signal is present, the DMX operating mode is automatically activated. CAUTION: 

Never reach through the protective grille, risk of injury! Never push objects through the protective grille! People with long hair should take special 

care as long hair can get caught in the fan and result in serious injury!

SELECTING THE DMX START ADDRESS

If necessary, stop the manual operating mode by pressing the START/MODE button. If there is no DMX signal, 3 minus signs appear on the display; 

if there is a DMX signal, the DMX address is shown. Adjust the desired DMX address using the UP and DOWN buttons (001-512, hold the button for 

fast change of value). The synchronous control of multiple devices (same model) through a DMX control unit (e.g. DMX mixer) can be achieved by 

assigning the devices to an identical DMX start address and connecting them using DMX cables. You will find a DMX channel assignment table in the 

DMX CONTROL section of this manual.

MANUAL OPERATION

If a DMX signal is present, manual operation is not possible on the device; therefore, disconnect the device from a DMX network. Use the START/

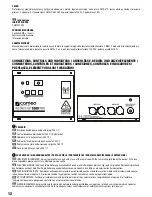
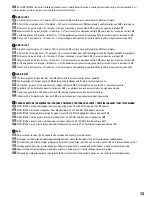
MODE button to activate the manual operating mode (short press). To change the fan speed, use the rotary encoder N  7 and adjust between 1 and 

100 (left stop = minimum speed, right stop = maximum speed). To stop the manual operating mode, briefly press the START/MODE button again. 

REMOTE CONTROL

If a DMX signal is present, remote operation using the remote is not possible on the device; therefore, disconnect the device from a DMX network. 

Press and hold the START/MODE button for approx. 5 seconds to enable the control via the remote control (dot between the 1st and 2nd digit of the 

display lights up). The default setting of the blower fan speed is adjusted on the device using the rotary encoder N  7; press the ON button on the 

remote control to allow the fan to start. To stop the blower, press the OFF button. To stop the remote control operation, press the START/MODE button 

once more and hold for approx. 5 seconds. (dot between the 1st and 2nd digit of the display goes off). 

DE

Nach dem Anschließen an das Stromnetz ist das Gerät sofort betriebsbereit. Die Bedientasten verfügen über eine Beleuchtung, welche beim 

Betätigen einer der Tasten automatisch eingeschaltet und nach ca. 15 Sekunden Inaktivität automatisch abgeschaltet wird. Liegt am Gerät ein 

DMX-Signal an, wird zwangsweise die DMX-Betriebsart aktiviert. ACHTUNG: Niemals durch die Schutzgitter greifen, Verletzungsgefahr! Stecken Sie 

niemals Gegenstände durch die Schutzgitter! Besondere Vorsicht gilt bei Personen mit Langhaarfrisur, lange Haare können angesogen werden und 

sich im Ventilator verfangen, schwere Verletzungen können die Folge sein!

DMX-STARTADRESSE EINSTELLEN

Beenden Sie ggf. die manuelle Betriebsart, indem Sie die Taste START/MODE drücken. Liegt kein DMX-Signal an, werden nun im Display 3 Minus-

zeichen angezeigt, liegt ein Signal an, die DMX-Adresse. Stellen Sie die gewünschte DMX-Adresse mit Hilfe der Tasten UP und DOWN ein (001 - 512, 

Taste gedrückt halten, für schnelle Wertänderung). Die synchrone Ansteuerung mehrerer Geräte des gleichen Modells durch ein DMX-Steuergerät 

(z.B. DMX-Pult) erreichen Sie, indem Sie die Geräte auf die identische DMX-Startadresse einstellen und mit Hilfe von DMX-Kabeln verbinden. Die 

DMX-Tabelle mit der Kanalbelegung finden Sie in dieser Anleitung unter DMX STEUERUNG.

MANUELLER BETRIEB

Liegt ein DMX-Signal am Gerät an, ist der manuelle Betrieb nicht möglich, trennen Sie daher das Gerät von einem DMX-Verbund. Nutzen Sie nun die 

START/MODE-Taste um die manuelle Betriebsart zu aktivieren (kurz drücken). Die Gebläsegeschwindigkeit ändern Sie mit Hilfe des Drehreglers Nr. 7 

von 1 bis 100 (Linksanschlag = minimale Geschwindigkeit, Rechtsanschlag = maximale Geschwindigkeit). Zum Beenden der manuellen Betriebsart 

drücken Sie wiederum die Taste START/MODE kurz. 

STEUERUNG ÜBER FERNBEDIENUNG

Liegt ein DMX-Signal am Gerät an, ist die Steuerung über die Fernbedienung nicht möglich, trennen Sie daher das Gerät von einem DMX-Verbund. 

Drücken und halten Sie die START/MODE-Taste für die Dauer von ca. 5 Sekunden, um die Steuerung über die Fernbedienung zu aktivieren (Punkt 

zwischen 1. und 2. Stelle des Displays leuchtet). Die Voreinstellung der Gebläsegeschwindigkeit erfolgt mit Hilfe des Drehreglers Nr. 7 am Gerät, 

drücken Sie nun auf der Fernbedienung die Taste ON, um das Gebläse zu starten. Um das Gebläse zu stoppen, drücken Sie auf die Taste OFF. Deakti-

vieren Sie die Steuerung über die Fernbedienung, indem Sie abermals die START/MODE-Taste drücken und für die Dauer von ca. 5 Sekunden halten 

(Punkt zwischen 1. und 2. Stelle des Display erlischt). 

FR

Après connexion au secteur, l’appareil est immédiatement prêt à fonctionner. Les touches utilisateur sont pourvues d’un dispositif d’éclairage 

intégré : elles s’allument dès qu’elles sont utilisées, et s’éteignent automatiquement au bout d’environ 15 secondes d’inactivité. Dès qu’un signal de 

pilotage DMX parvient à l’appareil, il passe automatiquement en mode DMX. ATTENTION : Ne jamais saisir l’appareil par la grille de protection, 

danger de blessure ! Ne jamais introduire d’objets à travers la grille de protection ! Une prudence toute particulière est conseillée aux personnes à 

cheveux longs : si les cheveux se prennent dans le ventilateur, il peut en résulter des blessures graves !

RÉGLAGE DE L’ADRESSE DE DÉPART DMX

Si c’est nécessaire, désactivez le mode manuel en appuyant sur la touche START/MODE. Si aucun signal de pilotage DMX n’arrive, 3 signes «-» ap-

paraissent sur l’afficheur LED. En présence d’un signal DMX, l’adresse de départ DMX est visualisée. Réglez alors la valeur d’adresse de départ DMX 

désirée avec les touches UP et DOWN (de 001 à 512, maintenez la touche enfoncée pour un défilement rapide). Pour piloter simultanément plusieurs 

projecteurs (de modèle identique) avec un contrôleur DMX (par exemple, console d’éclairage DMX), réglez-les tous sur une adresse de départ DMX 

identique, et reliez-les entre eux avec des câbles DMX. Vous trouverez le tableau spécifiant l’assignation de canaux des différents modes DMX dans 

les pages suivantes de ce Manuel Utilisateur.

Summary of Contents for CLIA1000PRO

Page 1: ...1 USER S MANUAL BEDIENUNGSANLEITUNG MANUEL D UTILISATION MANUAL DE USUARIO INSTRUKCJA OBSŁUGI MANUALE D USO WIND MACHINE INSTANT AIR PRO CLIA1000PRO REMOTE CONTROL ...

Page 2: ...installations Make certain that wall mounts are properly installed and secured Make certain that the equipment is installed securely and cannot fall down 7 During installation observ e the applicable safety regulations for your country 8 Never install and operate the equipment near radiators heat registers ovens or other sources of heat Make certain that the equipment is always installed so that i...

Page 3: ...is equipment is subject to the respectively applicable national accident prevention rules and regulations As a manufacturer Adam Hall is obligated to notify you formally about the existence of potential health risks Hea ring damage due to high volume and prolonged exposure When in use this product is capable of producing high sound pressure levels SPL that can lead to irreversible hearing damage i...

Page 4: ...nder ein und aus da sonst die Lebensdauer des Geräts beeinträchtigt werden könnte 28 WICHTIGER HINWEIS Ersetzen Sie Sicherungen ausschließlich durch Sicherungen des gleichen Typs und Wertes Sollte eine Sicherung wiederholt auslösen wenden Sie sich bitte an ein autorisiertes Servicezentrum 29 Um das Gerät vollständig vom Stromnetz zu trennen entfernen Sie das Netzkabel bzw den Netzadapter aus der S...

Page 5: ... Pour le nettoyage de l appareil utilisez un chiffon sec 20 Observez toutes les réglementations en vigueur dans votre pays pour mettre l appareil au rebut Lorsque vous jetez l emballage de l appareil veuillez séparer plastique papier et carton 21 Les films plastique doivent être mis hors de portée des enfants APPAREILS RELIÉS AU SECTEUR 22 ATTENTION Si le câble de l appareil est muni d un fil de t...

Page 6: ...toute particulière est conseillée aux personnes à cheveux longs si les cheveux se prennent dans le ventilateur il peut en résulter des blessures graves Veillez à ce que l aspiration de l air puisse s effectuer librement Assurez vous que la saleté le sable les poussières ne puissent pas être aspirées ES MEDIDAS DE SEGURIDAD 1 Lea atentamente las instrucciones de este manual 2 Guarde toda la informa...

Page 7: ...a evitar cualquier sobrecalentamiento o fallo de funcionamiento mantenimiento y limpieza no cubiertos por la garantía 34 Asimismo deberá dejarse una distancia mínima de 0 5 metros con cualquier material inflamable ATENCIÓN Para evitar el riesgo de descarga eléctrica no retire la tapa El equipo no contiene elementos que el usuario pueda reparar o sustituir Para cualquier tarea de mantenimiento o re...

Page 8: ...a elektrycznego należy sprawdzić czy napięcie i częstotliwość sieci elektrycznej odpowiada wartościom podanym na urządzeniu Jeśli urządzenie jest wyposażone w przełącznik napięcia należy podłączyć je do gniazda tylko wówczas gdy wartości urządzenia odpowiadają wartościom sieci elektrycznej Jeśli dołączony kabel sieciowy lub dołączony adapter sieciowy nie pasuje do gniazda elektrycznego należy skon...

Page 9: ...teressa i dispositivi specifici per l esterno per i quali valgono le indicazioni speciali riportate di seguito Non portare mai il dispositivo a contatto con materiali liquidi o gas infiammabili 12 Accertarsi che all interno del dispositivo non possa penetrare acqua per gocciolamento o spruzzo Non collocare sul dispositivo oggetti contenenti liquidi quali vasi tazze o bicchieri 13 Assicurarsi che n...

Page 10: ...la cassa potrebbero scaldarsi durante l impiego Dopo aver usato l apparecchiatura lasciarla raffreddare per almeno 10 minuti prima di toccarla o trasportarla ATTENZIONE PRODOTTI AUDIO con LIVELLI SONORI ELEVATI Questo dispositivo è destinato a uso professionale Il suo utilizzo in ambito commerciale è soggetto alle normative e alle direttive nazionali vigenti in materia di prevenzione di infortuni ...

Page 11: ... Leistungsaufnahme 75W FR Introduction INSTANT AIR PRO CLIA1000PRO FONCTIONS DE PILOTAGE Pilotage DMX sur 1 canal Mode manuel Télécommande RF FONCTIONNALITÉS Machine à vent professionnelle boîtier métallique robuste piètement réglable fonctionnement silencieux pilotage DMX 512 mode manuel contrôle par télécommande sans fil RF entrées et sorties DMX sur embases 3 et 5 points tension d alimentation ...

Page 12: ...ment le fusible par un fusible neuf du même format et du même calibre valeurs indiquées sur le panneau arrière de l appareil Si le fusible fond de façon répétée veuillez consulter un centre de réparations agréé ES NOTA IMPORTANTE Sustituya el fusible únicamente por otro del mismo tipo y características serigrafiadas en el equipo Si el fusible se fundiera continuamente póngase en contacto con un se...

Page 13: ...ual operation DE Das dreistellige LED Display zeigt die DMX Adresse und die Menüpunkte für die manuelle Steuerung an FR Cet afficheur lumineux à trois caractères LED indique l adresse DMX et les éléments de menu relatifs à l utilisation manuelle ES La pantalla LED de tres dígitos muestra la dirección DMX y las opciones de menú para controlar el equipo manualmente PL Trzycyfrowy wyświetlacz LED wsk...

Page 14: ...MX Signal an werden nun im Display 3 Minus zeichen angezeigt liegt ein Signal an die DMX Adresse Stellen Sie die gewünschte DMX Adresse mit Hilfe der Tasten UP und DOWN ein 001 512 Taste gedrückt halten für schnelle Wertänderung Die synchrone Ansteuerung mehrerer Geräte des gleichen Modells durch ein DMX Steuergerät z B DMX Pult erreichen Sie indem Sie die Geräte auf die identische DMX Startadress...

Page 15: ...l equipo detecta una señal DMX desconecte el equipo de cualquier red DMX Man tenga pulsado el botón START MODE durante unos 5 segundos para activar el control mediante el mando a distancia se enciende el punto entre los dígitos 1 y 2 de la pantalla La velocidad del ventilador se ajusta en el equipo por medio del potenciómetro 7 A continuación pulse el botón ON del mando a distancia para poner en m...

Page 16: ... assegnazione dei canali è riportata più avanti in questo manuale alla sezione CONTROLLO DMX FUNZIONAMENTO MANUALE Poiché il funzionamento manuale non è possibile se sul dispositivo è presente un segnale DMX staccare il dispositivo da qualsiasi interconnessione DMX Utilizzare il tasto START MODE per attivare la modalità di funzionamento manuale premere brevemente Girando la manopola 7 si imposta l...

Page 17: ... the first DMX device e g DMX Controller 2 Connect the female 3 pin XLR connector of the DMX cable connected to the first projector to the DMX input male 3 pin socket of the next DMX device In the same way connect the DMX output of this device to the DMX input of the next device and repeat until all devices have been connected Please note that as a rule DMX devices are connected in series and conn...

Page 18: ...ts z B DMX Controller 2 Verbinden Sie den weibliche XLR Stecker des an den ersten Scheinwerfer angeschlossenen DMX Kabels mit dem DMX Eingang männliche XLR Buchse des nächsten DMX Geräts Verbinden Sie den DMX Ausgang dieses Geräts in der gleichen Weise mit dem DMX Eingang des nächsten Geräts und so weiter Bitte beachten Sie dass DMX Geräte grundsätzlich seriell verschaltet werden und die Verbindun...

Page 19: ...eur XLR mâle de l appareil DMX suivant Reliez la sortie DMX de cet appareil selon le même méthode à l entrée DMX de l appareil DMX suivant et ainsi de suite Veillez à ce que tous les appareils DMX soient reliés en série et n oubliez pas que les liaisons ne peuvent être partagées sans utiliser de splitter actif Ne pas dépasser le nombre maximal d appareils par chaîne DMX soit 32 Vous trouverez un c...

Page 20: ...hembra del cable DMX del primer foco a la entrada DMX del equipo siguiente conector de chasis macho Conecte la salida DMX de este último equipo a la entrada DMX del equipo siguiente y así sucesivamente Tenga en cuenta que los dispositivos DMX están conectados en serie y que las conexiones no se pueden dividir sin un splitter activo El número máximo de equipos DMX conectados en cadena es de 32 Las ...

Page 21: ...ą wtyczkę XLR kabla DMX podłączonego do pierwszego reflektora podłączyć do wejścia DMX męskie gniazdo XLR następnego urządzenia DMX Wyjście DMX tego urządzenia podłączyć w taki sam sposób do wejścia DMX następnego urządzenia i tak dalej Należy pamiętać że urządzenia DMX podłącza się szeregowo a połączeń nie można rozdzielać bez aktywnego rozdzielacza Maksymalna liczba urządzeń DMX w łańcuchu DMX n...

Page 22: ...imo proiettore DMX con l ingresso DMX presa XLR maschio del successivo dispositivo DMX Analogamente collegare l uscita DMX di questo dispositivo con l ingresso DMX del dispositivo seguente e così via Tenere presente che in linea di principio i dispositivi DMX sono collegati in serie e i collegamenti non si possono condividere senza uno splitter attivo In una catena DMX i dispositivi DMX non posson...

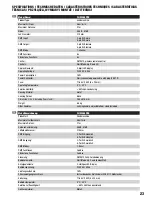
Page 23: ...l Metall SPECIFICATIONS TECHNISCHE DATEN CARACTÉRISTIQUES TECHNIQUES CARACTERÍSTICAS TÉCNICAS PRZYŁĄCZA WYMIARY I MONTAŻ DATI TECNICI EN Model Name CLIA1000PRO Product Type wind machine Maximal Air Flow 56 m min Maximum Distance 21 m Noise 45 dB 51 dB Fan Diameter 310 mm DMX Input 3 pin XLR male 5 pin XLR male DMX Output 3 pin XLR female 5 pin XLR female DMX Mode 1 channel DMX Functions fan Standa...

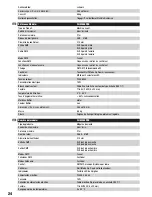
Page 24: ...r de type Schuko CEE 7 7 Fusible T1 6AL 250V 5 x 20 mm Température d utilisation 0 C 40 C Taux d hygrométrie relative 85 sans condensation Matériau Boîtier métal Couleur Boîtier noir Dimensions Ø x H avec piètement 385 x 515 mm Masse 8 5 kg Divers Poignée de transport intégrée piètement réglable ES Nombre del modelo CLIA1000PRO Tipo de producto Máquina de viento Caudal de aire máximo 56 m min Dist...

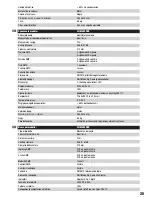
Page 25: ...ącze zasilania podłączony na stałe kabel sieciowy z wtyczką CEE 7 7 Bezpiecznik T1 6AL 250 V 5 x 20 mm Temperatura pracy 0 C 40 C Względna wilgotność powietrza 85 bez kondensacji Materiał obudowy metal Kolor obudowy czarny Wymiary Ø x wys stojak 385 x 515 mm Waga 8 5 kg Pozostałe cechy uchwyt do przenoszenia regulowany stojak w zestawie IT Nome del modello CLIA1000PRO Tipo di prodotto Macchina del...

Page 26: ...nderen europäischen Ländern mit Mülltrennung Dieses Symbol auf dem Produkt oder dazugehörigen Dokumenten weist darauf hin dass das Gerät am Ende der Produktlebenszeit nicht zusammen mit dem normalen Hausmüll entsorgt werden darf um Umwelt oder Personenschäden durch unkontrollierte Abfallentsorgung zu vermeiden Bitte entsorgen Sie dieses Produkt getrennt von anderen Abfällen und führen es zur Förde...

Page 27: ...cie lub związanych z nim dokumentach wskazuje iż urządzenie po zakończeniu okresu użytkowania nie może być utylizowane razem ze standar dowymi odpadami domowymi aby uniknąć szkód w środowisku lub szkód na osobie powstałych w wyniku niekontrolowanego usuwania odpadów Niniejszy produkt należy utylizować oddzielnie od innych odpadów i przekazać do punktu recyklingu w celu ponownego wykorzystania użyt...

Page 28: ...28 WWW CAMEOLIGHT COM Adam Hall GmbH Daimlerstrasse 9 61267 Neu Anspach Germany Tel 49 0 6081 9419 0 Fax 49 0 6081 9419 1000 web www adamhall com e mail mail adamhall com REV 01 ...

Reviews: