background image

2

EN

You‘ve made the right choice!

We have designed this product to operate reliably over many years. Please read this User‘s Manual carefully, so that you can begin making optimum 

use of your Cameo Light product quickly. Learn more about Cameo Light on our website WWW.

CAMEOLIGHT

.COM.

DE

Sie haben die richtige Wahl getroffen!

Dieses Gerät wurde unter hohen Qualitätsanforderungen entwickelt und gefertigt, um viele Jahre einen reibungslosen Betrieb zu gewährleisten.

Bitte lesen Sie diese Bedienungsanleitung sorgfältig, damit Sie Ihr neues Produkt von Cameo Light schnell und optimal einsetzen können.

Weitere Informationen über Cameo Light erhalten Sie auf unserer Website WWW.

CAMEOLIGHT

.COM.

FR

Vous avez fait le bon choix!

Cet appareil a été développé et fabriqué en appliquant des exigences de qualité très élevées: il garantit des années de fonctionnement sans prob-

lème.Veuillez lire attentivement ce Manuel Utilisateur : vous apprendrez rapidement à utiliser votre appareil Cameo Light de façon optimale. 

Vous trouverez davantage d‘informations à propos de Cameo Light sur notre site Web: WWW.

CAMEOLIGHT

.COM.

ES

¡Gracias por elegir Cameo Light!

Este equipo está diseñado y fabricado con los estándares de calidad más exigentes, para garantizar un correcto funcionamiento durante muchos 

años.Lea atentamente este manual de usuario para poder aprovechar rápidamente toda la funcionalidad de su nuevo producto de Cameo Light. 

Más información sobre Cameo Light en la web WWW.

CAMEOLIGHT

.COM.

PL

Gratulujemy wyboru!

To urządzenie zostało zaprojektowane i wyprodukowane przy zastosowaniu najwyższych kryteriów jakościowych w celu zapewnienia wieloletniej 
bezawaryjnej eksploatacji. Proszę starannie przeczytać niniejszą instrukcję obsługi, aby móc jak najszybciej zacząć użytkować ten produkt marki 
Cameo Light. Więcej informacji na temat Cameo Light znajdą Państwo na naszej stronie internetowej pod adresem WWW.

CAMEOLIGHT

.COM.

IT

Avete fatto la scelta giusta!

Questo dispositivo è stato sviluppato e prodotto in conformità con elevati standard qualitativi che ne garantiscono il regolare funzionamento per molti 

anni. Leggete attentamente questo manuale d‘uso per utilizzare al meglio il vostro nuovo prodotto Cameo Light. Per maggiori informazioni su Cameo 

Light consultare la nostra pagina Web WWW.

CAMEOLIGHT

.COM.

EN

PREVENTIVE MEASURES

1. Please read these instructions carefully. 

2. Keep all information and instructions in a safe place. 

3. Follow the instructions. 

4. Observe all safety warnings. Never remove safety warnings or other information from the equipment. 

5. Use the equipment only in the intended manner and for the intended purpose. 

6. Use only sufficiently stable and compatible stands and/or mounts (for fixed installations). Make certain that wall mounts are properly installed and secured. 

Make certain that the equipment is installed securely and cannot fall down. 

7. During installation, observ  e the applicable safety regulations for your country. 

8. Never install and operate the equipment near radiators, heat registers, ovens or other sources of heat. Make certain that the equipment is always 

installed so that is cooled sufficiently and cannot overheat. 

9. Never place sources of ignition, e.g., burning candles, on the equipment. 

10. Ventilation slits must not be blocked. 

11. This appliance is designed exclusively for indoor use, do not use this equipment in the immediate vicinity of water (does not apply to special out-

door equipment - in this case, observe the special instructions noted below). Do not expose this equipment to flammable materials, fluids or gases. 

12. Make certain that dripping or splashed water cannot enter the equipment. Do not place containers filled with liquids, such as vases or drinking 

vessels, on the equipment. 

13. Make certain that objects cannot fall into the device. 

14. Use this equipment only with the accessories recommended and intended by the manufacturer. 

15. Do not open or modify this equipment. 

16. After connecting the equipment, check all cables in order to prevent damage or accidents, e.g., due to tripping hazards. 

17. During transport, make certain that the equipment cannot fall down and possibly cause property damage and personal injuries.

18. If your equipment is no longer functioning properly, if fluids or objects have gotten inside the equipment or if it has been damaged in anot her 

way, switch it off immediately and unplug it from the mains outlet (if it is a powered device). This equipment may only be repaired by authorized, 

qualified personnel. 

19. Clean the equipment using a dry cloth. 

20. Comply with all applicable disposal laws in your country. During disposal of packaging, please separate plastic and paper/cardboard. 

21. Plastic bags must be kept out of reach of children.

FOR EQUIPMENT THAT CONNECTS TO THE POWER MAINS:

22. CAUTION: If the power cord of the device is equipped with an earthing contact, then it must be connected to an outlet with a protective ground. 

Never deactivate the protective ground of a power cord. 

23. If the equipment has been exposed to strong fluctuations in temperature (for example, after transport), do not switch it on immediately. Moisture 

and condensation could damage the equipment. Do not switch on the equipment until it has reached room temperature. 

24. Before connecting the equipment to the power outlet, first verify that the mains voltage and frequency match the values specified on the equip-

ment. If the equipment has a voltage selection switch, connect the equipment to the power outlet only if the equipment values and the mains power 

values match. If the included power cord or power adapter does not fit in your wall outlet, contact your electrician. 

Summary of Contents for CLIA1000PRO

Page 1: ...1 USER S MANUAL BEDIENUNGSANLEITUNG MANUEL D UTILISATION MANUAL DE USUARIO INSTRUKCJA OBSŁUGI MANUALE D USO WIND MACHINE INSTANT AIR PRO CLIA1000PRO REMOTE CONTROL ...

Page 2: ...installations Make certain that wall mounts are properly installed and secured Make certain that the equipment is installed securely and cannot fall down 7 During installation observ e the applicable safety regulations for your country 8 Never install and operate the equipment near radiators heat registers ovens or other sources of heat Make certain that the equipment is always installed so that i...

Page 3: ...is equipment is subject to the respectively applicable national accident prevention rules and regulations As a manufacturer Adam Hall is obligated to notify you formally about the existence of potential health risks Hea ring damage due to high volume and prolonged exposure When in use this product is capable of producing high sound pressure levels SPL that can lead to irreversible hearing damage i...

Page 4: ...nder ein und aus da sonst die Lebensdauer des Geräts beeinträchtigt werden könnte 28 WICHTIGER HINWEIS Ersetzen Sie Sicherungen ausschließlich durch Sicherungen des gleichen Typs und Wertes Sollte eine Sicherung wiederholt auslösen wenden Sie sich bitte an ein autorisiertes Servicezentrum 29 Um das Gerät vollständig vom Stromnetz zu trennen entfernen Sie das Netzkabel bzw den Netzadapter aus der S...

Page 5: ... Pour le nettoyage de l appareil utilisez un chiffon sec 20 Observez toutes les réglementations en vigueur dans votre pays pour mettre l appareil au rebut Lorsque vous jetez l emballage de l appareil veuillez séparer plastique papier et carton 21 Les films plastique doivent être mis hors de portée des enfants APPAREILS RELIÉS AU SECTEUR 22 ATTENTION Si le câble de l appareil est muni d un fil de t...

Page 6: ...toute particulière est conseillée aux personnes à cheveux longs si les cheveux se prennent dans le ventilateur il peut en résulter des blessures graves Veillez à ce que l aspiration de l air puisse s effectuer librement Assurez vous que la saleté le sable les poussières ne puissent pas être aspirées ES MEDIDAS DE SEGURIDAD 1 Lea atentamente las instrucciones de este manual 2 Guarde toda la informa...

Page 7: ...a evitar cualquier sobrecalentamiento o fallo de funcionamiento mantenimiento y limpieza no cubiertos por la garantía 34 Asimismo deberá dejarse una distancia mínima de 0 5 metros con cualquier material inflamable ATENCIÓN Para evitar el riesgo de descarga eléctrica no retire la tapa El equipo no contiene elementos que el usuario pueda reparar o sustituir Para cualquier tarea de mantenimiento o re...

Page 8: ...a elektrycznego należy sprawdzić czy napięcie i częstotliwość sieci elektrycznej odpowiada wartościom podanym na urządzeniu Jeśli urządzenie jest wyposażone w przełącznik napięcia należy podłączyć je do gniazda tylko wówczas gdy wartości urządzenia odpowiadają wartościom sieci elektrycznej Jeśli dołączony kabel sieciowy lub dołączony adapter sieciowy nie pasuje do gniazda elektrycznego należy skon...

Page 9: ...teressa i dispositivi specifici per l esterno per i quali valgono le indicazioni speciali riportate di seguito Non portare mai il dispositivo a contatto con materiali liquidi o gas infiammabili 12 Accertarsi che all interno del dispositivo non possa penetrare acqua per gocciolamento o spruzzo Non collocare sul dispositivo oggetti contenenti liquidi quali vasi tazze o bicchieri 13 Assicurarsi che n...

Page 10: ...la cassa potrebbero scaldarsi durante l impiego Dopo aver usato l apparecchiatura lasciarla raffreddare per almeno 10 minuti prima di toccarla o trasportarla ATTENZIONE PRODOTTI AUDIO con LIVELLI SONORI ELEVATI Questo dispositivo è destinato a uso professionale Il suo utilizzo in ambito commerciale è soggetto alle normative e alle direttive nazionali vigenti in materia di prevenzione di infortuni ...

Page 11: ... Leistungsaufnahme 75W FR Introduction INSTANT AIR PRO CLIA1000PRO FONCTIONS DE PILOTAGE Pilotage DMX sur 1 canal Mode manuel Télécommande RF FONCTIONNALITÉS Machine à vent professionnelle boîtier métallique robuste piètement réglable fonctionnement silencieux pilotage DMX 512 mode manuel contrôle par télécommande sans fil RF entrées et sorties DMX sur embases 3 et 5 points tension d alimentation ...

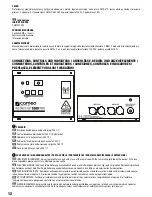
Page 12: ...ment le fusible par un fusible neuf du même format et du même calibre valeurs indiquées sur le panneau arrière de l appareil Si le fusible fond de façon répétée veuillez consulter un centre de réparations agréé ES NOTA IMPORTANTE Sustituya el fusible únicamente por otro del mismo tipo y características serigrafiadas en el equipo Si el fusible se fundiera continuamente póngase en contacto con un se...

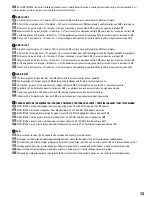
Page 13: ...ual operation DE Das dreistellige LED Display zeigt die DMX Adresse und die Menüpunkte für die manuelle Steuerung an FR Cet afficheur lumineux à trois caractères LED indique l adresse DMX et les éléments de menu relatifs à l utilisation manuelle ES La pantalla LED de tres dígitos muestra la dirección DMX y las opciones de menú para controlar el equipo manualmente PL Trzycyfrowy wyświetlacz LED wsk...

Page 14: ...MX Signal an werden nun im Display 3 Minus zeichen angezeigt liegt ein Signal an die DMX Adresse Stellen Sie die gewünschte DMX Adresse mit Hilfe der Tasten UP und DOWN ein 001 512 Taste gedrückt halten für schnelle Wertänderung Die synchrone Ansteuerung mehrerer Geräte des gleichen Modells durch ein DMX Steuergerät z B DMX Pult erreichen Sie indem Sie die Geräte auf die identische DMX Startadress...

Page 15: ...l equipo detecta una señal DMX desconecte el equipo de cualquier red DMX Man tenga pulsado el botón START MODE durante unos 5 segundos para activar el control mediante el mando a distancia se enciende el punto entre los dígitos 1 y 2 de la pantalla La velocidad del ventilador se ajusta en el equipo por medio del potenciómetro 7 A continuación pulse el botón ON del mando a distancia para poner en m...

Page 16: ... assegnazione dei canali è riportata più avanti in questo manuale alla sezione CONTROLLO DMX FUNZIONAMENTO MANUALE Poiché il funzionamento manuale non è possibile se sul dispositivo è presente un segnale DMX staccare il dispositivo da qualsiasi interconnessione DMX Utilizzare il tasto START MODE per attivare la modalità di funzionamento manuale premere brevemente Girando la manopola 7 si imposta l...

Page 17: ... the first DMX device e g DMX Controller 2 Connect the female 3 pin XLR connector of the DMX cable connected to the first projector to the DMX input male 3 pin socket of the next DMX device In the same way connect the DMX output of this device to the DMX input of the next device and repeat until all devices have been connected Please note that as a rule DMX devices are connected in series and conn...

Page 18: ...ts z B DMX Controller 2 Verbinden Sie den weibliche XLR Stecker des an den ersten Scheinwerfer angeschlossenen DMX Kabels mit dem DMX Eingang männliche XLR Buchse des nächsten DMX Geräts Verbinden Sie den DMX Ausgang dieses Geräts in der gleichen Weise mit dem DMX Eingang des nächsten Geräts und so weiter Bitte beachten Sie dass DMX Geräte grundsätzlich seriell verschaltet werden und die Verbindun...

Page 19: ...eur XLR mâle de l appareil DMX suivant Reliez la sortie DMX de cet appareil selon le même méthode à l entrée DMX de l appareil DMX suivant et ainsi de suite Veillez à ce que tous les appareils DMX soient reliés en série et n oubliez pas que les liaisons ne peuvent être partagées sans utiliser de splitter actif Ne pas dépasser le nombre maximal d appareils par chaîne DMX soit 32 Vous trouverez un c...

Page 20: ...hembra del cable DMX del primer foco a la entrada DMX del equipo siguiente conector de chasis macho Conecte la salida DMX de este último equipo a la entrada DMX del equipo siguiente y así sucesivamente Tenga en cuenta que los dispositivos DMX están conectados en serie y que las conexiones no se pueden dividir sin un splitter activo El número máximo de equipos DMX conectados en cadena es de 32 Las ...

Page 21: ...ą wtyczkę XLR kabla DMX podłączonego do pierwszego reflektora podłączyć do wejścia DMX męskie gniazdo XLR następnego urządzenia DMX Wyjście DMX tego urządzenia podłączyć w taki sam sposób do wejścia DMX następnego urządzenia i tak dalej Należy pamiętać że urządzenia DMX podłącza się szeregowo a połączeń nie można rozdzielać bez aktywnego rozdzielacza Maksymalna liczba urządzeń DMX w łańcuchu DMX n...

Page 22: ...imo proiettore DMX con l ingresso DMX presa XLR maschio del successivo dispositivo DMX Analogamente collegare l uscita DMX di questo dispositivo con l ingresso DMX del dispositivo seguente e così via Tenere presente che in linea di principio i dispositivi DMX sono collegati in serie e i collegamenti non si possono condividere senza uno splitter attivo In una catena DMX i dispositivi DMX non posson...

Page 23: ...l Metall SPECIFICATIONS TECHNISCHE DATEN CARACTÉRISTIQUES TECHNIQUES CARACTERÍSTICAS TÉCNICAS PRZYŁĄCZA WYMIARY I MONTAŻ DATI TECNICI EN Model Name CLIA1000PRO Product Type wind machine Maximal Air Flow 56 m min Maximum Distance 21 m Noise 45 dB 51 dB Fan Diameter 310 mm DMX Input 3 pin XLR male 5 pin XLR male DMX Output 3 pin XLR female 5 pin XLR female DMX Mode 1 channel DMX Functions fan Standa...

Page 24: ...r de type Schuko CEE 7 7 Fusible T1 6AL 250V 5 x 20 mm Température d utilisation 0 C 40 C Taux d hygrométrie relative 85 sans condensation Matériau Boîtier métal Couleur Boîtier noir Dimensions Ø x H avec piètement 385 x 515 mm Masse 8 5 kg Divers Poignée de transport intégrée piètement réglable ES Nombre del modelo CLIA1000PRO Tipo de producto Máquina de viento Caudal de aire máximo 56 m min Dist...

Page 25: ...ącze zasilania podłączony na stałe kabel sieciowy z wtyczką CEE 7 7 Bezpiecznik T1 6AL 250 V 5 x 20 mm Temperatura pracy 0 C 40 C Względna wilgotność powietrza 85 bez kondensacji Materiał obudowy metal Kolor obudowy czarny Wymiary Ø x wys stojak 385 x 515 mm Waga 8 5 kg Pozostałe cechy uchwyt do przenoszenia regulowany stojak w zestawie IT Nome del modello CLIA1000PRO Tipo di prodotto Macchina del...

Page 26: ...nderen europäischen Ländern mit Mülltrennung Dieses Symbol auf dem Produkt oder dazugehörigen Dokumenten weist darauf hin dass das Gerät am Ende der Produktlebenszeit nicht zusammen mit dem normalen Hausmüll entsorgt werden darf um Umwelt oder Personenschäden durch unkontrollierte Abfallentsorgung zu vermeiden Bitte entsorgen Sie dieses Produkt getrennt von anderen Abfällen und führen es zur Förde...

Page 27: ...cie lub związanych z nim dokumentach wskazuje iż urządzenie po zakończeniu okresu użytkowania nie może być utylizowane razem ze standar dowymi odpadami domowymi aby uniknąć szkód w środowisku lub szkód na osobie powstałych w wyniku niekontrolowanego usuwania odpadów Niniejszy produkt należy utylizować oddzielnie od innych odpadów i przekazać do punktu recyklingu w celu ponownego wykorzystania użyt...

Page 28: ...28 WWW CAMEOLIGHT COM Adam Hall GmbH Daimlerstrasse 9 61267 Neu Anspach Germany Tel 49 0 6081 9419 0 Fax 49 0 6081 9419 1000 web www adamhall com e mail mail adamhall com REV 01 ...

Reviews: