background image

21

E. DMX-BETRIEBSART (DMX)

Drei verschiedene DMX-Betriebsarten stehen zur Auswahl: 5-Kanal, 13-Kanal und 22-Kanal (DMX 05CH, 13CH, 22CH). Die Einstellung erfolgt wie zuvor 

unter Punkt D. BETRIEBSART EINSTELLEN beschrieben. Tabellen mit der Kanalbelegung der verschiedenen DMX-Modi finden Sie in dieser Anleitung 

unter DMX-STEUERUNG.

Mode DMX 22CH

F. SLAVE-BETRIEB (Slave)

Die Einstellung erfolgt wie zuvor unter Punkt D. BETRIEBSART EINSTELLEN beschrieben.

Verbinden Sie die Slave- und die Master-Einheit (gleiches Modell) mit Hilfe eines DMX-Kabels. Aktivieren Sie in der Master-Einheit eine der Standalone 

Betriebsarten (Auto, Sound, Static). Nun folgt die Slave-Einheit der Master-Einheit.

Mode         Slave

G. AUTO-BETRIEBSART (Prog1 - Prog8)

Die 8 verschiedenen Auto-Programme bestehen jeweils aus einer Abfolge fest programmierter Farbwechsel-, Gobowechsel- und Bewegungsabläufe.

Durch Drücken der MODE-Taste gelangen Sie in das Auswahl-Menü für Systemeinstellungen (System Settings). Mit Hilfe der Pfeiltasten wählen Sie 

nun den Menü-Punkt „Mode“ aus (dunkel hinterlegt) und bestätigen mit ENTER. Die Zeichen, die die Betriebsart anzeigen, wechseln ihre Farbe auf 

Rot und Sie können mit Hilfe der  und - die Auto-Betriebsart auswählen. Bestätigen Sie 2x mit ENTER und wählen nun mit Hilfe der  

und - eines der 8 Auto-Programme (Prog1 - Prog8), bestätigen mit ENTER und wählen jetzt mit Hilfe der Pfeiltasten den Menüpunkt „AutoSpeed“ aus, 

um die Programm-Laufgeschwindigkeit wunschgemäß einzustellen. Drücken Sie auf ENTER und stellen die Geschwindigkeit von 000 bis 255 mit Hilfe 

der  und - ein.  Bestätigen Sie mit ENTER und drücken 3x die MODE-Taste, um zur Hauptanzeige zurückzugelangen.

Mode          Auto

Auto Mode

Auto 

Prog 8

AutoSpeed 

   225

H. MUSIKSTEUERUNG (Sound)

Durch Drücken der MODE-Taste gelangen Sie in das Auswahl-Menü für Systemeinstellungen (System Settings). Mit Hilfe der Pfeiltasten wählen Sie nun 

den Menü-Punkt „Mode“ aus (dunkel hinterlegt) und bestätigen mit ENTER. Die Zeichen, die die Betriebsart anzeigen, wechseln ihre Farbe auf Rot und 

Sie können mit Hilfe der  und - die Betriebsart für die Musiksteuerung (Sound) auswählen. Indem Sie mit ENTER bestätigen, kann nun auch die 

Mikrofonempfindlichkeit mit Hilfe der + und - Tasten eingestellt werden (Sen00% = minimale Empfindlichkeit, Sen99% = maximale Empfindlichkeit). 

Bestätigen Sie mit ENTER und drücken 2x die MODE-Taste, um zur Hauptanzeige zurückzugelangen. Nun wird der Scheinwerfer über das eingebaute 

Mikrofon gesteuert und folgt dem Takt der Musik (Bassimpulse). 

Mode       Sound
Mode    Sen99%

I. STATISCHER MODUS (Static)

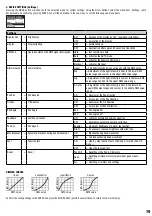
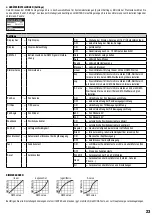
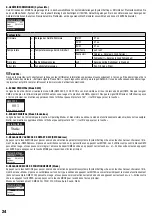
Der statische Modus ermöglicht es, ähnlich wie mit einem DMX-Steuergerät, alle Funktionen, wie z.B. Pan, Tilt, Farb- und Goborad und Stroboskop, 

direkt am Gerät mit Werten von 000 bis 255 einstellen zu können. Somit kann eine Szene erstellt werden, ohne einen zusätzlichen DMX-Controller zu 

benötigen. Durch Drücken der MODE-Taste gelangen Sie in das Auswahl-Menü für Systemeinstellungen (System Settings). Mit Hilfe der Pfeiltasten 

wählen Sie nun den Menü-Punkt „Mode“ aus (dunkel hinterlegt) und bestätigen mit ENTER. Die Zeichen, die die Betriebsart anzeigen, wechseln ihre 

Farbe auf Rot und Sie können mit Hilfe der  und - die Betriebsart für den Statischen Modus (Static) auswählen. Nachdem Sie mit ENTER 

bestätigt haben, können nun die Parameter mit Hilfe der Pfeiltasten angewählt werden (siehe Liste). Drücken Sie auf ENTER. Der Wert des Parameters 

kann jetzt mit Hilfe der  und - verändert werden. Bestätigen Sie die Eingabe mit ENTER. Nachdem alle Parameter wunschgemäß eingestellt 

wurden, drücken Sie mehrfach die Taste MODE um zurück zur Hauptanzeige zu gelangen.

Mode        Static

Static

Pan

000

-

255 0% to 100% 

Pan fine

000

-

255 0% to 100% 

Tilt

000

-

255 0% to 100% 

Tilt fine

000

-

255 0% to 100% 

Strobe

000

-

005 Strobe open

006

-

010 Strobe closed

011

-

033 Pulse Random, slow -> fast

034

-

056 Ramp up Random, slow -> fast

057

-

079 Ramp down Random, slow -> fast

080

-

102 Random Strobe Effect, slow -> fast

103

-

127 Strobe Break Effect, 5s…..1s (Short burst with break)

128

-

250 Strobe slow -> fast <1Hz - 20Hz

251

-

255 Strobe open

Dimmer

000

-

255 0% to 100% 

Summary of Contents for AURO SPOT CLAS100

Page 1: ...1 USER S MANUAL BEDIENUNGSANLEITUNG MANUEL D UTILISATION MANUAL DE USUARIO INSTRUKCJA OBSŁUGI MANUALE D USO AURO SPOT LED MOVING HEAD AURO SPOT CLAS100 CLAS200 ...

Page 2: ...installations Make certain that wall mounts are properly installed and secured Make certain that the equipment is installed securely and cannot fall down 7 During installation observ e the applicable safety regulations for your country 8 Never install and operate the equipment near radiators heat registers ovens or other sources of heat Make certain that the equipment is always installed so that i...

Page 3: ...ls SPL that can lead to irreversible hearing damage in performers employees and audience members For this reason avoid prolonged exposure to volumes in excess of 90 dB CAUTION IMPORTANT INFORMATION ABOUT LIGHTING PRODUCTS 1 The product has been developed for professional use in the field of event technology and is not suitable as household lighting 2 Do not stare even temporarily directly into the...

Page 4: ...lex Gerätestecker entsperrt werden bevor er entfernt werden kann Das bedeutet aber auch dass das Gerät durch ein Ziehen am Netzkabel verrutschen und herunterfallen kann wodurch Personen verletzt werden und oder andere Schäden auftreten können Verlegen Sie Ihre Kabel daher immer sorgfältig 31 Entfernen Sie Netzkabel und Netzadapter aus der Steckdose bei Gefahr eines Blitzschlags oder wenn Sie das G...

Page 5: ...ure de la pièce 24 Avant de relier l appareil à la prise murale vérifiez que la valeur et la fréquence de tension secteur sur laquelle il est réglé correspondent bien à la valeur et à la fréquence de la tension secteur locale Si l appareil possède un sélecteur de tension ne le branchez sur la prise murale qu après avoir vérifié que la valeur réglée correspond à la valeur effective de la tension se...

Page 6: ...n los accesorios recomendados por el fabricante 15 No abra el equipo ni intente modificarlo 16 Una vez conectado el equipo compruebe que en toda la longitud del cableado no hay peligro de que provoque una caída por ejemplo 17 Durante el transporte asegúrese de que el equipo no se caiga y pueda causar daños personales o materiales 18 Si el equipo no funciona correctamente o si se ha vertido líquido...

Page 7: ...eży przestrzegać wszystkich wskazówek ostrzegawczych Nie wolno usuwać wskazówek bezpieczeństwa ani innych informacji znajdujących się na urządzeniu 5 Używać urządzenia wyłącznie w sposób zgodny z jego przeznaczeniem 6 Stosować wyłącznie stabilne i pasujące statywy ew elementy mocujące w przypadku instalacji stałych Należy zadbać o prawidłową instalację uchwytów ściennych i ich odpowiednie zabezpie...

Page 8: ...zez użytkownika Czynności konserwacyjne i naprawy może przeprowadzać wyłącznie wykwalifikowany personel serwisowy Trójkąt równoboczny z symbolem błyskawicy sygnalizuje nieizolowane niebezpieczne napięcie we wnętrzu urządzenia które może spowodować porażenie prądem Trójkąt równoboczny z wykrzyknikiem oznacza ważne wskazówki dotyczące obsługi i konserwacji UWAGA WYSOKI POZIOM GŁOŚNOŚCI PRODUKTÓW AUD...

Page 9: ...clusivamente con fusibili dello stesso tipo e valore Se un fusibile continua a saltare rivolgersi a un centro di assistenza autorizzato 29 Per staccare completamente il dispositivo dalla rete elettrica rimuovere il cavo di rete o l adattatore di rete dalla presa 30 Per staccare un dispositivo provvisto di presa Volex è prima necessario sbloccare la relativa spina Volex del dispositivo stesso Tiran...

Page 10: ...ment This remote management system allows the status query and configuration of RDM devices via an RDM enabled controller DE Einführung LED MOVING HEAD AURO SPOT CLAS100 CLAS200 STEUERUNGSFUNKTIONEN 5 Kanal 13 Kanal 22 Kanal DMX Steuerung Master Slave Betrieb Standalone Funktionen EIGENSCHAFTEN High Power LEDs Farbrad mit 8 brillanten Farben Weiß Split Farben 6 austauschbare Gobos offen rotierende...

Page 11: ...et le suivi des appareils compatibles via un contrôleur compatible RDM ES Introducción CABEZA MÓVIL LED AURO SPOT CLAS100 CLAS200 MODOS DE CONTROL Control DMX de 5 canales 13 canales 22 canales Modo Maestro Esclavo Modos Autónomo CARACTERÍSTICAS LED de gran potencia rueda de colores con 8 colores brillantes blanco división de colores 6 gobos intercambiables vacío prisma giratorio de 3 caras enfoqu...

Page 12: ...zdalnego sterowania urządzeniem umożliwia przesyła nie zapytań o status i konfigurację urządzeń końcowych RDM za pomocą sterownika obsługującego standard RDM IT Introduzione TESTA MOBILE A LED AURO SPOT CLAS100 CLAS200 FUNZIONI DI COMANDO Controllo DMX a 5 canali 13 canali 22 canali Funzionamento master slave Funzioni standalone CARATTERISTICHE LED di grande potenza ruota colori con 8 colori brill...

Page 13: ... ES Salida eléctrica por Neutrik powerCON Sirve para alimentar otros focos CAMEO Asegúrese de que el consumo total de todos los equipos conectados no supere los amperios especificados del equipo PL Gniazdo sieciowe wyjściowe Neutrik PowerCON Gniazdo służy do zasilania dodatkowych reflektorów CAMEO Należy upewnić się że całkowity pobór mocy wszystkich podłączonych urządzeń nie przekracza wartości p...

Page 14: ...nts mâle pour branchement d un contrôleur DMX par exemple pupitre DMX ES XLR macho de 5 pines para conectar un equipo de control DMX como una mesa DMX PL 5 stykowe męskie gniazdo XLR do podłączenia urządzenia sterującego DMX np pulpitu DMX IT Presa XLR maschio a 5 poli per il collegamento di un dispositivo di controllo DMX ad esempio un mixer DMX 7 DMX OUT EN 5 pin female XLR socket for looping th...

Page 15: ...les modifications de valeurs de paramètres doivent être validées en appuyant sur la touche ENTER ET Permet de modifier à volonté la valeur d un paramètre sélectionné par exemple l adresse de départ DMX ES MODE pulse el botón MODE para acceder al menú de configuración del sistema Pulse este botón repetidamente para volver a la pantalla principal BOTONES Y estos botones permiten seleccionar las opci...

Page 16: ...à di funzionamento Controllo tramite musica si trova sul lato inferiore del faro OPERATION BEDIENUNG UTILISATION OPERACIÓN OBSŁUGA UTILIZZO EN NOTE When the spotlight is properly connected to the mains Software Update Please Wait only for internal purposes and the CAMEO logo appear successively on the display during the startup process and resetting of the motors After this operation the spotlight...

Page 17: ...d and confirm by pressing ENTER The digits which show the operating mode change their colour to red and you can use the and buttons to select the desired Music control mode Sound By pressing ENTER to confirm the microphone sensitivity can now also be adjusted using the and buttons Sen00 minimum sensitivity Sen99 maximum sensitivity Confirm with ENTER and press the MODE button 2x to return to the m...

Page 18: ... Gobo 2 046 065 Gobo 3 066 085 Gobo 4 086 105 Gobo 5 106 127 Gobo 6 128 128 Gobo Wheel Rotation Stop 129 191 Gobo Wheel Rotation Slow Fast CW 192 255 Gobo Wheel Rotation Fast Slow CCW GoboRota 000 005 Gobo Rotation off 006 127 Gobo Position 0 360 128 128 Gobo Rotation Stop 129 191 Gobo Rotation Slow Fast CW 192 250 Gobo Rotation Fast Slow CCW 251 255 Gobo Rotation Stop GoboShake 000 005 Gobo Shake...

Page 19: ... Curve Adjustment of the light intensity is finer in the lower and upper DMX value ranges and coarser in the middle DMX value range Pan Rev Pan Reverse ON Reversal of the Pan direction OFF no reversal of the Pan direction Tilt Rev Tilt Reverse ON Reversal of the Tilt direction OFF no reversal of the Tilt direction Pan Angle Pan Angle 630 Pan angle 630 540 Pan angle 540 Feedback position correction...

Page 20: ...lt das Display wieder zur Hauptanzeige Die Display Anzeige kann um 180 gedreht werden indem Sie die Taste betätigen DMX 22Ch 001 Press Mode To Nagivate B HAUPTANZEIGE Standalone Betriebsart In der oberen Zeile des Displays wird Operating Mode und gut sichtbar in der Mitte die Standalone Betriebsart angezeigt Beispiel Static Die Display Anzeige kann um 180 gedreht werden indem Sie die Taste betätig...

Page 21: ...nd bestätigen mit ENTER Die Zeichen die die Betriebsart anzeigen wechseln ihre Farbe auf Rot und Sie können mit Hilfe der Tasten und die Betriebsart für die Musiksteuerung Sound auswählen Indem Sie mit ENTER bestätigen kann nun auch die Mikrofonempfindlichkeit mit Hilfe der und Tasten eingestellt werden Sen00 minimale Empfindlichkeit Sen99 maximale Empfindlichkeit Bestätigen Sie mit ENTER und drüc...

Page 22: ... Gobo 2 046 065 Gobo 3 066 085 Gobo 4 086 105 Gobo 5 106 127 Gobo 6 128 128 Gobo Wheel Rotation Stop 129 191 Gobo Wheel Rotation Slow Fast CW 192 255 Gobo Wheel Rotation Fast Slow CCW GoboRota 000 005 Gobo Rotation off 006 127 Gobo Position 0 360 128 128 Gobo Rotation Stop 129 191 Gobo Rotation Slow Fast CW 192 250 Gobo Rotation Fast Slow CCW 251 255 Gobo Rotation Stop GoboShake 000 005 Gobo Shake...

Page 23: ...sst sich im unteren und oberen DMX Wertbereich fein und im mittleren DMX Wertbereich grob einstellen Pan Rev Pan Reverse ON Umkehrung der Pan Bewegungsrichtung OFF keine Umkehrung der Pan Bewegungsrichtung Tilt Rev Tilt Reverse ON Umkehrung der Tilt Bewegungsrichtung OFF keine Umkehrung der Tilt Bewegungsrichtung Pan Angle Pan Winkel 630 Pan Winkel 630 540 Pan Winkel 540 Feedback Positionskorrektu...

Page 24: ...ipal Les mentions apparaissant dans l afficheur peuvent pivoter à 180 il suffit d appuyer sur la touche DMX 22Ch 001 Press Mode To Navigate B ÉCRAN PRINCIPAL Mode Standalone La ligne du haut de l écran indique la mention Operating Mode et bien visible au milieu le mode de fonctionnement autonome dans notre exemple Static Les mentions apparaissant dans l afficheur peuvent pivoter à 180 il suffit d ...

Page 25: ...puyant sur ENTER Les caractères indiquant le mode de fonctionnement passent en rouge et vous pouvez alors choisir le mode de pilotage par la musique Sound avec les touches et Après avoir validé votre choix en appuyant sur ENTER vous pouvez régler la sensibilité du microphone avec les touches et Sen00 sensibilité minimale Sen99 sensibilité maximale Validez par ENTER puis appuyez 2 fois sur la touch...

Page 26: ...tation roue de gobos Lent rapide sens des aiguilles d une montre 192 255 Rotation roue de gobos rapide lente sens inverse des aiguilles d une montre GoboRota 000 005 Arrêt rotation gobo 006 127 Position gobo 0 360 128 128 Arrêt rotation gobo 129 191 Rotation gobo lente rapide sens des aiguilles d une montre 192 250 Rotation gobo rapide lente sens des aiguilles d une montre 251 255 Arrêt rotation g...

Page 27: ...our les valeurs DMX basses et élevées et plus rapidement pour les valeurs DMX moyennes courbe en S Pan Rev Inversion du Pan ON inversion du sens de mouvement de Pan OFF pas d inversion du sens de mouvement de Pan Tilt Rev Inversion du Tilt ON inversion du sens de mouvement de Tilt OFF pas d inversion du sens de mouvement de Tilt Pan Angle Angle de Pan 630 angle de Pan 630 540 angle de Pan 540 Feed...

Page 28: ...mpe el color de fondo de la pantalla cambiará a rojo y se mostrará el mensaje No DMX Cuando se recupere la señal DMX se volverá a la pantalla principal La pantalla se puede girar 180 pulsando el botón DMX 22Ch 001 Press Mode To Nagivate B PANTALLA PRINCIPAL modo Autónomo En la fila superior de la pantalla se muestra Operating Mode y en el centro se muestra el modo de funcionamiento autónomo por ej...

Page 29: ...a y confirme con el botón ENTER Los caracteres que indican el modo operativo cambiarán a color rojo a continuación utilice los botones y para seleccionar el modo Control por sonido Sound Confirme con ENTER y luego con los botones y ajuste la sensibilidad del micrófono Sen00 sensibilidad mínima Sen99 sensibilidad máxima Confirme la selección con el botón ENTER y pulse MODE dos veces para volver a l...

Page 30: ...rotación de rueda de gobos 129 191 Rotación de rueda de gobos lento rápido sentido horario 192 255 Rotación de rueda de gobos rápido lento sentido antihorario GoboRota 000 005 Desactivar rotación de gobos 006 127 Posición de gobos 0 360 128 128 Detener rotación de gobos 129 191 Rotación de gobos lento rápido sentido horario 192 250 Rotación de gobos rápido lento sentido antihorario 251 255 Detener...

Page 31: ...n Rev Invertir pan ON invertir el sentido de giro horizontal pan OFF no invertir el sentido de giro horizontal pan Tilt Rev Invertir tilt ON invertir el sentido de giro vertical tilt OFF no invertir el sentido de giro vertical tilt Pan Angle Ángulo pan 630 límite de giro horizontal pan de 630 540 límite de giro horizontal pan de 540 Feedback Corrección de la posición ON con corrección automática d...

Page 32: ...ony i zostaje wyświetlony napis No DMX Brak sygnału DMX Jeśli sygnał jest ponownie podawany na wyświetlaczu ponownie pojawia się wskazanie główne Wskazanie wyświetlacza można obrócić o 180 poprzez naciśnięcie przycisku DMX 22Ch 001 Press Mode To Nagivate B WSKAZANIE GŁÓWNE tryb pracy Standalone W górnym wierszu wyświetlacza widoczny jest napis Operating Mode Tryb pracy a pośrodku w dobrze widoczny...

Page 33: ...ocą strzałek wybrać teraz pozycję menu Mode Tryb ciemne podświetlenie i potwierdzić przyciskiem ENTER Kolor znaków określających tryb pracy zmieni się na czerwony Za pomocą przycisków i można wybrać tryb pracy sterowanie muzyką Sound Po naciśnięciu przycisku ENTER można ustawić czułość mikrofonu za pomocą przycisków oraz Sen00 czułość minimalna Sen99 czułość maksymalna Potwierdzić przyciskiem ENTE...

Page 34: ... Gobo 2 046 065 Gobo 3 066 085 Gobo 4 086 105 Gobo 5 106 127 Gobo 6 128 128 Gobo Wheel Rotation Stop 129 191 Gobo Wheel Rotation Slow Fast CW 192 255 Gobo Wheel Rotation Fast Slow CCW GoboRota 000 005 Gobo Rotation off 006 127 Gobo Position 0 360 128 128 Gobo Rotation Stop 129 191 Gobo Rotation Slow Fast CW 192 250 Gobo Rotation Fast Slow CCW 251 255 Gobo Rotation Stop GoboShake 000 005 Gobo Shake...

Page 35: ...ólnie w dolnym zakresie wartości DMX oraz precyzyjniej w górnym zakresie wartości DMX Krzywa S intensywność światła można ustawić precyzyjnie w dolnym i górnym zakresie wartości DMX oraz bardziej ogólnie w środkowym zakresie wartości DMX Pan Rev Pan Reverse ON odwrócenie kierunku ruchu PAN OFF standardowy kierunek ruchu PAN Tilt Rev Tilt Reverse ON odwrócenie kierunku ruchu TILT OFF standardowy ki...

Page 36: ...ri sul display appare il messaggio Software Update Please Wait solo manutenzione e il logo CAMEO Al termine della procedura il faro è pronto per l uso e passa alla modalità di funzionamento selezionata in precedenza A VISUALIZZAZIONE PRINCIPALE modalità di funzionamento DMX Sulla riga superiore del display appare la modalità DMX DMX 05Ch 13Ch 22Ch e ben visibile al centro l indirizzo di avvio DMX ...

Page 37: ...NTER e con i tasti freccia selezionare ora la voce di menu AutoSpeed per impostare la velocità di avanzamento del programma desiderata Premere ENTER e impostare la velocità da 000 a 255 utilizzando i tasti e Confermare con ENTER e premere tre volte il tasto MODE per tornare alla visualizzazione principale Mode Auto Auto Mode Auto Prog 8 AutoSpeed 225 H CONTROLLO TRAMITE MUSICA Sound Premendo il pu...

Page 38: ...6 128 Arresto ruota colori 129 255 Velocità ruota colori lento rapido Colori 1 12 Gobo 000 005 Gobo 0 libero 006 025 Gobo 1 026 045 Gobo 2 046 065 Gobo 3 066 085 Gobo 4 086 105 Gobo 5 106 127 Gobo 6 128 128 Arresto rotazione della ruota di gobos 129 191 Rotazione della ruota di gobos lento rapido senso orario 192 255 Rotazione della ruota di gobos rapido lento senso antiorario GoboRota 000 005 Rot...

Page 39: ... maggior finezza nell intervallo di valori DMX superiore S Curve l intensità luminosa può essere regolata con maggior finezza nell intervallo di valori DMX inferiore e superiore con minor finezza nell intervallo di valori DMX medio Pan Rev Inversione pan ON inversione della direzione di giro orizzontale OFF senza inversione della direzione di giro orizzontale Tilt Rev Inversione tilt ON inversione...

Page 40: ...e confermare con ENTER In seguito si accede al sottomenu per la visualizzazione delle seguenti informazioni del sistema Utilizzare di nuovo i tasti freccia per selezionare i parametri desiderati ed ENTER per visualizzarli System Settings DMX Address 001 Mode DMX 22CH Settings System Info System Info Firmware Indicazione del firmware del dispositivo 1U01 V1 xx 2U01 V1 xx 3U01 V1 xx Temperature Indi...

Page 41: ...rogram Speed 5 Reset 000 005 no function Reset 006 127 Reset Pan Tilt 128 191 Reset Effects Prism Gobo 192 255 Reset All Functions 13 CH Mode Ch Function Values Sub Group 1 Pan 000 255 0 to 100 Pan 2 Pan fine 000 255 0 to 100 3 Tilt 000 255 0 to 100 Tilt 4 Tilt fine 000 255 0 to 100 5 Dimmer 000 255 0 to 100 Dimmer 6 Strobe functions 000 005 Strobe open multifunctional strobe 006 010 Strobe closed...

Page 42: ...obo 006 025 Gobo 1 026 045 Gobo 2 046 065 Gobo 3 066 085 Gobo 4 086 105 Gobo 5 106 127 Gobo 6 128 128 Gobo Wheel Rotation Stop 129 191 Gobo Wheel Rotation Slow Fast CW 192 255 Gobo Wheel Rotation Fast Slow CCW 9 Gobo Rotation 000 005 Gobo Rotation off 006 127 Gobo Position 0 360 128 128 Gobo Rotation Stop 129 191 Gobo Rotation Slow Fast CW 192 250 Gobo Rotation Fast CCW 251 255 Gobo Rotation Stop ...

Page 43: ... Ramp down Random slow fast 080 102 Random Strobe Effect slow fast 103 127 Strobe Break Effekt 5s 1s Short burst with break 128 250 Strobe slow fast 1Hz 20Hz 251 255 Strobe open 8 Colour Wheel 000 005 Colour off open Colour Wheel 006 010 Split Colour Open Red 011 015 Red 016 020 Split Colour Red Orange 021 028 Orange 029 035 Split Colour Orange Yellow 036 043 Yellow 044 050 Split Colour Yellow Gre...

Page 44: ...4 165 Speed 5 166 197 Speed 6 198 229 Speed 7 230 255 Speed 8 12 Prism 000 005 Prism off 006 010 Prism in 011 127 Prism Position 0 360 128 128 Prism Rotation Stop 129 191 Prism Rotation Slow Fast CW 192 250 Prism Rotation Fast Slow CCW 251 255 Prism Rotation Stop 13 Focus 000 255 0 to 100 Focus 14 Focus fine 000 255 0 to 100 15 Auto Program 000 005 no function Auto Program 006 038 Program 1 039 07...

Page 45: ...an Tilt Fast Slow Pan Tilt speed 21 Device settings 000 005 no function Device settings 006 037 Blackout while Moving on Hold 3s 038 069 Blackout while Moving off Hold 5s 070 101 Invert Pan on Hold 3s 102 133 Invert Pan off Hold 5s 134 165 Invert Tilt on Hold 3s 166 197 Invert Tilt off Hold 5s 198 229 silent Fan on Hold 3s 230 255 silent Fan off Hold 5s 22 Reset 000 005 no function Reset 006 127 R...

Page 46: ... the first DMX device e g DMX Controller 2 Connect the female 3 pin XLR connector of the DMX cable connected to the first projector to the DMX input male 3 pin socket of the next DMX device In the same way connect the DMX output of this device to the DMX input of the next device and repeat until all devices have been connected Please note that as a rule DMX devices are connected in series and conn...

Page 47: ...ts z B DMX Controller 2 Verbinden Sie den weibliche XLR Stecker des an den ersten Scheinwerfer angeschlossenen DMX Kabels mit dem DMX Eingang männliche XLR Buchse des nächsten DMX Geräts Verbinden Sie den DMX Ausgang dieses Geräts in der gleichen Weise mit dem DMX Eingang des nächsten Geräts und so weiter Bitte beachten Sie dass DMX Geräte grundsätzlich seriell verschaltet werden und die Verbindun...

Page 48: ...eur XLR mâle de l appareil DMX suivant Reliez la sortie DMX de cet appareil selon le même méthode à l entrée DMX de l appareil DMX suivant et ainsi de suite Veillez à ce que tous les appareils DMX soient reliés en série et n oubliez pas que les liaisons ne peuvent être partagées sans utiliser de splitter actif Ne pas dépasser le nombre maximal d appareils par chaîne DMX soit 32 Vous trouverez un c...

Page 49: ...hembra del cable DMX del primer foco a la entrada DMX del equipo siguiente conector de chasis macho Conecte la salida DMX de este último equipo a la entrada DMX del equipo siguiente y así sucesivamente Tenga en cuenta que los dispositivos DMX están conectados en serie y que las conexiones no se pueden dividir sin un splitter activo El número máximo de equipos DMX conectados en cadena es de 32 Las ...

Page 50: ...ą wtyczkę XLR kabla DMX podłączonego do pierwszego reflektora podłączyć do wejścia DMX męskie gniazdo XLR następnego urządzenia DMX Wyjście DMX tego urządzenia podłączyć w taki sam sposób do wejścia DMX następnego urządzenia i tak dalej Należy pamiętać że urządzenia DMX podłącza się szeregowo a połączeń nie można rozdzielać bez aktywnego rozdzielacza Maksymalna liczba urządzeń DMX w łańcuchu DMX n...

Page 51: ...imo proiettore DMX con l ingresso DMX presa XLR maschio del successivo dispositivo DMX Analogamente collegare l uscita DMX di questo dispositivo con l ingresso DMX del dispositivo seguente e così via Tenere presente che in linea di principio i dispositivi DMX sono collegati in serie e i collegamenti non si possono condividere senza uno splitter attivo In una catena DMX i dispositivi DMX non posson...

Page 52: ...it prévu à cet effet veuillez fixer l élingue de sécurité avant le montage du support en oméga Précision importante Le montage en hauteur doit être exclusivement effectué par du personnel spécialement formé ES Gracias a los pies de goma integrados el foco se puede instalar perfectamente en el suelo de un escenario por ejemplo Para montarlo en trusses utilice el soporte en omega suministrado emplee...

Page 53: ...RDM enabled PAN Angle 540 630 540 630 TILT Angle 235 235 Controllers Mode Enter Up Down Mode Enter Up Down Display Elements Backlit colour LCD display battery power supply for network independent system adjustments automat ically recharging battery Backlit colour LCD display battery power supply for network independent system adjustments automat ically recharging battery Operating Voltage 100 240 ...

Page 54: ...odus Master Slave Betrieb Steuerung DMX512 RDM enabled DMX512 RDM enabled PAN Winkel 540 630 540 630 TILT Winkel 235 235 Bedienelemente Mode Enter Up Down Mode Enter Up Down Anzeigeelemente beleuchtetes Farb LC Display Batteriespeisung für netzunabhängige Systemeinstellungen automatisch wiederaufladender Akku beleuchtetes Farb LC Display Batteriespeisung für netzunabhängige Systemeinstellungen aut...

Page 55: ...grammes automatiques pilotage par la musique mode statique mode Master Slave Pilotage DMX 512 compatible RDM DMX 512 compatible RDM Angle de PAN 540 630 540 630 Angle de TILT 235 235 Contrôles Touches Mode Enter Up Down Touches Mode Enter Up Down Indicateurs Écran LCD à rétroéclairage couleur alimentation sur batterie pour réglage système sans branchement secteur accu à recharge automatique Écran ...

Page 56: ...áticos control por sonido modo Fijo modo Maestro Esclavo Control DMX512 compatible con RDM DMX512 compatible con RDM Ángulo de giro horizontal pan 540 630 540 630 Ángulo de giro vertical tilt 235 235 Controles Mode Enter Arriba Abajo Mode Enter Arriba Abajo Visualización Pantalla LCD de colores alimentada por batería para realizar ajustes sin conexión a la red eléctrica recarga automática de bater...

Page 57: ...y sterowanie muzyka tryb statyczny tryby pracy Master Slave Sterowanie DMX512 zgodność ze standardem RDM DMX512 zgodność ze standardem RDM Kąt ruchu PAN 540 630 540 630 Kąt ruchu TILT 235 235 Elementy obsługi Mode Enter Up Down Mode Enter Up Down Wskaźniki podświetlany wyświetlacz LCD wskaźnik akumula torowego zasilania wyświetlacza umożliwiającego wprowadzanie ustawień niezależnie od dostęp ności...

Page 58: ...ichen Abfällen entsorgt werden FR GARANTIE FABRICANT LIMITATION DE RESPONSABILITÉ Nos conditions actuelles de garantie et de limitation de responsabilité sont disponibles à l adresse suivante http www adamhall com media shop downloads documents manufacturersdeclarations pdf Pour les réparations veuillez contacter Adam Hall GmbH Daimlerstraße 9 61267 Neu Anspach E Mail Info adamhall com 49 0 6081 9...

Page 59: ...e swoimi dostawcami i ewentualne sprawdzenie uzgodnionych umownie warunków utylizacji urządzeń Niniejszy produkt nie może być utylizowany razem z innymi odpadami przemysłowymi IT MANUFACTURER S WARRANTY LIMITATION OF LIABILITY Le nostre attuali condizioni di garanzia e la limitazione di responsabilità sono consultabili alla pagina http www adamhall com media shop down loads documents manufacturers...

Page 60: ...60 WWW CAMEOLIGHT COM Adam Hall GmbH Daimlerstrasse 9 61267 Neu Anspach Germany Tel 49 0 6081 9419 0 Fax 49 0 6081 9419 1000 web www adamhall com e mail mail adamhall com REV 01 ...

Reviews: