Cameo
®
is a registered brand of the Adam Hall Group
Adam Hall GmbH | Adam-Hall-Str. 1 | 61267 Neu Anspach | Germany
Phone: +49 6081 9419-0 |
adamhall
.com
MOUNTING
The spotlight can be mounted on a wall using the wall mounting kit,
either as an uplight or rotated through 180° as a downlight.
Before installation, ensure that the spotlight is completely discon-
nected from the power supply and that the power supply cable is
free from voltage. Check that the connections are secure during all
assembly steps!
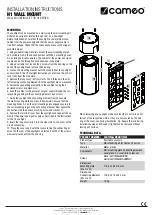
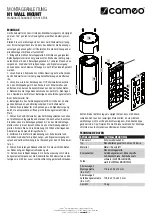
1. Using suitable fixing materials, mount the wall mounting plate A
on a suitable wall in the desired position with the 4 mounting hooks
A-1 pointing vertically upwards. The cables for the power and signal
supply can be fed through various openings in the plate.
2. Using a suitable tool, loosen the 4 screws from the end ring on the
back of the spotlight and remove the end ring.
3. Loosen the mounting bracket with the sockets from the spotlight
as described in the H1 spotlight instructions and remove the 4 short
cover rails from the side slots.
4. Remove the long cover rail from slot G. The 4 threads in the slot
for fastening connecting element B to the spotlight are now exposed.
5. Fasten the connecting element B to the spotlight using the 4
enclosed screws and washers C.
6. Feed the cables for the power and signal supply through the cor-
responding opening in the connecting element (see arrow).
7. Guide the spotlight and connecting element from above onto
the wall mounting plate and press it downwards. Ensure that the
mounting hooks A-1 on the wall mounting plate engage securely in
the corresponding lugs on the connecting element. Now secure the
connection with the enclosed locking screw and washer D.
8. Remove the terminal cover from the spotlight and connect the ca-
bles for the power and signal supply as described in the instructions
for the H1 spotlight.
9. Insert the long cover rails F into the side slots for the cover of the
U-bolt connection.
10. Place the cover cap E with the recess facing the connecting el-
ement on the rear of the spotlight and fasten it with 3 of the screws
previously loosened from the end ring.
When installing as an uplight, make sure that the cover rails do not
fall out of the respective slots, as they are not secured by the end
ring or the cover cap during installation. Tip: Secure the rails during
installation using an adhesive strip that can be removed without
leaving any residue.
TECHNICAL DATA
PRODUCT NUMBER:
CLH1WALLMOUNT(WH)
Product type:
Spotlight accessory
Type:
Wall mounting kit for Cameo H1 series
Material:
Metal, plastic
Components:
Wall mounting plate, connecting element,
cover plate, 2 x cover rails, screw set
Colour:
black (CLH1WALLMOUNT)
white (CLH1WALLMOUNTWH)
Dimensions
Mounting plate
(W x H x D):
118.6 x 250 x 13 mm
Dimensions
Connecting elements
(W x H x D):
125.9 x 315 x 43.2 mm
Weight:
1.3 kg
E
F
G
F
D
B
A
C
INSTALLATION INSTRUCTIONS
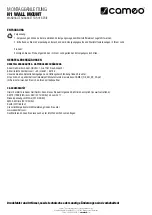
H1 WALL MOUNT
WALL MOUNTING KIT FOR H1 SERIES


