background image

147

DMX

DEUTSCH

FRANCAIS

ESP

AÑOL

ENGLISH

IT

ALIANO

POLSKI

10

 ESC

Jeśli funkcja prawego enkodera jako przycisku nie jest wyraźnie pokazana w prawym dolnym 
rogu wyświetlacza, naciśnięcie enkodera powoduje przejście w strukturze menu o jeden poziom 
wyżej.

OBSŁUGA

WSKAZÓWKI

•  Po prawidłowym podłączeniu reflektora do sieci zasilania podczas procesu uruchamiania wy-

świetlana jest następująca sekwencja komunikatów: „Welcome to Cameo”, nazwa modelu oraz 
wersja oprogramowania. Następnie reflektor jest gotowy do pracy i przełącza się na ostatnio 
wybrany tryb. 

•  Jeśli aktywowano jeden z trybów DMX lub tryb slave, a na wejściu DMX nie ma sygnału sterują-

cego, znaki środkowych wierszy na wyświetlaczu zaczynają migać.

•  Jeśli w ciągu około 1 minuty nie nastąpi żadna zmiana, na wyświetlaczu (ekranie głównym) 

automatycznie pokazany zostanie aktualnie aktywowany tryb pracy. 

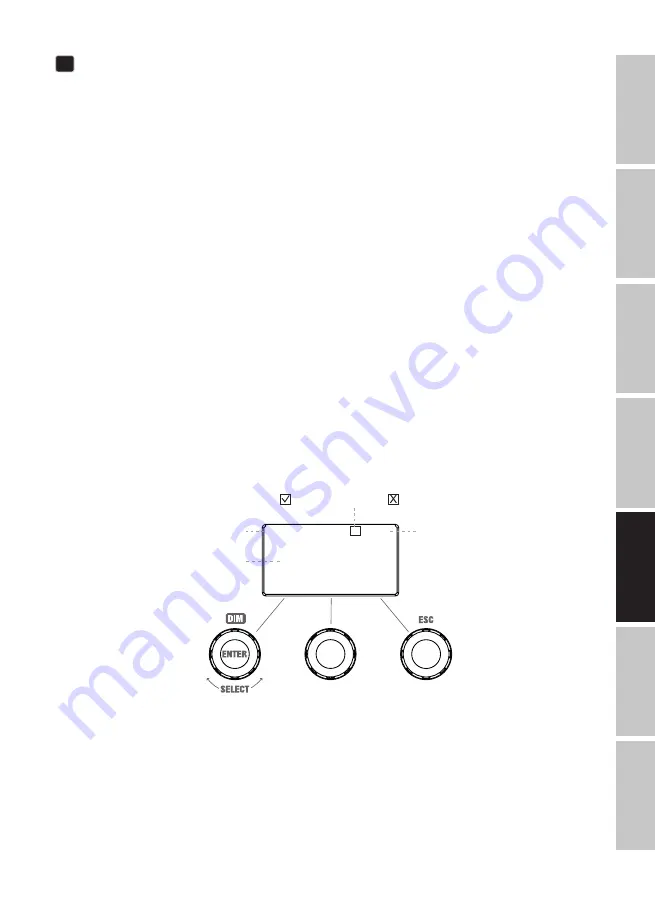
EKRAN GŁÓWNY WYŚWIETLACZA: TRYB PRACY DMX

Ekran główny w trybie pracy DMX prezentuje aktualnie ustawiony adres startowy DMX, tryb DMX 
i inne informacje (patrz ilustracja).

DMX            | DMX      | Auto

DMX Address 001

5CH RGBAL

Mode                             Menu

Status sygnału sterującego  = sygnał DMX dostępny    = brak sygnału DMX

aktualnie aktywowany tryb pracy

Tryb wentylatora

Adres startowy DMX i  

tryb DMX

Naciśnięcie enkodera =  

wybór trybu pracy (Mode)

Naciśnięcie enkodera =  
otwarcie menu głównego 
(Menu)

Summary of Contents for P2 FC

Page 1: ...P2 FC FULL COLOUR PROFILE SPOTLIGHT CLP2FC USER S MANUAL BEDIENUNGSANLEITUNG MANUEL D UTILISATION MANUAL DE USUARIO INSTRUKCJA OBS UGI MANUALE D USO...

Page 2: ...ISTANCE TO ILLUMINATED SURFACE 35 MINIMUM DISTANCE TO NORMALLY FLAMMABLE MATERIALS 35 DISPOSAL 36 MANUFACTURER S DECLARATIONS 36 DEUTSCH INFORMATIONEN ZU DIESER BEDIENUNGSANLEITUNG 38 BESTIMMUNGSGEM S...

Page 3: ...CESSOIRES DISPONIBLES EN OPTION 98 CARACT RISTIQUES TECHNIQUES 100 DISTANCE MINIMALE PAR RAPPORT LA SURFACE CLAIR E 102 DISTANCE MINIMALE PAR RAPPORT AUX MAT RIAUX NORMALEMENT INFLAMMABLES 102 LIMINAT...

Page 4: ...PRZY CZA ELEMENTY OBS UGI I WSKA NIKI 145 OBS UGA 147 MONTA 160 MONTA TUBUSU SOCZEWKI ZE STA YM K TEM ROZWARCIA WI ZKI WIETLNEJ 161 CZYSZCZENIE KONSERWACJA I NAPRAWY 164 OPCJONALNE AKCESORIA 166 DANE...

Page 5: ...IONE 199 ACCESSORI OPZIONALI 200 DATI TECNICI 202 DISTANZA MINIMA DALLA SUPERFICIE ILLUMINATA 204 DISTANZA MINIMA DAI MATERIALI NORMALMENTE INFIAMMABILI 204 SMALTIMENTO 205 DICHIARAZIONI DEL PRODUTTOR...

Page 6: ...oduct is only intended for qualified users with specialist knowledge of event technology Use of the product outside the specified technical data and operating conditions is considered inappropriate Li...

Page 7: ...iquids or objects get inside it or if it has been damaged in any other way switch it off immediately and unplug it from the power source The device may be repaired only by authorised repair techni cia...

Page 8: ...nection Ensure that the total current consumption of all connected devices does not exceed the specified value 7 Replace plug in power cables with original cables only HAZARD 1 Choking hazard Plastic...

Page 9: ...ce any ignition sources such as burning candles near the device 3 Ventilation openings must not be covered and fans must not be blocked 4 For transport use the original packaging or packaging provided...

Page 10: ...FOR MOBILE INDOOR DEVICES 1 Temporary operation Event equipment is generally only designed for temporary operation 2 Continuous operation or permanent installation can impair the functioning of the d...

Page 11: ...t number CLIDMXSTICK EZ Remote with optional Cameo UNICON product number CLIREMOTE FEATURES 230 W 5 in 1 RGBAL COB LED DMX512 W DMX optional 5 pin DMX connections Quicklight via rotary push encoder Op...

Page 12: ...ble mains input socket Operating voltage 100 240 V AC 50 60 Hz A suitable power cable with TRUE1 compatible plug is included 2 POWER OUT TRUE1 compatible mains output socket Facilitates power supply t...

Page 13: ...is interrupted the characters in the display begin to flash When there is a control signal again the flashing stops 8 DIM ENTER SELECT Rotary push encoder for the adjustment and control of the spotli...

Page 14: ...rol signal at the DMX input the characters in the centre line of the display will start to flash If no input is made within approximately 1 minute the currently activated mode is automatical ly shown...

Page 15: ...m by pressing the middle rotary push encoder DMX mode the previously set DMX start address is automatically saved Rotate encoder change value Press encoder confirm value change Enter Press encoder Ope...

Page 16: ...coder select operating mode Mode Rotate encoder set colour Tint Press encoder open main menu menu Rotate Encoder set colour temperature CCT STANDALONE MODE HSI Hue Saturation Intensity Starting from t...

Page 17: ...s encoder toggle between R G and B A and L Strobe Colour DIRECT LED Auto DIM R G 100 255 255 Mode Colour Menu STANDALONE MODE GEL colour filter presets Starting from the main display press the left pu...

Page 18: ...the renaming of presets can be made in the Edit User Colour menu item User Colour Auto Mode Back Menu Rotate encoder set brightness DIM Press encoder select operating mode Mode Press encoder open main...

Page 19: ...you will immediately be taken to the next processing step A Z _ 0 9 Edit User Colour Name Save Next ESC Now decide how you want to create the colour for the preset choose between the 4 methods CCT HSI...

Page 20: ...oder Set fade time t fade Press encoder open main menu Rotate encoder set step time t step Press encoder back to loop selection Play Loop Auto DIM t Step t Fade 100 4s 3s Mode Back Menu EDIT LOOP Edit...

Page 21: ...ound below the colour numbers 1 to 8 Use the same procedure to set the colours for steps 2 to 8 Complete the process and save the sequence by pressing the left encoder ENTER Step1 Step2 Step3 Step4 St...

Page 22: ...left encoder ENTER Connect the spotlight and UNICON using a DMX cable select DMX Control in the UNICON menu then EZ Remote and enter the same unit ID Now control the spotlight using RGB GEL CCT or HSI...

Page 23: ...h mic Light intensity can be broadly adjusted at low er DMX values and finely adjusted at higher DMX values S curve Light intensity can be finely adjusted at lower and higher DMX values and broadly ad...

Page 24: ...ess the centre and right encoders for approx 4 seconds Off Automatic locking of the controls is disabled Fan Adjust fan control Auto Automatic fan control Off Deactivated fan with greatly reduced brig...

Page 25: ...mode adjustment of amber User Cal L Cross mode adjustment of lime Autolock Automatic locking of the operating elements is activated deactivated Fan Fan setting MANUAL LOCKING FUNCTION In addition to...

Page 26: ...able truss clamp which is attached to the mounting bracket C Suitable truss clamps are optionally available Loosen the two clamp levers on the sides of the spotlight D to adjust the beam direction in...

Page 27: ...age or contaminate the lens behind when disassembling or assembling the tube Ensure that no foreign bodies enter the spotlight housing 3 Do not operate the spotlight without the tube To remove the tub...

Page 28: ...without the zoom lens tube Disassemble the tube with the adjustable shutter unit as described above Place the zoom lens tube approximately one eighth of a turn counterclockwise onto the front of the...

Page 29: ...the Zoom tubes have a built in receptacle for insertion of a gobo holder A or an iris module B gobo holder and iris module optionally available To do this loosen the two knurled screws of the shaft co...

Page 30: ...1 Housing surfaces must be cleaned with a clean damp cloth Make sure that no moisture can penetrate the device 2 Air inlets and outlets must be regularly cleaned of dust and dirt If compressed air is...

Page 31: ...unit and soft edge filter included CLP22550LENS Zoom lens tube with 25 to 50 beam angle adjustable shutter unit and soft edge filter included CLP219LENS Lens tube with 19 beam angle CLP226LENS Lens tu...

Page 32: ...32 DMX ITALIANO POLSKI ESPA OL FRANCAIS DEUTSCH ENGLISH DIMENSIONS 633 3 4 2 1 136 2 35 569 3 425 456 1 223 5 235 5 6 330 7 683 2 2 7 6 2 245 3 330 7 314 Shutter closed 314 Shutter closed...

Page 33: ...l 10240lm Cal Full 11587lm 3200K 7568lm 5600K 25 50 Lens 25 12241lm Full 12448lm Cal Full 14033lm 3200K 9133lm 5600K 25 50 Lens 50 12108lm Full 12153lm Cal Full 13938lm 3200K 8792lm 5600K Lense Optic...

Page 34: ...EL User Color Play Loop Slave System settings DMX Address DMX Mode Stand Alone Slave EZ Remote Edit User Color Edit Loop Wireless Settings Display Flip Display Off Timer Sig nal Fail Dimmer Curve Dimm...

Page 35: ...F MINIMUM DISTANCE TO ILLUMINATED SURFACE 0 5 m This symbol with distance specification in metres m indicates the minimum distance between the light head and the illuminated surface In this example th...

Page 36: ...oved disposal company or a municipal disposal facility 2 Observe all disposal laws and regulations applicable in your country 3 As a private customer you can obtain information on environmentally frie...

Page 37: ...television reception which can be determined by turning the equipment off and on the user is encouraged to try to correct the interference by one or more of the following measures Reorient or relocat...

Page 38: ...e Verwendung in Haushalten geeignet Weiterhin ist dieses Produkt nur f r qualifizierte Benutzer mit Fachkenntnissen im Umgang mit Veranstaltungstechnik vorgesehen Die Benutzung des Produkts au erhalb...

Page 39: ...nere gelangt sind oder das Ger t anderweitig besch digt wurde schalten Sie es sofort aus und trennen es von der Spannungsversorgung Dieses Ger t darf nur von autorisiertem Fachpersonal repariert werde...

Page 40: ...hlos senen Ger te den vorgegebenen Wert nicht berschreitet 7 Ersetzen Sie steckbare Netzleitungen nur durch Originalleitungen GEFAHR 1 Erstickungsgefahr Kunststoffbeutel und Kleinteile m ssen au er Re...

Page 41: ...ird und nicht berhitzen kann 2 Platzieren Sie keine Z ndquellen wie z B brennende Kerzen in der N he des Ger ts 3 L ftungs ffnungen d rfen nicht abgedeckt und L fter nicht blockiert werden 4 Nutzen Si...

Page 42: ...ranstaltungsequipment ist grunds tzlich nur f r den vor bergehenden Betrieb konzipiert 2 Dauerbetrieb oder dauerhafte Installation kann zur Beeintr chtigung der Funktion und vorzeitiger Alterung der G...

Page 43: ...MXSTICK EZ Remote mit optional erh ltlichem Cameo UNICON Artikelnummer CLIREMOTE EIGENSCHAFTEN 230 W 5in1 RGBAL COB LED DMX512 W DMX optional 5 Pol DMX Anschl sse Quicklight via Dreh Dr ck Encoder Bet...

Page 44: ...ebsspannung 100 240V AC 50 60Hz Ein geeignetes Netzkabel mit TRUE1 kompatiblem Ger testecker befindet sich im Lieferumfang 2 POWER OUT TRUE1 kompatible Netzausgangsbuchse Dient der Netzversorgung weit...

Page 45: ...ge im Display automatisch zur Hauptanzeige Hinweis zur Hauptanzeige in den Betriebsarten mit externer Steuerung Sobald das Steuersignal unterbrochen wird beginnen die Zeichen im Display zu blinken lie...

Page 46: ...aktiviert war Ist eine der DMX Betriebsarten oder der Slave Betrieb aktiviert und es liegt kein Steuersignal am DMX Eingang an beginnen die Zeichen der mittleren Zeilen im Display zu blinken Wenn inne...

Page 47: ...ren Dreh Dr ck Encoder dr cken DMX Mode die zuvor eingestellte DMX Startadresse wird dabei automatisch gespeichert Encoder drehen Wert ndern Encoder dr cken Wert nderung best tigen Enter Encoder dr ck...

Page 48: ...triebsart Mode Encoder drehen Farbton einstellen Tint Encoder dr cken Hauptmen ffnen Menu Encoder drehen Farbtemperatur einstellen CCT STANDALONE BETRIEBSART HSI Hue Saturation Intensity Ausgehend von...

Page 49: ...llen Encoder dr cken umschalten zwischen R G und B A und L Strobe Colour DIRECT LED Auto DIM R G 100 255 255 Mode Colour Menu STANDALONE BETRIEBSART GEL Farbfilter Presets Ausgehend von der Hauptanzei...

Page 50: ...duelle Preset Einstellungen und das Umbenennen der Presets k nnen im Men punkt Edit User Colour vorgenommen werden User Colour Auto Mode Back Menu Encoder drehen Helligkeit einstellen DIM Encoder dr c...

Page 51: ...t Name erhalten und Sie gelangen sofort zum n chsten Bearbeitungsschritt A Z _ 0 9 Edit User Colour Name Save Next ESC Entscheiden Sie nun auf welche Weise Sie die Farbe f r das Preset erstellen m cht...

Page 52: ...ilfe des mittleren und rechten Encoders siehe Abbildung Die individuellen Einstellungen und das Umbenennen der Farbsequenzen k nnen im Men punkt Edit Loop im Hauptmen vorgenommen werden Encoder drehen...

Page 53: ...gelangen sofort zum n chsten Bearbeitungsschritt A Z _ 0 9 Edit Loop Name Save Next ESC W hlen Sie Schritt 1 der 8 Schritt Sequenz Step1 Step8 durch Drehen des linken Encoders aus um danach die Farbe...

Page 54: ...ge gelangen Sie durch Dr cken auf den linken Dreh Dr ck En coder in das Men zum Ausw hlen der Betriebsart Mode Durch Drehen des linken Encoders w hlen Sie nun den Men punkt DMX aus Auswahlpfeil links...

Page 55: ...swahlpfeil links beachten und best tigen durch Dr cken auf den linken Encoder ENTER Daraufhin gelangen Sie in das Untermen zum Einstellen der Untermen Punkte siehe Tabelle Auswahl mit SELECT best tige...

Page 56: ...oberen DMX Wertbereich fein und im mittleren DMX Wertbereich grob einstellen Dimmer Respon se Dimmverhalten Led Der Strahler reagiert abrupt auf nderungen des DMX Werts Halogen Der Strahler verh lt si...

Page 57: ...oder f r ca 4 Sekunden Off Automatische Sperrung der Bedienelemente deaktiviert Fan L ftersteuerung anpassen Auto Automatische L ftersteuerung Off Deaktivierter L fter bei stark reduzierter Helligkeit...

Page 58: ...etriebsart bergreifende Anpassung von Amber User Cal L Betriebsart bergreifende Anpassung von Lime Autolock Automatische Sperrung der Bedienelemente deaktiviert aktiviert Fan L ftereinstellung MANUELL...

Page 59: ...n und herabfallen Dadurch k nnen Personen schwer verletzt oder get tet werden Der Montageb gel kann in zwei Positionen am Scheinwerfer angebracht werden A und B Achten Sie beim ndern der Position dara...

Page 60: ...beiden mitgelieferten R ndelschrauben B in die entsprechenden Gewinde im Linsentubus und ziehen sie fest Zum Fokussieren der Lichtprojekti on l sen Sie die R ndelschrauben leicht und verschieben den L...

Page 61: ...verunreinigen Achten Sie darauf dass keine Fremd k rper in das Scheinwerfergeh use gelangen 3 Betreiben Sie den Scheinwerfer nicht ohne Zoom Linsentubus Demontieren Sie den Tubus mit Blendenschiebere...

Page 62: ...ber einen Einbauschacht in den ein Gobohalter A oder ein Irismodul B eingesetzt werden kann Gobohalter und Irismodul optional erh ltlich L sen Sie hierf r die beiden R ndelschrauben der Schachtabdeck...

Page 63: ...uf zu achten dass keine Feuchtigkeit in das Ger t eindringen kann 2 Luft Ein und Austritts ffnungen m ssen regelm ig von Staub und Schmutz befreit werden Im Fall des Einsatzes von Druckluft ist darauf...

Page 64: ...Edge Filter inklusive CLP22550LENS Zoom Linsentubus mit 25 bis 50 Abstrahl winkel Blendenschiebereinheit und Soft Edge Filter inklusive CLP219LENS Linsentubus mit 19 Abstrahlwinkel CLP226LENS Linsent...

Page 65: ...65 DMX DEUTSCH FRANCAIS ESPA OL ENGLISH ITALIANO POLSKI ABMESSUNGEN 633 3 4 2 1 136 2 35 569 3 425 456 1 223 5 235 5 6 330 7 683 2 2 7 6 2 245 3 330 7 314 Shutter closed 314 Shutter closed...

Page 66: ...Full 10240 lm Cal Full 11587 lm 3200 K 7568 lm 5600 K 25 50 Linse 25 12241 lm Full 12448 lm Cal Full 14033 lm 3200 K 9133 lm 5600 K 25 50 Linse 50 12108 lm Full 12153 lm Cal Full 13938 lm 3200 K 8792...

Page 67: ...p Slave Systemeinstellungen DMX Adresse DMX Modus Stand Alone Slave EZ Remote Benutzerfarbe bearbeiten Loop bearbeiten Wireless Einstellungen Display Flip Display Aus Timer Signalfehler Dimmer Kurve D...

Page 68: ...Linse 5 8 kg 25 50 Linse 4 5 kg RDM UID 0x08A4011C 0000 FFFF MINDESTABSTAND ZUR BELEUCHTETEN FL CHE 0 5 m Dieses Symbol mit Entfernungsangabe in Metern m gibt den Mindestabstand des Leuchtk rpers zur...

Page 69: ...hrem Land 2 Beachten Sie alle in Ihrem Land geltenden Entsorgungsgesetze 3 Als Privatkunde erhalten Sie Informationen zu umweltfreundlichen Entsorgungs m glichkeiten ber den H ndler bei dem das Produk...

Page 70: ...Ihren Vertriebspartner CE KONFORMIT T Hiermit erkl rt die Adam Hall GmbH dass dieses Produkt folgender Richtlinie entspricht soweit zutreffend Niederspannungsrichtlinie 2014 35 EU EMV Richtlinie 2014...

Page 71: ...produit est destin uniquement aux utilisateurs qualifi s poss dant des connaissances sp cialis es en mati re de technique v nementielle L utilisation du produit en dehors des caract ristiques techniqu...

Page 72: ...quelque autre mani re que ce soit l teindre et le d brancher aussit t de l alimentation lec trique Seuls des professionnels agr s sont habilit s r parer cet appareil 3 Pour les appareils de classe de...

Page 73: ...ils raccord s ne doit pas d passer la valeur fix e 7 Remplacer les c bles d alimentation enfichables uniquement par des c bles d origine DANGER 1 Risque d touffement Les sachets en plastique et les pe...

Page 74: ...ignition proximit de l appareil telles que des bou gies allum es 3 Les orifices de ventilation ne doivent pas tre recouverts et les ventilateurs ne doivent pas tre bloqu s 4 Pour le transport utilise...

Page 75: ...QUES CONCERNANT LES APPAREILS D INT RIEUR MOBILES 1 Fonctionnement temporaire L quipement v nementiel est con u uniquement pour une utilisation temporaire 2 Le fonctionnement continu ou l installation...

Page 76: ...CK EZ Remote avec Cameo UNICON disponible en option r f rence CLIREMOTE CARACT RISTIQUES LED COB RGBAL 5 en 1 230 W DMX512 W DMX en option Connecteurs DMX 5 broches Qui cklight via encodeur rotatif bo...

Page 77: ...le TRUE1 Tension de fonctionnement 100 240 V CA 50 60 Hz Un c ble r seau appropri est fourni avec un connecteur compatible TRUE1 2 POWER OUT SORTIE D ALIMENTATION Embase secteur de sortie compatible T...

Page 78: ...concernant l affichage principal dans les modes de fonctionnement avec pilotage externe Si le signal de commande est interrompu les caract res l cran se mettent clignoter Ils cessent de clignoter d s...

Page 79: ...i l un des modes de fonctionnement DMX ou le mode esclave est activ et qu aucun signal de commande n est pr sent sur l entr e DMX les caract res des lignes centrales de l cran commencent clignoter Au...

Page 80: ...lieu DMX Mode L adresse de d part DMX pr c demment para m tr e est alors automatiquement enregistr e Tourner l encodeur Modifier la valeur Appuyer sur l encodeur Confirmer la modification de la valeur...

Page 81: ...ler la teinte Tint Appuyer sur l encodeur Ouvrir le menu principal Menu Tourner l encodeur R gler la temp rature chroma tique CCT MODE STANDALONE HSI Hue Saturation Intensity partir de l cran principa...

Page 82: ...r l encodeur Commuter entre R G B A et L Stroboscope Colour DIRECT LED Auto DIM R G 100 255 255 Mode Colour Menu MODE STANDALONE GEL Presets de filtre couleur partir de l cran principal appuyer sur l...

Page 83: ...Edit User Color permet de r gler individuellement et de renommer les presets User Colour Auto Mode Back Menu Tourner l encodeur R gler la luminosit DIM Appuyer sur l encodeur S lectionner le mode de...

Page 84: ...s modifi et on acc de directement l tape de modification suivante A Z _ 0 9 Edit User Colour Name Save Next ESC Pour la couleur du preset s lectionner le mode de cr ation souhait parmi les 4 m thodes...

Page 85: ...du milieu et de droite voir l illustration L option de menu Edit Loop du menu principal permet de r gler individuellement et de renommer les s quences de couleurs Tourner l encodeur R gler la luminos...

Page 86: ...de directement l tape de modification suivante A Z _ 0 9 Edit Loop Name Save Next ESC Tourner l encodeur de gauche pour s lectionner le pas 1 de la s quence en 8 pas Step1 Step8 afin de d finir ensuit...

Page 87: ...che pour acc der au menu permettant de s lectionner le mode de fonctionnement Mode Tourner l enco deur de gauche pour s lectionner pr sent l option de menu DMX faire attention la fl che de s lection g...

Page 88: ...er sur l encodeur de gauche pour valider ENTER On acc de alors au sous menu permettant de r gler les options de sous menu suivantes voir tableau s lectionner avec SELECT confirmer avec ENTER modifier...

Page 89: ...et sup rieure et de fa on approximative dans la plage de valeurs DMX moyenne Dimmer Res ponse Comportement de dimmer Led Le projecteur r agit de fa on brutale aux modifications de la valeur DMX Haloge...

Page 90: ...ge l cran apr s une tentative de commande Locked D verrouillage Appuyer simultan ment sur les encodeurs du milieu et de droite pendant env 4 secondes Off Verrouillage automatique des l ments de comman...

Page 91: ...ed Shift Variation de couleur activ e d sactiv e PWM Fr quence du signal PWM de la LED Calibr Calibrage User Cal R Ajustement du rouge concerne tous les modes de fonctionnement User Cal G Ajustement d...

Page 92: ...sur l ensemble du mat riel d installation et sur le projecteur Sans les qualifications requises n essayez pas d effectuer vous m me l installation mais faites appel une entreprise professionnelle Des...

Page 93: ...e fonctionner le projecteur sans le tube de lentille Pour monter un tube de lentille avec un angle de rayonnement fixe ins rer le tube avec le support rabattable ressort de mani re orienter le cadre d...

Page 94: ...ur A Tourner maintenant le tube d environ un huiti me de tour dans le sens inverse des aiguilles d une montre B et le retirer du bo tier du projecteur C Pour monter le tube proc der dans l ordre inver...

Page 95: ...ontre en veillant ce que le support de s curit ressort du cadre de filtre soit orient vers le haut et que l unit soit correctement plac e dans les guides correspondants du bo tier du projecteur B Bloq...

Page 96: ...le couvercle du logement jusqu la but e sur le logement de montage et le fixer l aide des deux vis molet es B A C C ENTRETIEN MAINTENANCE ET R PARATION Pour garantir le bon fonctionnement de l appare...

Page 97: ...oivent tre nettoy s r guli rement et d barrass s de la poussi re et des impuret s 4 De mani re g n rale aucun produit de nettoyage ou produit abrasif ne doit tre utilis pour l entretien faute de quoi...

Page 98: ...CLP22550LENS Tube de lentille zoom avec angle de rayon nement de 25 50 unit coulissante de diaphragme et filtre Soft Edge inclus CLP219LENS Tube de lentille avec angle de rayonnement de 19 CLP226LENS...

Page 99: ...99 DMX DEUTSCH FRANCAIS ESPA OL ENGLISH ITALIANO POLSKI DIMENSIONS 633 3 4 2 1 136 2 35 569 3 425 456 1 223 5 235 5 6 330 7 683 2 2 7 6 2 245 3 330 7 314 Shutter closed 314 Shutter closed...

Page 100: ...10055 lm Full 10240 lm Cal Full 11587 lm 3200K 7568 lm 5600K 25 50 Lentille 25 12241 lm Full 12448 lm Cal Full 14033 lm 3200K 9133 lm 5600K 25 50 Lentille 50 12108 lm Full 12153 lm Cal Full 13938 lm...

Page 101: ...de l appareil Fonctions RDM Cameo RDM Standard Autonome Modes du codeur CCT HSI Direct LED GEL User Color Play Loop esclave Param tres syst me Adresse DMX Mode DMX Autonome Esclave EZ Remote diter cou...

Page 102: ...Lentille 19 1 5 kg Lentille 26 1 46 kg Lentille 36 1 35 kg Lentille 50 1 35 kg Lentille 15 30 5 8 kg Lentille 25 50 4 5 kg UID RDM 0x08A4011C 0000 FFFF DISTANCE MINIMALE PAR RAPPORT LA SURFACE CLAIR E...

Page 103: ...r respecter la l gislation relative l limination des d chets en vigueur dans votre pays 3 Les clients particuliers peuvent se renseigner sur les possibilit s d limination respectueuses de l environnem...

Page 104: ...cas de panne contacter votre partenaire commercial CONFORMIT CE Par la pr sente Adam Hall GmbH d clare que ce produit est conforme aux directives suivantes si applicables Directive basse tension 2014...

Page 105: ...ste producto solo est previsto para su utilizaci n por parte de usuarios cualificados con conocimientos sobre tecnolog a para eventos La utilizaci n del producto para aplicaciones m s all de las espec...

Page 106: ...e funcionar correctamente si penetra alg n l quido u otro objeto en su interior o si el equipo sufriera cualquier otro tipo de da o Este equipo debe repararlo exclusiva mente personal especializado y...

Page 107: ...omprobar que el consumo el ctrico total de todos los equipos conectados no supere el valor predeterminado 7 Sustituir los cables de alimentaci n enchufables nicamente por cables originales PELIGRO 1 P...

Page 108: ...del equipo ninguna fuente de ignici n como por ejemplo velas encendidas 3 No cubrir las aberturas de ventilaci n ni obstruir los ventiladores 4 Para el transporte utilizar el embalaje original o el em...

Page 109: ...temporal En principio los equipos para eventos est n dise ados solo para un funcionamiento temporal 2 El funcionamiento continuo o la instalaci n permanente pueden perjudicar el fun cionamiento y prov...

Page 110: ...de Cameo disponible opcionalmente n mero de art culo CLIREMOTE CARACTER STICAS LED COB RGBAL de 230 W 5 en 1 DMX512 W DMX opcional Conexiones DMX de 5 pines Quicklight mediante mando giratorio y puls...

Page 111: ...tible con TRUE1 Tensi n operativa 100 240 V CA 50 60 Hz El volumen de suministro incluye un cable de alimentaci n adecuado con conector compa tible con TRUE1 2 POWER OUT Toma de salida de red compatib...

Page 112: ...lla cambia autom ticamente a la pantalla principal Aviso sobre la pantalla principal en los modos operativos con control externo En el momento en que se interrumpe la se al de control los caracteres d...

Page 113: ...do operativo empleado Si est activado uno de los modos de funcionamiento DMX o el modo esclavo y no hay se al de control en la entrada DMX los caracteres de las l neas centrales de la pantalla empieza...

Page 114: ...able central DMX Mode la direcci n inicial DMX ajustada previamente se guardar autom ticamente Girar el mando giratorio modificar valor Pulsar mando giratorio confirmar modificaci n de valor Enter Pul...

Page 115: ...justar el tono Tint Pulsar el mando giratorio abrir el men principal Menu Rotaci n del mando giratorio ajustar la temperatura de color CCT MODO OPERATIVO AUT NOMO DE HSI Hue Saturation Intensity Desde...

Page 116: ...l mando giratorio conmutar entre R G y B A y L Strobe Colour DIRECT LED Auto DIM R G 100 255 255 Mode Colour Menu MODO AUT NOMO GEL presets de filtro de color Desde la pantalla principal si pulsa el m...

Page 117: ...e de los presets se pueden realizar en la opci n de men Edit User Colour User Colour Auto Mode Back Menu Girar el mando giratorio ajustar el brillo DIM Pulsar el mando giratorio seleccionar el modo de...

Page 118: ...minado se mantiene y pasa de inmediato al siguiente paso de edici n A Z _ 0 9 Edit User Colour Name Save Next ESC Ahora puede decidir de qu manera desea crear el color para el preset seleccionar entre...

Page 119: ...la figura Los ajustes individuales y el cambio de nombre de las secuencias de colores se pueden realizar en la opci n de men Edit Loop del men principal Girar el mando giratorio ajustar el brillo DIM...

Page 120: ...y pasa de inmediato al siguiente paso de edici n A Z _ 0 9 Edit Loop Name Save Next ESC Seleccione el paso 1 de la secuencia de 8 pasos Step1 Step8 girando el mando giratorio izquier do y a continuaci...

Page 121: ...atorio y pulsable izquierdo accede al men para seleccionar el modo de funcionamiento Mode Gire el mando giratorio izquierdo para seleccionar el elemento del men DMX observe la flecha de selecci n a la...

Page 122: ...e pulsando el mando giratorio izquierdo ENTER Se accede al submen para ajustar los elementos del submen ver tabla seleccionar con SELECT confirmar con ENTER cambiar valor o estado con SELECT confirmar...

Page 123: ...uperior de valores DMX y de forma aproximada en el rango medio de valores DMX Dimmer Respon se Respuesta de ate nuaci n Led El proyector reacciona de forma brusca a las modificaciones del valor DMX Ha...

Page 124: ...urante unos 4 segundos Off Bloqueo autom tico desactivado de los ele mentos de manejo Fan Adaptar el control de ventiladores Auto Control autom tico del ventilador Off Ventilador desactivado con brill...

Page 125: ...todos los modos operativos Cal de usuario A Adaptaci n de Amber a todos los modos operativos Cal de usuario L Adaptaci n de Lime a todos los modos operativos Autolock Bloqueo autom tico de los mandos...

Page 126: ...ones graves o incluso la muerte de personas La percha de montaje se puede montar en el foco en dos posiciones A y B Al cambiar la posi ci n aseg rese de que la percha de montaje se vuelve a fijar de f...

Page 127: ...foco sin el tubo de lente Para montar un tubo de lente con ngulo de dispersi n fijo introduzca el tubo de lente con el soporte abatible con resorte para un portafiltros orientado hacia arriba en el t...

Page 128: ...r de la carcasa del foco A Gire el tubo aprox un octavo de vuelta en sentido antihorario B y ret relo de la carcasa del foco C hacia adelante Para montar el tubo proceda en sentido inverso y aseg rese...

Page 129: ...oporte de seguridad con resorte para un por tafiltros est orientado hacia arriba y que la unidad est correctamente asentada en las corres pondientes gu as de la carcasa del foco B Bloquee ahora el tub...

Page 130: ...n su posici n Vuelva a colocar la cubierta de la ranura sobre la ranura de montaje hasta el tope y f jela con los dos tornillos moleteados B A C C CUIDADO MANTENIMIENTO Y REPARACI N Para garantizar el...

Page 131: ...so 3 Los cables y los contactos deben limpiarse regularmente para evitar que acumulen polvo y suciedad 4 En general no deben utilizarse detergentes ni agentes abrasivos para el cuidado ya que podr an...

Page 132: ...dos CLP22550LENS Tubo de lente con zoom con ngulo de dis persi n de 25 a 50 unidad de corredera de diafragma y filtro Soft Edge incluidos CLP219LENS Tubo de lente con ngulo de dispersi n de 19 CLP226L...

Page 133: ...133 DMX DEUTSCH FRANCAIS ESPA OL ENGLISH ITALIANO POLSKI MEDIDAS 633 3 4 2 1 136 2 35 569 3 425 456 1 223 5 235 5 6 330 7 683 2 2 7 6 2 245 3 330 7 314 Shutter closed 314 Shutter closed...

Page 134: ...K Lente de 15 30 a 30 10 055 lm Full 10 240 lm Cal Full 11 587 lm a 3200 K 7568 lm a 5600 K Lente de 25 50 a 25 12241 lm Full 12448 lm Cal Full 14 033 lm a 3200 K 9133 lm a 5600 K Lente de 25 50 a 50...

Page 135: ...directo GEL color de usuario bucle de reproducci n esclavo Ajustes del sistema Direcci n DMX modo DMX independiente esclavo control remoto EZ editar color de usuario editar bucle ajuste inal mbrico g...

Page 136: ...de 50 1 35 kg Lente de 15 30 5 8 kg Lente de 25 50 4 5 kg RDM UID 0x08A4011C 0000 FFFF DISTANCIA M NIMA CON RESPECTO A LA SUPERFICIE ILUMINADA 0 5 m Este s mbolo con indicaci n de distancia en metros...

Page 137: ...s a la eliminaci n de residuos 3 Los clientes particulares reciben informaci n sobre las posibilidades de elimina ci n respetuosas con el medio ambiente a trav s del distribuidor que les haya vendido...

Page 138: ...con las siguientes directivas en la medida en que sean pertinentes Directiva sobre baja tensi n DBT 2014 35 UE Directiva sobre compatibilidad electromagn tica CEM 2014 30 UE Directiva sobre restriccio...

Page 139: ...u domowego Ponadto ten produkt jest przeznaczony wy cznie dla wykwalifikowanych u ytkownik w posiada j cych wiedz w zakresie obs ugi technicznej imprez U ytkowanie produktu niezgodnie z wyszczeg lnion...

Page 140: ...a dosta y si przedmioty lub p yny albo zosta o ono uszkodzone w inny spos b nale y je natychmiast wy czy i od czy od r d a napi cia Naprawy urz dzenia mo e przeprowadza wy cznie autoryzowany personel...

Page 141: ...tkich pod czonych urz dze nie mo e przekroczy wymaganej warto ci 7 Wtykane przewody zasilaj ce wymienia wy cznie na oryginalne NIEBEZPIECZE STWO 1 Niebezpiecze stwo uduszenia Worki z tworzywa sztuczne...

Page 142: ...urz dzenia nie umieszcza r de zap onu takich jak zapalone wiece 3 Nie wolno zakrywa otwor w wentylacyjnych ani blokowa wentylator w 4 Do transportu nale y u ywa oryginalnych opakowa lub opakowa przew...

Page 143: ...PRZ TU DO STOSOWANIA W PO MIESZCZENIACH 1 Praca tymczasowa Sprz t do organizacji imprez zasadniczo przeznaczony jest do pracy tymczasowej 2 Ci g a eksploatacja lub monta na sta e mo e prowadzi do pogo...

Page 144: ...XSTICK EZ Remote z dost pnym opcjonalnie urz dzeniem UNICON marki Cameo numer artyku u CLIRE MOTE CHARAKTERYSTYKA 230 W 5w1 RGBAL COB LED DMX512 Opcjonalnie W DMX 5 pinowe z cza DMX Opcja Quicklight u...

Page 145: ...ybilne z TRUE1 Napi cie robocze 100 240 V AC 50 60 Hz W zestawie znajduje si tak e odpowiedni kabel sieciowy z wtyczk kompatybiln z TRUE1 2 POWER OUT Gniazdo wyj ciowe kompatybilne z TRUE1 r d o zasil...

Page 146: ...z wka dotycz ca ekranu g wnego w trybach pracy z zewn trznym sterowaniem Gdy sygna steruj cy zostanie przerwany znaki na wy wietlaczu zaczn miga a gdy sygna zostanie ponownie w czony przestan miga 8 D...

Page 147: ...li aktywowano jeden z tryb w DMX lub tryb slave a na wej ciu DMX nie ma sygna u steruj cego znaki rodkowych wierszy na wy wietlaczu zaczynaj miga Je li w ci gu oko o 1 minuty nie nast pi adna zmiana...

Page 148: ...koder obrotowo przyciskowy DMX Mode ustawiony wcze niej adres startowy DMX zostanie przy tym automatycznie zapisany Obr cenie enkodera zmiana warto ci naci ni cie enkodera potwierdzenie zmiany warto c...

Page 149: ...era ustawienie tonu barwnego Tint naci ni cie enkodera otwarcie menu g wnego Menu Obr cenie enkodera ustawienie temperatury barwo wej CCT TRYB PRACY STANDALONE HSI Hue Saturation Intensity Je li podcz...

Page 150: ...e enkodera prze czenie mi dzy R G i B A i L Strobe kolor DIRECT LED Auto DIM R G 100 255 255 Mode Colour Menu TRYB PRACY STANDALONE GEL Ustawienia wst pne filtra kolor w Je li podczas wy wietlania ekr...

Page 151: ...ualnych ustawie wst pnych i zmiany nazwy ustawie wst pnych mo na dokona w punkcie menuEdit User Colour User Colour Auto Mode Back Menu Obr cenie enkodera ustawienie jasno ci DIM naci ni cie enkodera w...

Page 152: ...zostanie zachowana i nast pi natychmiasto we przej cie do nast pnego etapu edycji A Z _ 0 9 Edit User Colour Name Save Next ESC Teraz mo na zdecydowa o sposobie tworzenia koloru dla ustawienia wst pn...

Page 153: ...owym i prawym enkoderem patrz ilustracja Indywidualnych ustawie i zmiany nazwy sekwencji kolor w mo na dokona w punkcie menu Edit Loop w menu g wnym Obr cenie enkodera ustawienie jasno ci DIM naci ni...

Page 154: ...a ustawienia wst pnego zostanie zachowana i nast pi natychmiastowe przej cie do nast pnego etapu edycji A Z _ 0 9 Edit Loop Name Save Next ESC Wybra krok 1 sekwencji 8 krokowej Step1 Step8 obracaj c l...

Page 155: ...ania ekranu g wnego zostanie naci ni ty lewy enkoder obrotowo przyci skowy nast pi przej cie do menu wyboru trybu pracy Mode Poprzez obr cenie lewego enkode ra wybra punkt menu DMX zwr ci uwag na strz...

Page 156: ...ie lewego enkodera SELECT wybra punkt menu Settings zwr ci uwag na strza k wyboru z lewej strony Aby potwierdzi nacisn lewy enkoder ENTER Nast pi przej cie do podmenu w kt rym mo na dokona ustawie pun...

Page 157: ...zyjnie w g rnym zakresie warto ci DMX S Curve Nat enie wiat a mo na ustawi precyzyjnie w g rnym i dolnym zakresie warto ci DMX oraz zgrubnie w rodkowym zakresie warto ci DMX Dimmer Respon se Charakte...

Page 158: ...ietlaczu pojawi si komunikat Locked Odblokowanie Jednocze nie nacisn rod kowy i prawy enkoder i przytrzyma przez ok 4 sekundy Off Automatyczna blokada element w obs ugi jest wy czona Fan dopasowanie s...

Page 159: ...arwy aktywowana dezaktywowana PWM Cz stotliwo PWM lampy LED Calibr Kalibracja User Cal R Niezale ne od trybu pracy dopasowanie koloru czerwonego User Cal G Niezale ne od trybu pracy dopasowanie koloru...

Page 160: ...modziel nie lecz skorzysta z pomocy profesjonalnych firm Istnieje ryzyko e nieprawid owo zamontowane i niezabezpieczone urz dzenia poluzuj si i spadn Mo e to spowodo wa powa ne obra enia cia a lub mie...

Page 161: ...eflektora dosta y si cia a obce 3 Nie u ywa reflektora bez tubusu soczewki Aby zamontowa tubus soczewki ze sta ym k tem rozwarcia wi zki nale y wsun tubus ze spr ynuj cym sk adanym uchwytem na ramk fi...

Page 162: ...A Obr ci tubus o oko o jedn sm obrotu w lewo B i wyj go z obudowy reflektora C W celu zamontowania tubusu wykona te czynno ci w odwrotnej kolej no ci upewniaj c si e jednostka jest prawid owo osadzon...

Page 163: ...uwag na to aby spr ynowy uchwyt zabezpieczaj cy ramk filtra by skierowany ku g rze a jednostka by a prawid owo osadzona w odpowiednich prowadnicach w obudowie reflektora B Zablokowa tubus z soczewk zm...

Page 164: ...e nasun do oporu pokryw na element monta owy i zamocowa za pomoc dw ch rub rade kowanych B A C C CZYSZCZENIE KONSERWACJA I NAPRAWY Aby zapewni bezawaryjne dzia anie urz dzenia przez d ugi czas nale y...

Page 165: ...i usuwa z nich py i zabrudzenia 4 Do piel gnacji nie wolno stosowa rodk w czyszcz cych ani rodk w o dzia aniu ciernym w przeciwnym razie mo e doj do pogorszenia jako ci powierzchni 5 Urz dzenia nale...

Page 166: ...CLP22550LENS Tubus z soczewk zmiennoogniskow o k cie rozwarcia wi zki od 25 do 50 z prowadnic przys ony i filtrem Soft Edge w zestawie CLP219LENS Tubus z soczewk o k cie rozwarcia wi zki 19 CLP226LEN...

Page 167: ...167 DMX DEUTSCH FRANCAIS ESPA OL ENGLISH ITALIANO POLSKI WYMIARY 633 3 4 2 1 136 2 35 569 3 425 456 1 223 5 235 5 6 330 7 683 2 2 7 6 2 245 3 330 7 314 Shutter closed 314 Shutter closed...

Page 168: ...y 30 10 055 lm pe ny 10 240 lm kal Pe ny 11 587 lm przy 3200 K 7568 lm przy 5600 K Soczewka 25 50 przy 25 12241 lm pe ny 12448 lm kal Pe ny 14 033 lm przy 3200 K 9133 lm przy 5600 K Soczewka 25 50 prz...

Page 169: ...ytkownika odtwarzanie w p tli slave Ustawienia systemu Adres DMX tryb DMX tryb stand alone slave EZ Remote edycja koloru u ytkownika edycja p tli ustawienia sieci bezprzewodowej obracanie wy wietlacz...

Page 170: ...wka 50 1 35 kg Soczewka 15 30 5 8 kg Soczewka 25 50 4 5 kg RDM UID 0x08A4011C 0000 FFFF MINIMALNA ODLEG O OD POWIERZCHNI O WIETLANEJ 0 5 m Ten symbol z informacj o odleg o ci w metrach m wskazuje mini...

Page 171: ...rzestrzega wszystkich przepis w dotycz cych usuwania odpad w obowi zuj cych w kraju u ytkowania 3 Klient prywatny otrzyma informacje na temat przyjaznych dla rodowiska sposob w usuni cia produktu od s...

Page 172: ...arations CAMEO_DE_EN_ES_FR pdf W sprawie serwisu nale y skontaktowa si z dystrybutorem ZGODNO CE Adam Hall GmbH o wiadcza niniejszym e produkt spe nia wymogi nast puj cych dyrektyw o ile dotyczy Dyrek...

Page 173: ...omestica Inoltre questo prodotto destinato esclusivamente a utenti qualificati con conoscenze specialisti che in materia di tecnologia per eventi L utilizzo del prodotto al di fuori delle condizioni d...

Page 174: ...iatamente e scollegarlo dall alimentazione elettrica La riparazione del dispositivo deve essere affidata esclusivamente a personale qualificato autorizzato 3 In caso di dispositivi con classe di prote...

Page 175: ...te da tutti i dispositivi collegati non deve superare il valore indicato 7 Sostituire i cavi di alimentazione ad innesto esclusivamente con cavi originali PERICOLO 1 Pericolo di soffocamento I sacchet...

Page 176: ...d evitare il surriscaldamento 2 Non posizionare fonti di combustione come candele accese nelle vicinanze del dispositivo 3 Le feritoie di ventilazione non devono essere coperte e le ventole non devono...

Page 177: ...TRIALI PORTATILI 1 Funzionamento temporaneo Le attrezzature per eventi sono concepite esclusiva mente per un uso temporaneo 2 Il funzionamento continuo o l installazione permanente possono compromette...

Page 178: ...e con Cameo UNICON opzionale codice articolo CLIREMOTE CARATTERISTICHE LED COB RGBAL 5 in 1 da 230 W DMX512 W DMX opzionale Connettori DMX a 5 poli Quickli ght tramite codificatore rotativo a pression...

Page 179: ...ione di esercizio 100 240 V AC 50 60 Hz Un cavo di alimentazione adatto con connettore IEC compatibile con TRUE1 compreso nella fornitura 2 POWER OUT Presa di uscita compatibile con TRUE1 Serve per l...

Page 180: ...ta sulla schermata principale nelle modalit di funzionamento con comando esterno Non appena il segnale di comando si interrompe i caratteri sul display iniziano a lampeggiare quando il segnale si ripr...

Page 181: ...t di funzionamento DMX o la modalit slave e non presente alcun segnale di controllo all ingresso DMX i caratteri delle righe centrali sul display inizieranno a lampeggiare Se non si esegue alcuna immi...

Page 182: ...odalit DMX per memorizzare automaticamente l indirizzo di avvio DMX impostato in precedenza Rotazione del codificatore modifica del valore Pressione sul codificatore conferma della modifica del valore...

Page 183: ...t Pressione sul codificatore apertura del menu principale Menu Rotazione del codificatore regolazione della temperatura di colore CCT MODALIT DI FUNZIONAMENTO STAND ALONE HSI Hue Saturation Intensity...

Page 184: ...re commutazione tra R G e B A e L Strobe Colour DIRECT LED Auto DIM R G 100 255 255 Mode Colour Menu MODALIT DI FUNZIONAMENTO STAND ALONE GEL preset filtro cromatico Partendo dalla schermata principal...

Page 185: ...iva ridenominazione possono essere effettuate tramite la voce di menu Edit User Color User Colour Auto Mode Back Menu Rotazione del codificatore impostazione della luminosit DIM Pressione sul codifica...

Page 186: ...nservato e si potr accedere immediatamente alla fase di elaborazione successiva A Z _ 0 9 Edit User Colour Name Save Next ESC Quindi si dovr scegliere il modo desiderato per creare il colore per la pr...

Page 187: ...azioni personalizzate e la ridenominazione delle sequenze cromatiche possono essere effettuate alla voce di menu Edit Loop nel menu principale Rotazione del codificatore impostazione della luminosit D...

Page 188: ...ato e si potr accedere immediatamente alla fase di elaborazione successiva A Z _ 0 9 Edit Loop Name Save Next ESC Selezionare il passo 1 della sequenza in 8 passi Step1 Step8 ruotando il codificatore...

Page 189: ...a pressione sinistro nel menu per selezionare la modalit di funzionamento Mode Ruotare il codificatore per selezionare la voce di menu DMX osservare la freccia di selezione a sinistra e confermare pr...

Page 190: ...tra e confermare premendo lo stesso codifi catore ENTER Si accede quindi al sottomenu per l impostazione delle voci di sottomenu vedi tabella selezionare con SELECT confermare con ENTER modifica dello...

Page 191: ...alori DMX inferiore e superiore e grossolanamente nell intervallo di valori DMX intermedio Dimmer Respon se Comportamento dimmer Led Il proiettore reagisce in maniera repentina alle modifiche del valo...

Page 192: ...play dopo il test di funzionamento Locked Per sbloccare Premere contemporaneamente i codificatori centrale e destro per circa 4 secondi Off Blocco automatico degli elementi di comando disattivato Fan...

Page 193: ...del dispositivo LED Temp Visualizzazione della temperatura LED in gradi Celsius e Fahrenheit Op Hours Tempo di servizio totale in ore e minuti Display Spegnimento display attivato disattivato Signal...

Page 194: ...quindi possibile modificare le impostazioni del proiettore per mezzo del codificatore Dopo ca 1 minuto verr nuovamente visualizzata la modalit di funzionamento im postata Per revocare il blocco tenere...

Page 195: ...sare lesioni gravi o mortali alle persone La staffa di montaggio pu essere applicata sul proiettore in due posizioni A e B Quando si mo difica la posizione assicurarsi che la staffa di montaggio venga...

Page 196: ...ro rivolto verso l alto nel tubo con l unit otturatore A A questo punto avvitare le due viti a testa zigrinata in dotazione B nelle filettature corrispondenti del tubo per le lenti e serrarle Per mett...

Page 197: ...stare attenzione a non danneggiare o contaminare la lente retrostante Assicurarsi che nell alloggiamento del proietto re non penetrino corpi estranei 3 Non azionare il proiettore senza il tubo delle l...

Page 198: ...nto integrato in cui possibile inserire un supporto per gobo A o un modulo iride B supporto per gobo e modulo iride disponibili come opzione A tal fine allentare leggermente le due viti a testa zigrin...

Page 199: ...l interno del dispositivo 2 Le aperture di ingresso e uscita dell aria devono essere pulite regolarmente rimuovendo polvere e sporcizia In caso di utilizzo di aria compressa prestare attenzione a non...

Page 200: ...si CLP22550LENS Tubo per lenti zoom con angolo di emissione da 25 a 50 unit otturatore e filtro soft edge inclusi CLP219LENS Tubo per lenti con angolo di emissione di 19 CLP226LENS Tubo per lenti con...

Page 201: ...201 DMX DEUTSCH FRANCAIS ESPA OL ENGLISH ITALIANO POLSKI INGOMBRO 633 3 4 2 1 136 2 35 569 3 425 456 1 223 5 235 5 6 330 7 683 2 2 7 6 2 245 3 330 7 314 Shutter closed 314 Shutter closed...

Page 202: ...in full 10240 lm in cal Full 11587 lm a 3200 K 7568 lm a 5600 K Lente da 25 50 a 25 12241 lm in full 12448 lm in cal Full 14033 lm a 3200 K 9133 lm a 5600 K Lente 25 50 a 50 12108 lm in full 12153 lm...

Page 203: ...y Loop Slave Impostazioni di sistema Indirizzo DMX modalit DMX Stand Alone Slave EZ Remote Modifica colore utente Modifica loop Impostazioni wireless Display Flip Timer di spegnimento display Segnale...

Page 204: ...da 25 50 4 5 kg RDM UID 0x08A4011C 0000 FFFF DISTANZA MINIMA DALLA SUPERFICIE ILLUMINATA 0 5 m Questo simbolo con la distanza in metri m indica la distanza minima tra il corpo della lampada e la supe...

Page 205: ...leggi sullo smaltimento in vigore nel Paese di installazione 3 I clienti privati possono richiedere informazioni sulle possibilit di smaltimento ecosostenibile al rivenditore presso il quale stato acq...

Page 206: ...ivolgersi al proprio distributore di fiducia CONFORMIT CE Con la presente Adam Hall GmbH dichiara che questo prodotto soddisfa le seguenti direttive ove pertinente Direttiva bassa tensione 2014 35 UE...

Page 207: ...K 3200K 088 088 Halogen White 3200K 089 128 3200K 4000K 129 129 Neutral White 4000K 130 169 4000K 5600K 170 170 Studio White 5600K 171 210 5600K 6500K 211 211 Daylight White 6500K 212 251 6500K cold D...

Page 208: ...ff 4CH CCT Warm white 006 006 Warm white 007 046 Warm white 2700K 047 047 Bulb White 2700K 048 087 2700K 3200K 088 088 Halogen White 3200K 089 128 3200K 4000K 129 129 Neutral White 4000K 130 169 4000K...

Page 209: ...Hz 251 255 Strobe open 4 4 Red 000 255 0 to 100 Red 5 Red fine 000 255 0 to 100 5 6 Green 000 255 0 to 100 Green 7 Green fine 000 255 0 to 100 6 8 Blue 000 255 0 to 100 Blue 9 Blue fine 000 255 0 to 1...

Page 210: ...9 46 Dark Magenta 010 013 29 Plasa Red 014 017 26 Bright Red 018 021 127 Smokey Pink 022 025 36 Medium Pink 026 029 19 Fire 030 033 135 Deep Golden Amber 034 037 778 Millennium Gold 038 041 21 Gold Am...

Page 211: ...166 169 343 Special Medium Lavender 170 173 798 Chrysalis Pink 174 177 701 Provence 178 181 797 Deep Purple 182 185 48 Rose Purple 186 189 345 Fuchsia Pink 190 193 795 Magical Magenta 194 197 128 Bri...

Page 212: ...s 078 081 No function 082 083 DTW Redshift on hold 1 5 s 084 085 DTW Redshift off hold 1 5 s 086 097 No function 098 099 Auto Fan hold 3s 100 101 Fan Off hold 3s 102 103 Constant Low Fan hold 3s 104 1...

Page 213: ...the value to 000 to avoid disturbance by endless function call DE 1 Nachdem die Einstellungen vorgenommen wurden stellen Sie den Wert auf 000 ein um St rungen durch endlosen Funktionsaufruf zu vermei...

Page 214: ......

Page 215: ......

Page 216: ...CAMEOLIGHT COM REV 01 Adam Hall GmbH Adam Hall Str 1 61267 Neu Anspach Germany Phone 49 6081 9419 0 adamhall com Adam Hall Ltd The Seedbed Business Centre SS3 9QY Essex United Kingdom...

Reviews: