background image

3

DMX

DEUTSCH

FRANCAIS

ESP

AÑOL

ENGLISH

IT

ALIANO

POLSKI

ENGLISH

YOU‘VE MADE THE RIGHT CHOICE!

We have designed this product to operate reliably over many years. Please read this User‘s Manual carefully, so that you can begin making 

optimum use of your Cameo Light product quickly. Learn more about Cameo Light on our website WWW.

CAMEOLIGHT

.COM.

PREVENTIVE MEASURES

1. Please read these instructions carefully. 

2. Keep all information and instructions in a safe place. 

3. Follow the instructions. 

4. Observe all safety warnings. Never remove safety warnings or other information from the equipment. 

5. Use the equipment only in the intended manner and for the intended purpose. 

6. Use only sufficiently stable and compatible stands and/or mounts (for fixed installations). Make certain that wall mounts are properly 

installed and secured. Make certain that the equipment is installed securely and cannot fall down. 

7. During installation, observ  e the applicable safety regulations for your country. 

8. Never install and operate the equipment near radiators, heat registers, ovens or other sources of heat. Make certain that the equipment is 

always installed so that is cooled sufficiently and cannot overheat. 

9. Never place sources of ignition, e.g., burning candles, on the equipment. 

10. Ventilation slits must not be blocked. 

11. This appliance is designed exclusively for indoor use, do not use this equipment in the immediate vicinity of water (does not apply 

to special outdoor equipment - in this case, observe the special instructions noted below). Do not expose this equipment to flammable 

materials, fluids or gases. 

12. Make certain that dripping or splashed water cannot enter the equipment. Do not place containers filled with liquids, such as vases or 

drinking vessels, on the equipment. 

13. Make certain that objects cannot fall into the device. 

14. Use this equipment only with the accessories recommended and intended by the manufacturer. 

15. Do not open or modify this equipment. 

16. After connecting the equipment, check all cables in order to prevent damage or accidents, e.g., due to tripping hazards. 

17. During transport, make certain that the equipment cannot fall down and possibly cause property damage and personal injuries.

18. If your equipment is no longer functioning properly, if fluids or objects have gotten inside the equipment or if it has been damaged in 

anot her way, switch it off immediately and unplug it from the mains outlet (if it is a powered device). This equipment may only be repaired 

by authorized, qualified personnel. 

19. Clean the equipment using a dry cloth. 

20. Comply with all applicable disposal laws in your country. During disposal of packaging, please separate plastic and paper/cardboard. 

21. Plastic bags must be kept out of reach of children.

FOR EQUIPMENT THAT CONNECTS TO THE POWER MAINS:

22. CAUTION: If the power cord of the device is equipped with an earthing contact, then it must be connected to an outlet with a protective 

ground. Never deactivate the protective ground of a power cord. 

23. If the equipment has been exposed to strong fluctuations in temperature (for example, after transport), do not switch it on immediately. 

Moisture and condensation could damage the equipment. Do not switch on the equipment until it has reached room temperature. 

24. Before connecting the equipment to the power outlet, first verify that the mains voltage and frequency match the values specified on the 

equipment. If the equipment has a voltage selection switch, connect the equipment to the power outlet only if the equipment values and the 

mains power values match. If the included power cord or power adapter does not fit in your wall outlet, contact your electrician. 

25. Do not step on the power cord. Make certain that the power cable does not become kinked, especially at the mains outlet and/or power 

adapter and the equipment connector. 

26. When connecting the equipment, make certain that the power cord or power adapter is always freely accessible. Always disconnect the 

equipment from the power supply if the equipment is not in use or if you want to clean the equipment. Always unplug the power cord and 

power adapter from the power outlet at the plug or adapter and not by pulling on the cord. Never touch the power cord and power adapter 

with wet hands. 

27. Whenever possible, avoid switching the equipment on and off in quick succession because otherwise this can shorten the useful life of 

the equipment.

28. IMPORTANT INFORMATION: Replace fuses only with fuses of the same type and rating. If a fuse blows repeatedly, please contact an 

authorised service centre. 

29. To disconnect the equipment from the power mains completely, unplug the power cord or power adapter from the power outlet. 

30. If your device is equipped with a Volex power connector, the mating Volex equipment connector must be unlocked before it can be re-

moved. However, this also means that the equipment can slide and fall down if the power cable is pulled, which can lead to personal injuries 

and/or other damage. For this reason, always be careful when laying cables. 

31. Unplug the power cord and power adapter from the power outlet if there is a risk of a lightning strike or before extended periods of disuse.

32. The device must only be installed in a voltage-free condition (disconnect the mains plug from the mains).

33. Dust and other debris inside the unit may cause damage. The unit should be regularly serviced or cleaned (no guarantee) depending on 

ambient conditions (dust etc., nicotine, fog) by qualified personnel to prevent overheating and malfunction.

34. Please keep a distance of at least 0.5 m to any combustible materials.

35. Power cables to power multiple devices must have a cross-section of at least 1.5 mm². Within the EU, the cables must correspond to 

H05VV-F, or similar. Suitable cables are offered by Adam Hall. With these cables, you can connect multiple devices via the power OUT 

connection to the power IN connection of an additional device. Make sure that the total current consumption of all connected devices does not 

exceed the specified value on all connected devices (label on the device). Make sure to keep power cable connections as short as possible.

Summary of Contents for SCUBA

Page 1: ...USER S MANUAL BEDIENUNGSANLEITUNG MANUEL D UTILISATION MANUAL DE USUARIO INSTRUKCJA OBS UGI MANUALE D USO SCUBA WATER EFFECT LIGHT WITH 90W LED COLOUR WHEEL AND 2 LENSES CLSCUBA...

Page 2: ...INSTALLATION ET MONTAGE 29 TECHNOLOGIE DMX 30 CARACT RISTIQUES TECHNIQUES 31 D CLARATIONS DU FABRICANT 32 PILOTAGE EN MODE DMX ESPA OL MEDIDAS DE SEGURIDAD 33 INTRODUCCI N 34 CONEXIONES ELEMENTOS DE M...

Page 3: ...ive ground of a power cord 23 If the equipment has been exposed to strong fluctuations in temperature for example after transport do not switch it on immediately Moisture and condensation could damage...

Page 4: ...altitude Warning This product is not intended for use in tropical climates Caution Intense LED light source Risk of eye damage Do not look into the light source CAUTION IMPORTANT INFORMATION ABOUT LIG...

Page 5: ...it the DMX control signal 5 SAFETY EYEBOLT When installing on a crossbeam secure the device using a suitable safety cable on the safety eyebolt 6 FANS VENTILATION GRILLES In order to avoid overheating...

Page 6: ...ress If there is no control signal to the DMX input the display will begin to flash This flashing will stop as soon as a control signal is received DMX Addr 001 MAIN DISPLAY STANDALONE MODE The lower...

Page 7: ...the UP and DOWN buttons now select the Mode menu option bottom row and confirm via ENTER Using the UP and DOWN buttons again select the Slave menu option and confirm via ENTER Press MODE again to ret...

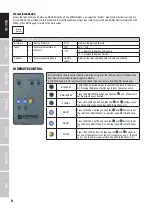
Page 8: ...r installed on the front side The maximum range is approx 8 meters 1x CR2025 battery for IR remote control included in deliver remove insulating film before use BLACKOUT The BLACKOUT button serves to...

Page 9: ...djustable twin bracket stand the spotlight can be placed in a suitable location on a flat surface Install on a crossbeam using a traverse clamp that is attached to the twin bracket stand A Suitable tr...

Page 10: ...DMX device e g DMX Controller 2 Connect the female 3 pin XLR connector of the DMX cable connected to the first projector to the DMX input male 3 pin socket of the next DMX device In the same way conn...

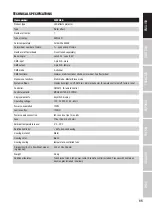
Page 11: ...e mode System settings Display backlight on off DMX fail dimmer behavior IR remote control on off factory reset Controller DMX512 IR remote control Control elements MODE ENTER UP DOWN Display elements...

Page 12: ...ustainable economic activity Household users should contact either the retailer where they purchased this product or their local government office for details on where and how they can recycle this it...

Page 13: ...Sie alle in Ihrem Land geltenden Entsorgungsgesetze Trennen Sie bei der Entsorgung der Verpackung bitte Kunststoff und Papier bzw Kartonagen voneinander 21 Kunststoffbeutel m ssen au er Reichweite vo...

Page 14: ...se Warnung Dieses Symbol kennzeichnet hei e Oberfl chen W hrend des Betriebs k nnen bestimmte Teile des Geh uses hei werden Ber hren oder transportieren Sie das Ger t nach einem Einsatz erst nach eine...

Page 15: ...signals 5 SICHERUNGS SE Sichern Sie das Ger t bei der Traversenmontage mit einem geeigneten Sicherungsseil an der Sicherungs se 6 L FTER L FTUNGSGITTER Um berhitzung des Ger ts zu vermeiden achten Sie...

Page 16: ...euersignal am DMX Eingang an f ngt das Display an zu blinken das Blinken stoppt sobald ein Steuersignal anliegt DMX Addr 001 HAUPTANZEIGE STANDALONE BETRIEBSART In der unteren Zeile des Displays wird...

Page 17: ...Sie nun den Men punkt Mode untere Zeile aus und best tigen mit ENTER W hlen Sie wiederum mit Hilfe von UP und DOWN den Untermen punkt Slave aus und best tigen mit ENTER Dr cken Sie wiederholt auf MODE...

Page 18: ...weite betr gt circa 8 Meter 1x Batterie CR2025 f r IR Fernbedienung im Lieferumfang vor Gebrauch Isolierfolie entfernen BLACKOUT Die BLACKOUT Taste dient dazu das Leuchtmittel im Projektor abzuschalte...

Page 19: ...kann der Scheinwerfer an einer geeigneten Stelle auf eine ebene Fl che gestellt werden Die Montage an einer Traverse erfolgt mit Hilfe einer Traversenklemme die am Doppelb gel befestigt wird A Geeign...

Page 20: ...XLR Buchse des ersten DMX Ger ts z B DMX Controller 2 Verbinden Sie den weibliche XLR Stecker des an den ersten Scheinwerfer angeschlossenen DMX Kabels mit dem DMX Eingang m nnliche XLR Buchse des n c...

Page 21: ...einstellungen Display Beleuchtung On Off DMX Fail Dimmverhalten IR Fernbedienung On Off Factory Reset Steuerung DMX512 IR Fernbedienung Bedienelemente MODE ENTER UP DOWN Anzeigeelemente beleuchtetes L...

Page 22: ...gung zu vermeiden Bitte entsorgen Sie dieses Produkt getrennt von anderen Abf llen und f hren es zur F rderung nachhaltiger Wirtschaftskreisl ufe dem Recycling zu Als Privatkunde erhalten Sie Informat...

Page 23: ...s parer plastique papier et carton 21 Les films plastique doivent tre mis hors de port e des enfants APPAREILS RELI S AU SECTEUR 22 ATTENTION Si le c ble de l appareil est muni d un fil de terre il d...

Page 24: ...spond des surfaces chaudes En cours de fonctionnement certaines parties de l appareil peuvent devenir chaudes Apr s utilisation ne manipulez ou ne transportez l appareil qu au bout de 10 minutes de re...

Page 25: ...nal de commande DMX 5 ILLET DE S CURIT Lors du montage sur traverse s curiser l appareil via un c ble de retenue adapt ins r dans l illet de s curit pr vu cet effet 6 VENTILATEUR GRILLE DE VENTILATION...

Page 26: ...du bas indique l adresse de d part DMX actuellement param tr e En l absence de signal de commande l entr e DMX l cran se met clignoter Le clignotement cesse d s que le signal de commande est d livr DM...

Page 27: ...ure et confirmer avec ENTER Utiliser de nouveau les touches UP et DOWN pour s lectionner l option de sous menu Slave et appuyer sur ENTER pour confirmer Appuyer plusieurs reprises sur la touche MODE p...

Page 28: ...nt Sa port e maximale est d environ 8 m tres 1x pile CR2025 pour t l commande infrarouge incluse retirer le film isolant avant utilisation BLACKOUT La touche BLACKOUT sert teindre la source lumineuse...

Page 29: ...jecteur peut tre plac un endroit appropri sur une surface plane Le montage sur traverse s effectue l aide d un dispositif de serrage fix sur l trier double A Des pinces de serrage sur traverse adapt e...

Page 30: ...r projecteur l entr e DMX connecteur XLR m le de l appareil DMX suivant Reliez la sortie DMX de cet appareil selon le m me m thode l entr e DMX de l appareil DMX suivant et ainsi de suite Veillez ce q...

Page 31: ...st me clairage de l cran On Off DMX Fail comportement de gradation t l commande infrarouge On Off restauration des r glages d usine Pilotage DMX512 commande distance par infrarouge l ments de commande...

Page 32: ...mination non contr l e des d chets S parez le des aut res types de d chets et recyclez le afin de promouvoir la r utilisation durable des ressources naturelles Nous conseillons aux utilisateurs non pr...

Page 33: ...para reciclarlos en sus contenedores respectivos 21 No deje las bolsas de pl stico al alcance de los ni os PARA LOS EQUIPOS CON TOMA EL CTRICA 22 ADVERTENCIA Si el cable el ctrico est provisto de un...

Page 34: ...TION Ce symbole correspond des surfaces chaudes En cours de fonctionnement certaines parties de l appareil peuvent devenir chaudes Apr s utilisation ne manipulez ou ne transportez l appareil qu au bou...

Page 35: ...se al de control DMX 5 C NCAMO DE SEGURIDAD En el montaje en travesa o fije el equipo con un cable de seguridad adecuado en el c ncamo de seguridad 6 VENTILADOR REJILLA DE VENTILACI N Para evitar que...

Page 36: ...recci n inicial DMX ajustada actualmente Si no se recibe ninguna se al de control en la entrada DMX la pantalla empezar a parpadear pero dejar de hacerlo en cuanto vuelva a recibirse una se al de cont...

Page 37: ...ferior y confirme la selecci n con ENTER Nuevamente con los botones UP y DOWN seleccione la opci n Slave del submen y confirme la selecci n con ENTER Pulse varias veces MODE para regresar a la pantall...

Page 38: ...ente a la parte delantera del sensor de infrarrojos incorporado El rango de alcance m ximo es de unos 8 metros El volumen de suministro incluye 1 pila CR2025 para el mando a distancia por infrarrojos...

Page 39: ...ajustable el foco puede instalarse en un lugar adecuado sobre una superficie nivelada El montaje en un travesa o se realiza con una abrazadera apta para travesa o Esta abrazadera se fija en el soport...

Page 40: ...X 2 Conecte ahora el conector XLR hembra del cable DMX del primer foco a la entrada DMX del equipo siguiente conector de chasis macho Conecte la salida DMX de este ltimo equipo a la entrada DMX del eq...

Page 41: ...a de atenuaci n activaci n desactivaci n de control con mando a distancia por infrarrojos restablecimiento de los ajustes de f brica Control DMX512 mando a distancia por infrarrojos Elementos de manej...

Page 42: ...ar posibles efectos negativos en el medio ambiente y en la salud humana debidos al vertido incontrolado de desechos La recogida selectiva ayuda a su posterior reciclaje y fomenta la reutilizaci n sost...

Page 43: ...miast wy czy i od czy od gniazda sieciowego je li urz dzenie jest aktywne Napraw takiego urz dzenia mo e wykona tylko autoryzowany personel specjalistyczny 19 Do czyszczenia urz dzenia stosowa such ci...

Page 44: ...alizuje nieizolowane niebezpieczne napi cie we wn trzu urz dzenia kt re mo e spowodowa pora enie pr dem Tr jk t r wnoboczny z wykrzyknikiem oznacza wa ne wskaz wki dotycz ce obs ugi i konserwacji 2 Os...

Page 45: ...teruj cego DMX 5 UCHO ZABEZPIECZAJ CE Do zabezpieczania urz dzenia w przypadku monta u na trawersie s u specjalnie przeznaczona do tego lina i ucho zabezpieczaj ce 6 WENTYLATOR KRATKA WENTYLACYJNA Aby...

Page 46: ...nie ustawiony adres startowy DMX W przypadku braku sygna u steruj cego wy wietlacz miga Po wykryciu sygna u steruj cego miganie ustaje DMX Addr 001 TRYB PRACY STANDALONE NA EKRANIE G WNYM W dolnym wie...

Page 47: ...yciskiem ENTER Ponownie przyciskami UP i DOWN wybra w podmenu pozycj Slave i potwierdzi wyb r przyciskiem ENTER Nacisn dwukrotnie przycisk MODE aby powr ci do ekranu g wnego Po czy urz dzenia slave i...

Page 48: ...przodu Maksy malny zasi g wynosi oko o 8 metr w 1x bateria CR2025 do pilota zdalnego sterowania na podczerwie w zestawie przed u yciem nale y zdj foli izolacyjn BLACKOUT Przycisk BLACKOUT s u y do wy...

Page 49: ...egrowany podw jny pa k Aby zamontowa urz dzenie na kratownicy konieczny jest specjalny zacisk do kratownic kt ry jest przymocowany do podw jnego pa ka A Odpowiednie zaciski do trawersu s dost pne jako...

Page 50: ...dzenia DMX np kontrolera DMX 2 e sk wtyczk XLR kabla DMX pod czonego do pierwszego reflektora pod czy do wej cia DMX m skie gniazdo XLR nast pnego urz dzenia DMX Wyj cie DMX tego urz dzenia pod czy w...

Page 51: ...stemu w czanie wy czanie pod wietlenia ekranu b d DMX krzywa ciemniania w czanie wy czanie pilota na podczerwie przywracanie ustawie fabrycznych Sterowanie DMX512 pilot na podczerwie Elementy obs ugi...

Page 52: ...nownego wykorzystania u ytych w nim materia w w ramach idei zr wnowa onego rozwoju Klienci prywatni otrzymuj informacje w zakresie przyja znych dla rodowiska mo liwo ci usuwania odpad w od sprzedawcy...

Page 53: ...e nel Paese di installazione Al momento di smaltire l imballo separare la plastica dalla carta e dal cartone 21 I sacchetti di plastica devono essere tenuti lontani dalla portata dei bambini DISPOSITI...

Page 54: ...timento Questo simbolo indica superfici calde Alcune parti della cassa potrebbero scaldarsi durante l impiego Dopo aver usato l apparecchiatura lasciarla raffreddare per almeno 10 minuti prima di tocc...

Page 55: ...di controllo del DMX 5 OCCHIELLO DI SICUREZZA Per il montaggio su traversa fissare il dispositivo con un adeguato cavo di sicurezza all occhiello di sicurezza 6 VENTOLA GRIGLIA DELLA VENTOLA Per evita...

Page 56: ...lmente impostato In assenza di un segnale di comando all ingresso DMX i caratteri sul display iniziano a lampeggiare mentre in presenza del segnale il lampeggio si arresta DMX Addr 001 SCHERMATA PRINC...

Page 57: ...sti UP e DOWN selezionare la voce di menu Mode riga inferiore e confermare con ENTER Con i tasti UP e DOWN selezionare di nuovo la voce di sottomenu Slave e confermare con ENTER Premere MODE pi volte...

Page 58: ...sensore a infrarossi presente sul lato frontale Il raggio d azione massimo di circa 8 metri Una batteria CR2025 per il telecomando IR inclusa nella confezione Prima dell uso rimuovere la pellicola iso...

Page 59: ...egolabile possibile sistemare il proiettore nella posizione indicata su una superficie piana Il montaggio su una traversa effettuato tramite un apposito morsetto per traverse da fissare alla staffa di...

Page 60: ...emmina del cavo DMX connesso al primo proiettore DMX con l ingresso DMX presa XLR maschio del successivo dispositivo DMX Analogamente collegare l uscita DMX di questo dispositivo con l ingresso DMX de...

Page 61: ...ni di sistema Illuminazione display On Off DMX Fail comportamento dimmer telecomando IR On Off Factory Reset Controller DMX512 telecomando IR Elementi di comando MODE ENTER UP DOWN Elementi di visuali...

Page 62: ...me ai normali rifiuti domestici Il prodotto deve quindi essere smaltito separatamente da altri rifiuti e riciclato nell ottica dell incentivazione di cicli economici sostenibili I clienti privati poss...

Page 63: ...3 Orange 034 040 Split Colour Orange Yellow 041 047 Yellow 048 054 Split Colour Yellow Green 055 061 Green 062 068 Split Colour Green Cyan 069 075 Cyan 076 082 Split Colour Cyan Lavender 083 089 Laven...

Page 64: ...CAMEOLIGHT COM Adam Hall GmbH Adam Hall Str 1 61267 Neu Anspach Germany Tel 49 0 6081 9419 0 Fax 49 0 6081 9419 1000 web www adamhall com e mail mail adamhall com REV 01...

Reviews: