Eye
RX
User
Guide
Page 149
Time Synchronization
K. Time Synchronization
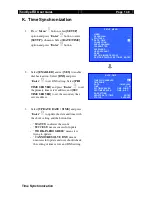
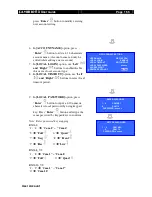
1.
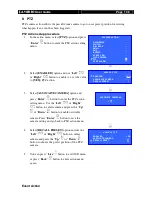
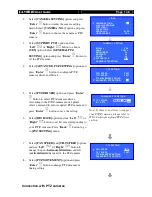
Press “
Menu
”
button, select
[SETUP]
option and press “
Enter
”
button to enter
[SETUP]
sub menu. Select
[DATE/TIME]
option and press “
Enter
” button.
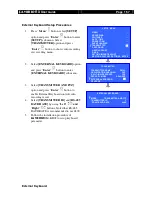
2.
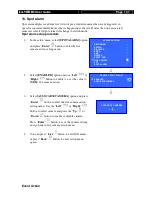
Select
[ENABLED]
and set
[YES]
to enable
dial back action. Select
[DNS]
and press
“
Enter
”
to set DNS setting. Select
[PRI
TIME SERVER]
and press “
Enter
”
to set
the primary time server address and
[SEC
TIME SERVER]
to set the secondary time
server address.
3.
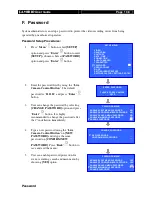
Select
[UPDATE DATE / TIME]
and press
“
Enter
”
to update the date and time with
the above setting and the botton line
“
STATUS
” indicates the results
“
SUCCESS
” means successful update
“
WORK-IN-PROGRESS
” means it is
trying to update
“
CANNOT RESOLVE DNS
” means
unsuccessful update and user should check
the setting of time server and DNS setting.
SETUP MENU
VIDEO
. . .
RECORDING
. . .
SWITCHES
. . .
DATE / TIME
. . .
CONNECTION
. . .
EVENT HANDLER
. . .
TRANSMITTER
. . .
PASSWORD
. . .
USER ACCOUNT . . .
RX-SE
. . .
SETTING IMPORT/EXPORT . . .
RESTORE FACTORY SETTINGS ENTER
DATE / TIME
TIME SYNC ENABLED
YES
TIME ZONE
. . .
DATE 11 MAR 2006
TIME
11 : 03
PRI TIME SERVER
TIME . WIND . .
SEC TIME SERVER
TIME . N IST . .
DNS SETTING
. . .
UPDATE DATE / TIME
ENTER
STATUS
SUCCESS


