background image

8) 

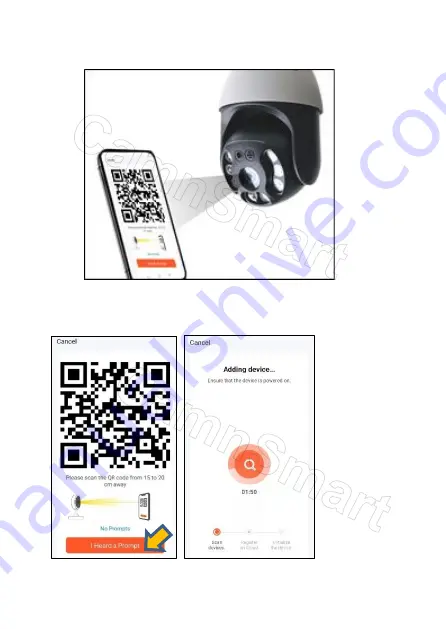
A QR code will show on your phone screen. Place the QR code in front of 

the camera lens to let the camera read the QR code. You need to move the 

QR code slowly forwards or backwards 10cm ~ 50cm distance to the camera 

lens. 


9) 

Once camera reads the QR code, it will say “Scan successfully, connecting 

to  the  network”  and  say  “connecting  to  the  server”.  Now  press  “I  heard  a 

Prompt”  button  on  app.  Then  just  wait.  Finally,  it  will  say  “configure 

successfully, you may use the camera now.” 


Camera is added successfully to you APP account. Now you can use it. 
 

www.camnsmart.com 

Summary of Contents for E27SX1TY

Page 1: ...Quick Guide CamnSmart PTZ Wi Fi Camera 1 Overview of the Cameras Model E27SX1TY ...

Page 2: ...Model E27XS2TY ...

Page 3: ...Model E27STY ...

Page 4: ...www camnsmart com Model E27TY ...

Page 5: ...g Forgot password on the login page 3 Add camera to App 1 Get ready your Wi Fi router and remember your Wi Fi password Note A please do not use special letters like as Wi Fi name and password B Camera supports 2 4GHz Wi Fi If your Wi Fi router is 5GHz it may be integrated with 2 4GHz But 2 4GHz Wi Fi and 5GHz Wi Fi have the same Wi Fi SSID name So you can get to your Wi Fi router s settings to set...

Page 6: ...l rotate left right and up down Then camera will say Welcome to use intelligent camera please use QR code net pairing or AP mode to configure the device If camera does not rotate and no saying anything after 50 seconds please do following a check power supplied properly and firmly b please reset the camera Below pictures show where are the reset buttons Use a pin to slightly press it for 3 5 secon...

Page 7: ...t Camera Wi Fi 7 Press Next On the Step 1 you already connected your phone to your Wi Fi So it automatically shows your Wi Fi name You just type in your Wi Fi password then press Next Important note you must type in correct Wi Fi password otherwise connection will fail in following steps ...

Page 8: ...kwards 10cm 50cm distance to the camera lens 9 Once camera reads the QR code it will say Scan successfully connecting to the network and say connecting to the server Now press I heard a Prompt button on app Then just wait Finally it will say configure successfully you may use the camera now Camera is added successfully to you APP account Now you can use it www camnsmart com ...

Page 9: ...4 APP Interface 5 Settings Interface ...

Page 10: ... to SD card Please get to Settings Storage Settings to set recording mode Notes 1 First time to use SD card needs format the SD card 2 After inserting SD card into camera please get to Settings Storage Settings to turn on Local Recording and select your preferable Recording Mode www camnsmart com This Quick Guide may be revised without further notice Copy writes by CamnSmart ...

Reviews: