4
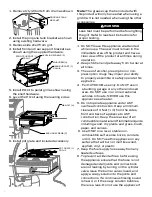
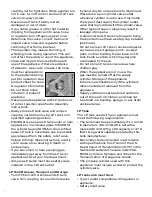
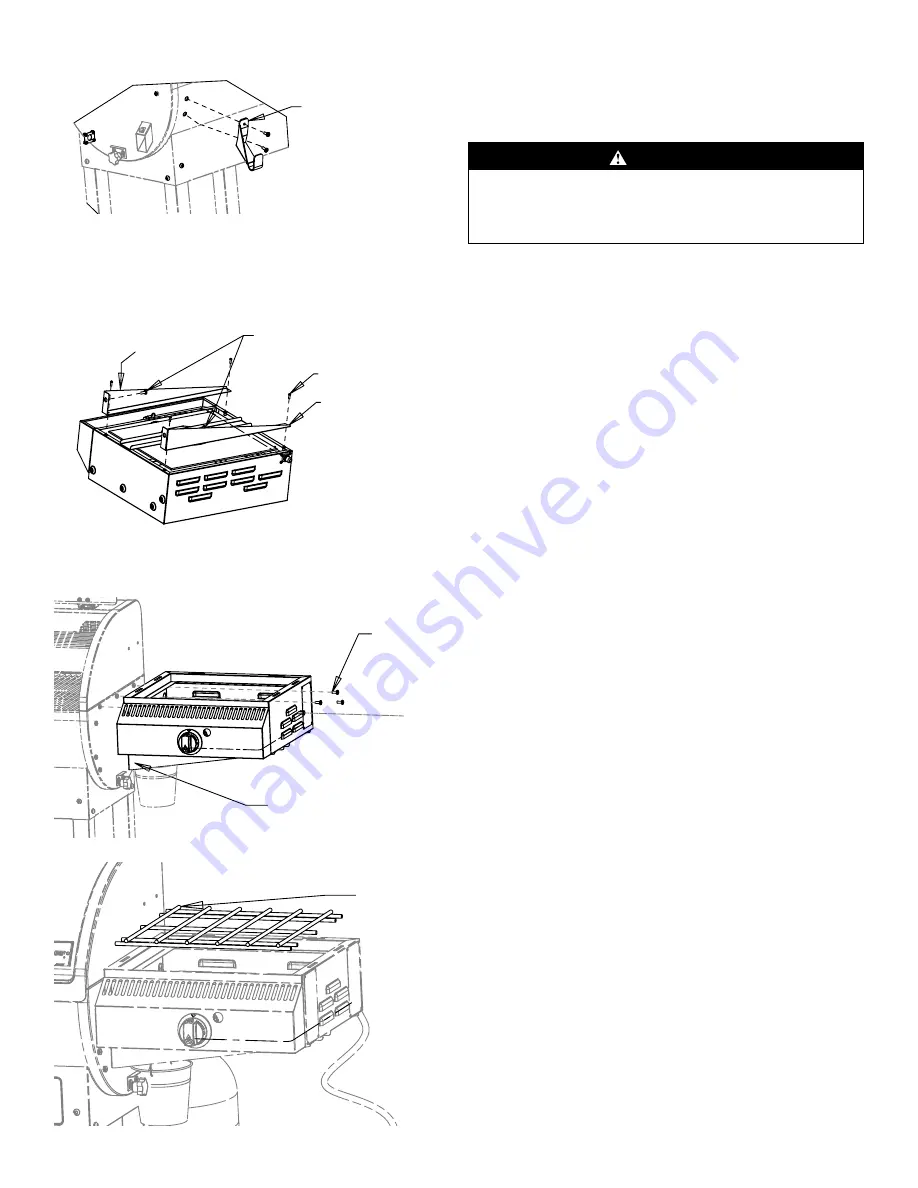
1. Remove Qty (2) bolts from drum as shown.
PROPANE TANK
BRACKET
2. Install the propane tank bracket as shown
using existing hardware.
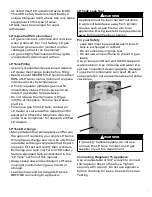
3. Remove side shelf from grill.
4. Install front and rear support brackets as
shown using the supplied hardware.
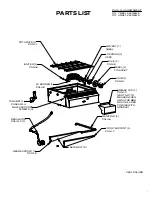
FRONT SUPPORT (1)
PG14-7
REAR SUPPORT (1)
PG14-8
LEVELING SCREWS (2)
M4 SCREW (4)
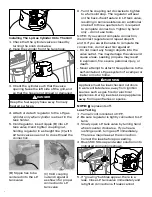
5. Install PG14 to pellet grill as shown using
the shelf hardware.
6. Level the PG14 using the leveling screw.
SCALE 0.100
LEVELING SCREWS (2)
M6 BOLT (4)
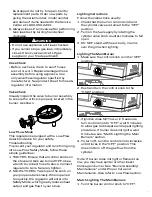
6. Install pot grate and included accessory.
POT GRATE (1)
PG14-1
Note: The grease cup that is included with
this product will only be needed when using a
griddle. It is not needed when using the other
accessories.
WARNING
Leak test must be performed before lighting
the grill. Refer to leak test instructions for
proper testing.
1. Do NOT leave this appliance unattended
while in use. The user must remain in the
immediate area of the product and have a
clear view of the product at all times during
operation.
2. Keep children and pets away from burner at
all times.
3. The use of alcohol, prescription or non-
prescription drugs may impair your ability
to properly assemble or safely operate this
appliance.
4. For OUTDOOR use only. Do NOT use in
a building, garage or any other enclosed
area. Do NOT use in or on recreational
vehicles or boats. NEVER use this
appliance as a heater.
5. Do not operate appliance under ANY
overhead construction. Keep a minimum
clearance of 3 feet (1 m) from the sides,
front and back of appliance to ANY
construction. Keep the area clear of all
combustible material and flammable liquids,
including wood, dry plants and grass, brush,
paper, and canvas.
6. Use ONLY on a level, stable non-
combustible surface like bricks, concrete
or dirt. Do NOT use this appliance on any
surface that will burn or melt like wood,
asphalt, vinyl, or plastic.
7. Keep the fuel supply hose away from any
heated surfaces.
8. To prevent accidental fires, before using
the appliance ensure that the hose is not
damaged and all joints and connections
are not leaking by turning on the cylinder
valve, leave the burner valve closed, and
apply a soapy solution to the joints and
connections. If a continuous hissing sound
is heard, or if the soapy solution bubbles,
there is a leak. Do not use the appliance if

