background image

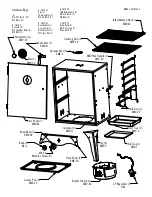
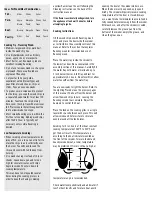
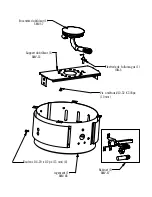
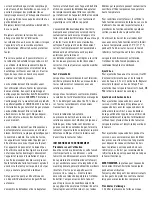
KNOB, TRAYS AND GRIDS

1.  Set the grease pan in the bottom of the 

smoker as shown.

2.  Set the chip tray in the first rack position of 

the smoker.

3.  Set water tray in the second position of the 

smoker.

4.  Insert the cooking grids into any of the 

remaining positions as desired.


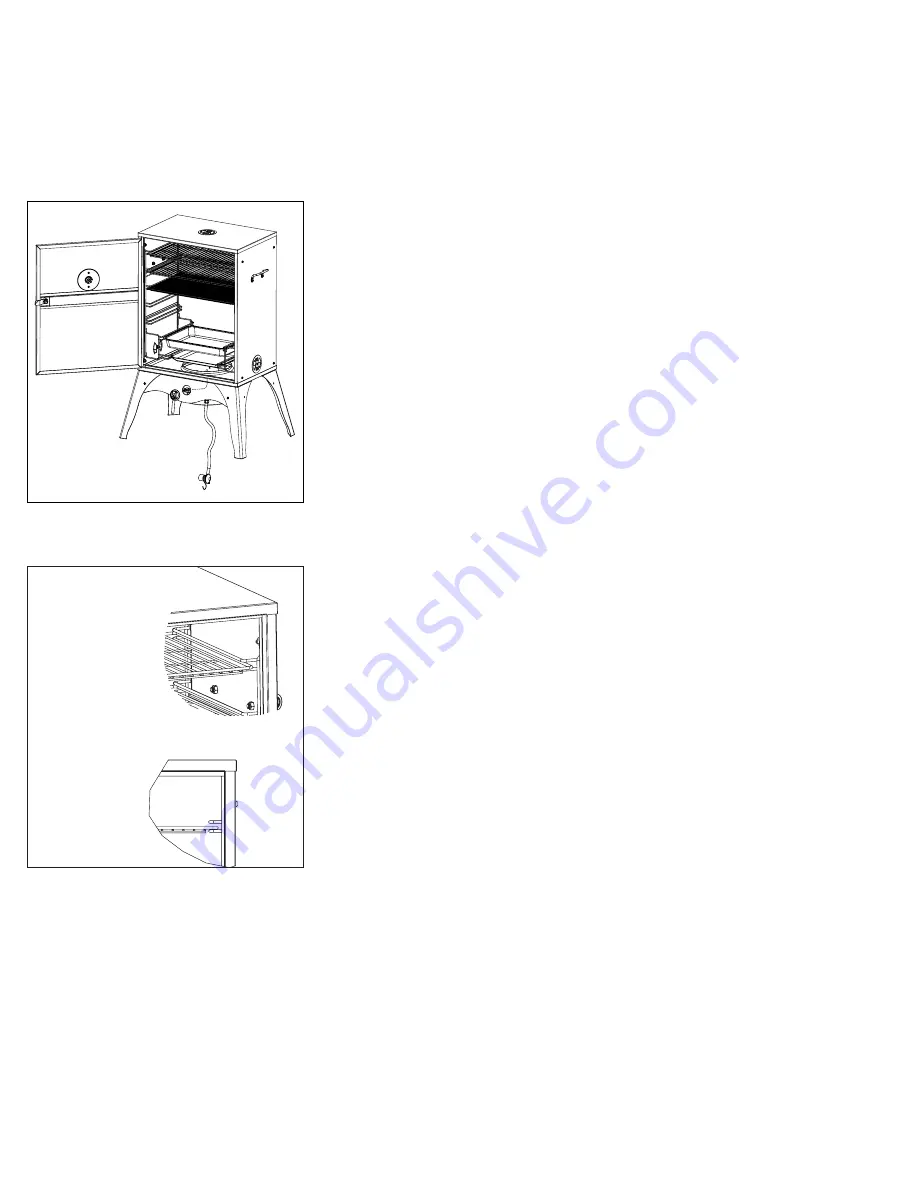
5.  When Inserting the smoking racks, make 

sure that the longest bar is on the top as 
shown.

WARNING

DO NOT use this smoker in a manner other 
than its intended purpose. Not intended for 
commercial use. Not intended to be installed or 
used in or on a recreational vehicle or boat.
When cooking with oil/grease, a fire 
extinguisher must be readily accessible. In 
the event of an oil/grease fire do not attempt 
to extinguish with water. Use Type BC dry 
chemical fire extinguisher or smother fire with 
dirt, sand of baking soda. In the event of rain 
while cooking with oil/grease, cover the cooking 
vessel immediately and turn off the appliance 
burners and gas supply. Do not attempt to 
move the appliance or cooking vessel. 
The use of alcohol, prescription or non-
prescription drugs may impair the consumer’s 
ability to properly assemble or safely operate 
this appliance.

FOR OUTDOOR USE ONLY! 

Do not operate the smoker indoors, in a garage, 
or in any other enclosed area or under overhead 
construction. Do not use on or under any 
apartment, condominium, balcony or deck. Do 
not operate smoker near flammable materials 
such as decks, fences, porches or carports. 
A minimum clearance range of 36 inches is 
recommended.
Do not store the smoker near gasoline or other 
combustible liquids or where combustible 
vapors may be present.

Use caution when assembling and operating 
smoker to avoid cuts and scrapes from rough or 
sharp edges.

Use caution when lifting or moving the smoker 
to avoid strains or back injury. 2 people are 
recommended to lift or move the smoker. Do not 
move the smoker while it is in use. Allow the 
smoker to cool to 115°F (45°C) before moving 
or storing.

When cooking, the appliance must be on 
a level, stable surface in an area clear of 
combustible material. An asphalt surface 
(blacktop) may not be acceptable for this 
purpose. Do not operate smoker on flammable 
material such as carpet or a wood deck. NEVER 
use gasoline or highly volatile fluids as a 
starter. 

Store the smoker in a dry, protected location.
This appliance is not intended for and should 
never be used as a heater.

DO NOT leave smoker unattended while in use. 
Operate the smoker with close supervision. 
Do not leave hot ashes unattended until the 
smoker cools completely.

DO NOT operate around children or animals. Do 
not conduct activities around smoker during or 
following use until cooled. Do not bump or tip 
smoker.
If Smoker becomes extremely hot - allow smoker 
to cool completely before handling. If you must 
handle the smoker while it is hot, always wear 
protective oven mitts or heat resistant gloves 
when handling the smoker or its components.

The water tray and wood chip box should not 
be moved while smoker is operating or until 
smoker has cooled sufficiently. These contain 
hot ashes and liquids that may cause serious 
injury. If you must move these components, 
ALWAYS wear protective oven mitts or heat 
resistant gloves.

Dispose of cold ashes by wrapping them in 
heavy duty aluminum foil and placing in a 
non-combustible container. Be sure there are 
no other combustible materials in or near the 
container. 

DO NOT obstruct flow of combustion air and/or 
ventilation air for smoker.

Use caution when opening the door of smoker 
while in operation. Keep hands, face, and body 
safe from hot steam or flare-ups. Protect your 
nose and mouth from smoke inhalation. Do 
not wear loose clothing while operating the 
smoker. Tie back long hair while operating the 
smoker. ALWAYS wear fully-covering shoes while 
operating the smoker.

Allow smoker and its components to cool 
completely before conducting any routine 
cleaning or maintenance. Do not move the 
appliance when in use.

Never use glassware, plastic or ceramic 
cookware on or in smoker. 
NEVER operate smoker without water in the 
water tray. NEVER allow the water to completely 
evaporate. Check the water level at least every 
2 hours. A sizzling sound may indicate a low 
water level. Follow instructions in this manual 
for adding water while operating.

When using flavoring wood, add a sufficient 
amount prior to operation to avoid having to 

Summary of Contents for SMV24S-5

Page 1: ...instructions could result in fire explosion or burn hazard which could cause property damage personal injury or death DANGER 1 Never operate this appliance unattended 2 Never operate this appliance w...

Page 2: ...Nuts 4 F SMV 55 Knob Bezel 1 M4 X 6 Screws 2 Valve Knob 1 Damper Vent 3 SMV 3 Cooking Grid 2 SMV 38 SMV Wire Handle 2 SMV 40 Wire Rail 2 SMV 20 Water Tray 1 SMV 6 Chip Tray 1 SMV 7 LP Regulator 1 HRL...

Page 3: ...Valve Asm 1 SMV 47 Ignitor Electrode 1 IGN 6 Drum 1 SMV 48 Burner Asm 1 SMV 57 Burner Bracket 1 SMV 33 M6 X 10 Bolt 4 M5 X 10 Machine Screw 3...

Page 4: ...ware provided 2 Tighten the nut enough to keep the damper vent snug but allow it to rotate with little resistance 3 Repeat steps 1 and 2 for the two remaining side damper vents ASSEMBLE LEGS 1 With th...

Page 5: ...y not be acceptable for this purpose Do not operate smoker on flammable material such as carpet or a wood deck NEVER use gasoline or highly volatile fluids as a starter Store the smoker in a dry prote...

Page 6: ...Firmly tighten by hand only 6 Place the tank to the side or rear of the smoker Make sure the hose does not touch any part of the burner drum housing CAUTION In the connection process the HVR side of t...

Page 7: ...in the smoker To add wood chips while cooking we recommend using tongs or long handled pliers to place the pieces into the wood chip tray without removing the tray It is not recommended to remove the...

Page 8: ...opened only open it briefly The smoker will quickly resume cooking temperature after the door is closed Always use a meat probe thermometer to ensure food is fully cooked before removing it from the s...

Page 9: ...closing the air vents Clean the water tray and cooking grids with hot soapy water Rinse and dry thoroughly Coat the water bowl and cooking grids lightly with cooking oil or cooking spray Frequently ch...

Page 10: ...ried crushed sage 2 Tbsp freshly cracked pepper 2 Tbsp kosher salt Instructions Pat dry ribs with soft towel Combine dry ingredients in a small container Generously cover ribs with dry rub Place in pl...

Page 11: ...ors pull flavors deep into the meat structure BRING ON THE SAUCE Select sauces that complement the flavors of your meat and wood Sauces with high sugar content should be applied at the end of the cook...

Page 12: ...normal wear of parts or damage caused by misuse abuse overheating and alteration No alterations are covered in this warranty Camp Chef is not responsible for any loss due to neglectful operation Furt...

Page 13: ...un incendie ou d une explosion DANGER 1 Ne jamais faire fonctionner cet appareil sans surveillance 2 Ne jamais faire fonctionner cet appareil moins de 10 pieds 3 05 m d une autre bouteille ge gaz 3 N...

Page 14: ...2 Valve Knob 1 registre d air 3 SMV 3 grille de cuisson 2 SMV 38 poign e en fil SMV 2 SMV 40 rail 2 SMV 20 r cipient eau 1 SMV 6 plateau pour copeaux de bois 1 SMV 7 d tendeur GPL 1 HRL Ensemble du lo...

Page 15: ...Robinet 1 SMV 47 lectrode de l allume gaz 1 IGN 6 logement 1 SMV 48 Ensemble du br leur 1 SMV 57 Support du br leur 1 SMV 33 Boulons 1 4 20 x 1 2 po 13 mm 4 Vis m taux 10 32 X 3 8 po 10 mm...

Page 16: ...6X10 et les crous M6 Important monter le panneau avant avec les pieds avant d attacher les boulons int rieurs car ces boulons doivent passer travers le panneau avant et le pied MONTER LE BR LEUR ET FI...

Page 17: ...et blessures au dos Il est recommand que deux personnes soul vent ou d placent le fumoir Ne pas d placer le fumoir lors de son utilisation Laisser le fumoir refroidir 45 C 115 F avant de le d placer...

Page 18: ...il dans un endroit clos est uniquement autoris lorsque la bouteille est d branch e et retir e de l appareil Toutes les installations doivent tre conformes aux codes locaux En l absence de tels codes l...

Page 19: ...ents et connexions avec une solution savonneuse Lorsque tous les robinets sont ferm s tendre la solution du test d tanch it un m lange de 50 de d tergent vaisselle et de 50 d eau sur tous les raccorde...

Page 20: ...u de pr parer l entreposage de l appareil Suivre les instructions de la pr sente notice pour les proc dures d entreposage correct et les mises en garde et avertissements importants qui y figurent V ri...

Page 21: ...la section de montage de la pr sente notice Remplir avec pr caution le r cipient eau d eau ou de marinade 2 5 cm 1 po du bord Un r cipient plein durera pendant environ 2 3 heures Ne pas remplir excess...

Page 22: ...les proc dures de nettoyage et d entretien ne peuvent qu tre effectu es pendant que le fumoir est teint et refroidi Ne d poser aucuns mat riaux combustibles essence et autres vapeurs et liquides infl...

Page 23: ...de l extr mit de l os apparaissent et que les c tes se d tachent facilement Poitrine de b uf aromatis e l hickory de plantation Poitrine de b uf de 1 8 2 7 kg 4 6 lb Marinade 2 5 tasses 6 dl de jus d...

Page 24: ...abus la surchauffe et les modifications Elle ne couvre non plus aucune modification Camp Chef n est pas responsable des pertes ventuelles r sultant de la n gligence Par ailleurs cette garantie ne cou...

Reviews: