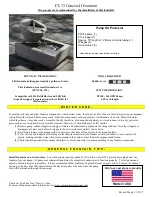


FT-333 MC-3 Fountain
Assembly Instructions
Two people are recommended for the installation of this fountain!
Assemble your fountain on a level surface capable of holding a minimum of 575 lbs with an
approximate 3.5 sq. ft. footprint (actual dimensions 37" x 17.75").
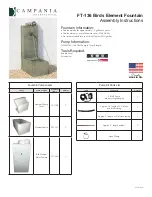
Step 1 -
Position the basin (FT-333A) where the fountain is to be installed, ensuring that it is level.
Step 2 -
Assemble the pump and tubing:
2a -
Using a hose clamp, attach the 1/2" non-kink tubing to the pump outlet.
2b -
Place the stopper around the pump cord approximately 6" from the pump.
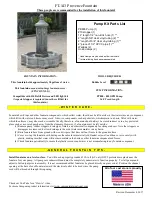
Step 3 -
Feed the pump cord through the larger hole toward the back of the basin (FT-333A) and
through the channel.
Step 4 -
FIRMLY press the stopper into the hole evenly.
4a -
Note: Using the handle of a screwdriver or hammer works best to press the stopper
in place.
Step 5 -
Fit the clear end of the tubing assembly over the CPVC pipe protruding at the bottom of
the basin.
Step 6 -
Insert the #7 Drain Stopper into the small drain hole in the bottom of the basin.
FT-333A (545 lbs)
37"L x 17.75"W x 39.25"H
Fountain Set-Up:
Assembly & Installation -
A fountain can be difficult to install without knowing and understanding the steps involved. To ensure your fountain is
installed properly, please read our instructions and tips before you begin.
Step 1 - Seek Professional Help:
Check if professional installation is recommended for your fountain.
Step 2 - Check Foundation:
Place your fountain on a level surface. It is recommended to place your fountain on concrete or a hard packed
gravel pad. If the base is level but some components seem off, rotate components or use wedges to level them.
Step 3 - Create a Drip Loop:
To prevent water from dripping down the cord and damaging the electrical socket, create a drip loop by allowing
the pump power cord to fall below the wall outlet.
Step 4 - Use a GFCI Outlet:
Use only a GFCI outlet when running a fountain.
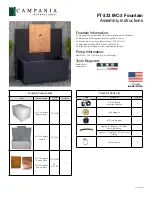
Step 7 -
Place the pump cover (FT-331B) over the pump.
Step 8 -
Fill the fountain with water.
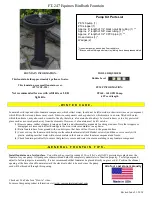
NOTE -
The copper or steel face plates will be installed and sealed in place before shipping.
FT-331B (15 lbs)
8.5"L x 6"W x 6"H
FT-333CPP Copper Plate (for FT-333/CP)
FT-333CSP Corten Steel Plate (for FT-333/CS)