background image

Airless Paint Sprayers

3

Operating Instructions and Assembly Instructions 

Safety Guidelines

ImPOrTANT SAFETy INSTrUCTIONS
SAvE ThESE INSTrUCTIONS

This manual contains information 
that is very important to know 
and understand. This information 
is provided for SAFETY and to 
PREVENT EQUIPMENT PROBLEMS. 
To help recognize this information, 
observe the following symbols. 


Danger indicates  

  an imminently 

hazardous situation which, if not 
avoided, will result in death or serious 
injury.
 

warning indicates  

  a potentially 

hazardous situation which, if not 
avoided, coulD result in death or 
serious injury.
 

caution indicates a  

  potentially 

hazardous situation which, if not 
avoided, MAY result in minor or 
moderate injury.
 

Notice indicates  

  important 

information, that if not followed, MAY 
cause damage to equipment.

Unpacking

After unpacking the unit, inspect 
carefully for any damage that may 
have occurred during transit. Make 
sure to tighten fittings, bolts, etc., 
before putting unit into service.


Do not operate  

  unit if damaged 

during shipping, handling or use. 
Damage may result in bursting and 
cause injury or property damage.

General Safety Information

CAlIFOrNIA PrOPOSITION 65


This product or its  

  power cord may 

contain chemicals, including lead, 
known to the State of california to 
cause cancer and birth defects or other 
reproductive harm. wash hands after 
handling.

GENErAl SAFETy

1.  SAVE THESE 

INSTRUCTIONS - To 
reduce the risks of fire 
or explosion, electrical 
shock, and injury to 
persons, read and understand 
all instructions included in this 
manual. Be thoroughly familiar 
with the controls and the proper 
use of the equipment.

2.  Always wear a mask 

or respirator and 
eye protection when 
painting. Be certain 
mask or respirator 
will provide necessary protection 
against inhalation of harmful 
vapors.

3.  Keep visitors away and NEVER 

allow children or pets in the work 
area.

4.   Do not smoke or eat when spraying 

paint, insecticides, or other 
flammable substances.

5.  Always work in a clean 

environment. To avoid injury and 
damage to the workpiece, do not 
aim the spray gun at any dust or 
debris.

6.  When spraying and cleaning, 

always follow the instructions and 
safety precautions provided by the 
material manufacturer (Refer to 
MSDS).

ElECTrICAl ShOCk hAzArD:

  Follow all local electrical and safety 

codes, as well as the National 
Electrical Code (NEC) and in the 
United States, the Occupational 
Safety and Health Act (OSHA).
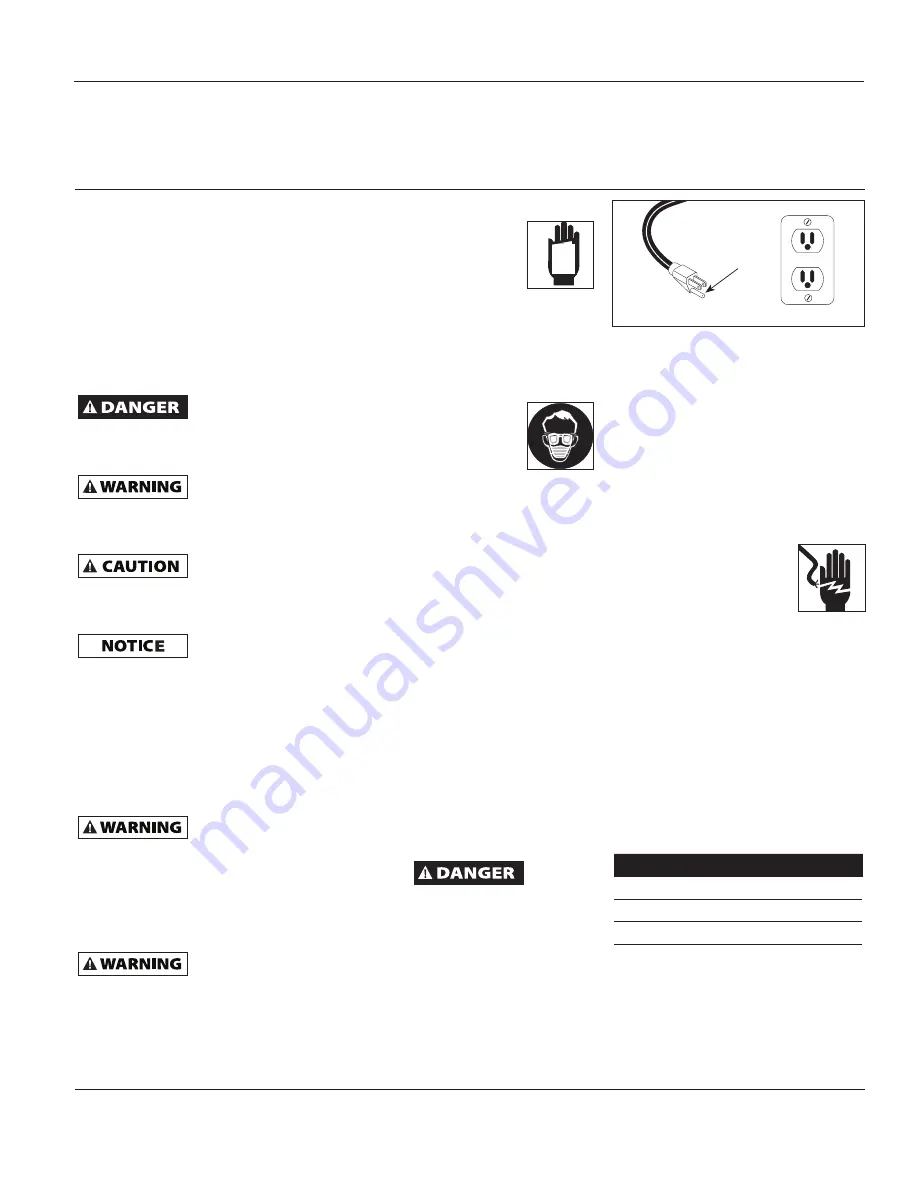
  This product requires a grounded 

120V, 15 Amp circuit (See Figure 1). 

MANUAL

NOTE:

  Applies to 120V countries 

only.

  If the power receptacles available 

will not fit this equipment’s power 
cord, then have an appropriate 
power receptacle installed by a 
certified electrician.

  Only qualified electricians or 

service personnel should perform 
maintenance on the electrical 
components of this equipment.

  Do not modify any of the 

electrical components of 
this equipment.

  Do not use a power cord 

adapter with this equipment.

  If using an extension cord, use only 

grounded three wire extension 
cords that are in good condition.

  Check with a qualified electrician 

or service person if the grounding 
instructions are not completely 
understood or you are in doubt 
as to whether the equipment is 
properly grounded.

APPrOPrIATE ExTENSION COrD 

GAUGE FOr GIvEN lENGThS

length of Cord

Gauge

25’

14

25-50’

12

50-100’

10

www.chpower.com

TEST

RESET

Figure 1 - Grounding

Grounding 

Pin

Summary of Contents for PS120B

Page 1: ...rs by observing all safety information Failure to comply with instructions could result in personal injury and or property damage Retain instructions for future reference Operating and Assembly Instru...

Page 2: ...0 Storage 14 Spray Gun Maintenance 15 Maintenance Chart 16 Specifications 17 Replacement Parts 18 Troubleshooting 20 Force Feeding Pump 22 Warranty 24 Table of Contents Application Chart Coating Can U...

Page 3: ...ntrols and the proper use of the equipment 2 Always wear a mask or respirator and eye protection when painting Be certain mask or respirator will provide necessary protection against inhalation of har...

Page 4: ...le tip follow the manufacturer s instructions for turning off the unit and relieving the pressure Do not leave the unit energized or under pressure while unattended When not in use turn off the unit a...

Page 5: ...e Use only conductive or grounded high pressure airless paint sprayer hoses specified by the manufacturer Verify that all containers and collection systems are grounded to prevent static discharge Do...

Page 6: ...new job is started Each pump is tested at the factory with a fluid that must be flushed from the system prior to painting It is also required prior to each successive use to flush the storage lubrican...

Page 7: ...in to move up through the tube Allow the fluid to circulate for one minute to ensure all air has been exhausted from the pump 5 Turn prime spray control to Spray position Watch for any fluid leaks See...

Page 8: ...ng Instructions Professional looking results can be obtained by following the spray tips below 1 Keep the gun perpendicular to the surface Always hold the gun perpendicular to the surface with the tip...

Page 9: ...2 on page 8 4 If clogging continues replace gun filter and consider straining the paint prior to use Equipment damage can occur if a needle or sharp object is used to clean the tip Tungsten carbide is...

Page 10: ...safe direction pull the gun trigger to relieve any pressure in the hose 2 Engage gun trigger lock 3 Place spray gun in bucket of water There should be enough water to cover spray tip This will preven...

Page 11: ...Lift suction assembly above fluid level in bucket While holding suction assembly above paint level allow pump to run until empty 5 Immediately place both suction assembly and bypass tube in a bucket...

Page 12: ...nt spray gun into bucket of paint and pull trigger NOTE To reduce splashing direct fluid stream along inside of bucket and above the paint level 11 As soon as cleaning fluid is flowing from spray gun...

Page 13: ...ed in safe direction pull trigger with lock released to relieve any pressure in hose 21 Engage gun trigger lock 22 Clean buckets and dispose of any waste paint and cleaning fluid in an environmentally...

Page 14: ...clockwise 5 Turn power switch ON Circulate Pump Protector through bypass tube until bucket of solution is EMPTY 6 Turn pressure to LOW completely counterclockwise 7 Wrap suction filter housing in pla...

Page 15: ...lowing these instructions 1 Place trigger in locked orientation tabs horizontal 2 With one hand holding trigger lightly against lock use a 1 4 inch nut driver to turn nut 13 page 19 in until trigger s...

Page 16: ...ng surfaces Before each use Yes Make sure they are clean Suction tube Before each use As required Yes Check for nicks and cuts Bypass tube Before each use As required Yes Check for nicks and cuts Suct...

Page 17: ...r Ratings Safety Features 0 2800 psi 120 Volts AC Spray gun trigger lock 60 Hz Spray gun trigger guard 7 0 Amps Spray gun pressure diffuser Prime Spray valve over pressure relief Model Weight lbs Capa...

Page 18: ...Mundy Memorial Dr Mt Juliet TN 37122 U S A Replacement Parts List Ref No Description Part No Qty 1 Stand AL168650SJ 1 2 Gun assembly with 0 013 insert tip AL2150 1 2a 0 013 Tip insert AL2213 1 2b 0 01...

Page 19: ...es 7 8 9 AL183600SV 1 11 Pin Gun Actuator AL024102AV 2 12 Actuator Gun AL182700AV 1 13 Nut 5 40 Hex Lock ST073804AV 1 14 Kit Gun Trigger Trigger Screws AL183100SV 1 15 Gun Filters 100 Mesh yellow AL08...

Page 20: ...t and or adjust position of Suction Assembly 10 Prime Spray Control is in the spray position 10 Turn the Prime Spray Control to the Prime position Motor runs but pump does not prime even though it was...

Page 21: ...gun Remove dried paint from around needle and back of actuator Replace actuator and 1 4 nut Set gun trigger position with trigger lock in locked orientation tabs horizontal by the following instructio...

Page 22: ...primes Force Feeding Pump Notes Weather conditions can cause unsatisfactory results when spraying some coatings High humidity prolongs set and cure times High temperatures decrease set and cure times...

Page 23: ...Notes 23 Operating Instructions and Assembly Instructions...

Page 24: ...Y DEFECT FAILURE OR MALFUNCTION OF THE CAMPBELL HAUSFELD PRODUCT Some states do not allow the exclusion or limitation of incidental or consequential damages so the above limitation or exclusion may no...

Reviews: