255-100 Novalynx
Analogue Output Evaporation Gauge
6
25.4 cm (50 x 50 x 10 inch). This platform can be made of wood pallets. You
can also use the 255-250 Evaporation Pan Support Platform (available by
special order).
Fences or other deterrents may be required to prevent animals from using the
evaporation pan as a watering trough. Locate the fence so that it does not cast
shadows or reflect sunlight onto the evaporation pan.
6.3 Field Installation Procedure
1.
Level the wooden platform.
2.
Place the evaporation pan on the level wooden platform so that the water
pipe
fitting faces the evaporation ga
u
ge.
3.
Mount the evaporation ga
u
ge so that the bottom of the ga
u
ge is at the same
elevation as the pan. This may require a platform for the evaporation ga
u
ge.
4.
Level the ga
u
ge by adjusting the three level
l
ing screws located on the
triangular base.
5.
Remove the top cover and place a bubble level across the opening.
6.
Adjust the level
l
ing screws until the bubble in the level is centred.
7.
Ensure that the float and chain inside the stilling well hang down straight
and
are centred in the ga
u
ge. The float must be free to move up and down
without
touching the sides of the ga
u
ge.
8.
Connect the evaporation ga
u
ge to the datalogger (Section
).
9.
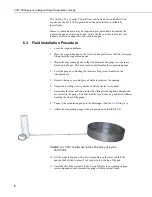
Attach the evaporation ga
u
ge to the evaporation pan (FIGURE
).
FIGURE 6-2. 255-100 Attached to the 255-200 by Using the
255-100P/F
10. Fill the evaporation pan with water. Depending on the local rainfall, the
pan should be filled to about 2 to 3 inches below the top of the pan.
11. Carefully check the joints for leaks. Using Teflon® tape or plumbers pipe
joint compound at each threaded coupling will help prevent leaks.


