Section 1. Site Preparation and Tower Assembly
1-5
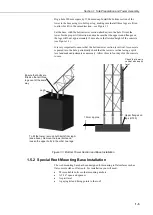
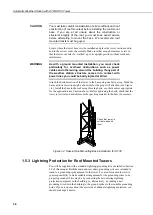
Dig a hole 900 mm square by 1200 mm deep. Install the bottom section of the
tower to the base using two bolts per leg, making sure that all three legs are fitted
to allow for tilt in the same direction – see Figure 1-3.
Set the base, with the bottom tower section attached, into the hole. Orient the
tower for the proper tilt direction, and make sure that the upper round flanges on
the legs will be at approximately 12 mm above the
finished
height of the concrete
(see Figure 1-3).
It is very important to ensure that the bottom tower section is vertical. As concrete
is poured into the hole, periodically check that the tower is vertical using a spirit
level and make adjustments as necessary. Allow three to four days for the concrete
to cure.
Figure 1-3 Bottom Tower Section and Base Installation
1.5.2 Special Roof-Mounting Base Installation
The roof-mounting base has been designed for mounting to flat surfaces such as
flat concrete slabs or flat roofs. For installation you will need:
Three suitable bolts or other mounting anchors
A 9/16" open-end spanner
A spirit level
A guying kit and fixing points to the roof
Check that tower is
vertical with a spirit
level
12 mm approx.
Upper flanges on
legs (UT30)
Ensure that bolts are
fitted so that all three
legs can tilt the same
way
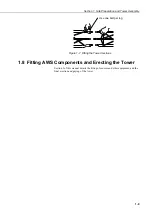
To tilt the tower, remove both bolts from leg A.
(see above). Remove the lower bolts and
loosen the upper bolts in the other two legs.
Leg A

