background image

Section 7.  Measurement Programming Examples

7-5

02:

P14

Thermocouple Temp (DIFF)

01:

5

Reps

02:

32

7.5mV 50Hz rejection Range

03:

2

IN Chan

04:

1

Type T (Copper-Constantan)

05:

1

Ref Temp Loc REF TEMP

06:

2

Loc [:TC #1 ]

07:

1

Mult

08:

0

Offset

7.4  Thermocouple Temperatures using an External

Reference Junction

When a number of thermocouple measurements is made at some distance from
the CR10X, it is often better to use a reference junction box located at the site
rather than use the 10TCRT Thermocouple Reference. Use of the external refer-
ence junction reduces the required length of expensive thermocouple wire as
ordinary copper wire can be used between the junction box (J-box) and CR10X.
In addition, if the temperature gradient between the J-box and the thermocouple
measurement junction is smaller than the gradient between the CR10X and the
measurement junction, thermocouple accuracy is improved.

In the following example, an external temperature measurement is used as the
reference for five thermocouple measurements. A Campbell Scientific 107
Temperature Probe is used to measure the reference temperature. The connection
scheme is shown in Figure 7-4.

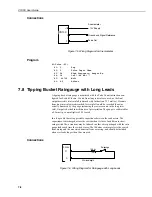
Figure 7-4  Thermocouples with External Reference Junction

If a more accurate reference temperature is needed, use a Campbell Scientific
AM25T Solid State Multiplexer (see Section 8). The AM25T uses a 1000 ohm
PRT as the reference temperature and is designed to minimise temperature
gradients across the terminal strip.

The temperature (in 

o

C) of the 107 Probe is stored in input location 1 and the

thermocouple temperatures (

o

C) in locations 2-6.

CR10X

Summary of Contents for CR10X

Page 1: ...CR10X Measurement and Control Module Instruction Manual Issued 1 3 02 rev 30 9 05 Copyright 2002 Campbell Scientific Inc Copied under licence by Campbell Scientific Ltd ...

Page 2: ......

Page 3: ...ieu of all other guarantees expressed or implied including those of suitability and fitness for a particular purpose Campbell Scientific is not liable for consequential damage Please inform us before returning equipment and obtain a Repair Refer ence Number whether the repair is under guarantee or not Please state the faults as clearly as possible and if the product is out of the guarantee period ...

Page 4: ......

Page 5: ...Sequence OV 14 OV4 4 Instruction Format OV 15 OV4 5 Loading a Program OV 15 OV5 Programming Examples OV 16 OV5 1 Sample Program 1 Direct Programming OV 17 OV5 2 Sample Program 1 Using Edlog OV 19 OV5 3 Sample Program 2 Direct Programming OV 19 OV5 4 Sample Program 2 Using Edlog OV 23 OV5 5 Editing an Existing Program OV 24 OV6 Data Retrieval Options OV 24 OV7 Specifications OV 27 Part II User Guid...

Page 6: ...Basics 3 1 3 1 Parameter Data Types 3 1 3 2 Repetitions 3 1 3 3 Entering Negative Numbers 3 2 3 4 Indexing Input Locations and Control Ports 3 2 3 5 Voltage Range and Overrange Detection 3 2 3 6 Output Processing 3 3 3 7 Use Of Flags Output and Program Control 3 3 3 7 1 The Output Flag 3 4 3 7 2 The Intermediate Processing Disable Flag 3 4 3 7 3 User Flags 3 5 3 8 Program Control Logical Construct...

Page 7: ...ith Photochopper Output 7 7 7 8 Tipping Bucket Raingauge with Long Leads 7 8 7 9 100Ω PRT in 4 Wire Half Bridge 7 9 7 10 100Ω PRT in 3 Wire Half Bridge 7 11 7 11 100Ω PRT in 4 Wire Full Bridge 7 12 7 12 Pressure Transducer 4 Wire Full Bridge 7 14 7 13 Lysimeter 6 Wire Full Bridge 7 15 7 14 227 Gypsum Soil Moisture Block 7 18 7 15 Non linear Thermistor in Half Bridge 7 19 7 16 Water Level Geokon s ...

Page 8: ...rs 13 10 13 4 Thermocouple Measurements 13 13 13 4 1 Error Analysis 13 14 13 4 2 Use of External Reference Junction or Junction Box 13 18 13 5 Bridge Resistance Measurements 13 19 13 6 Resistance Measurements Requiring AC Excitation 13 23 13 6 1 Influence of Ground Loop on Measurements 13 23 13 7 Calibration Process 13 24 13 7 1 Automatic Calibration Sequence 13 24 13 7 2 Instruction 24 Calibratio...

Page 9: ...3 Control Port Configuration and Sensor Wiring B 7 B 3 1 Configuration 1 B 7 B 3 2 Configuration 2 B 7 B 3 3 Configuration 3 B 7 B 3 4 Configuration 4 B 7 B 3 5 Configuration 5 B 8 B 4 Program Examples B 8 B 4 1 Example 1 Atmospheric Research AIR DB 1A Barometer B 8 B 4 1 1 CR10X Barometer Configuration Limitations B 8 B 4 1 2 CR10X Barometer Connection B 9 B 4 1 3 Instruction15 Parameter Consider...

Page 10: ...the Calling CR10X H 1 H 2 1 Instruction 97 H 1 H 2 2 Instruction 63 H 2 H 2 2 1 Programming Example 2 1 Calling CR10X using a COM200E Modem H 3 H 2 2 2 Programming Example Calling CR10X using RF Modems H 4 H 3 Remote Datalogger Programming H 4 H 3 1 Program Example for a Remote 21X H 5 Appendix I Modbus on the CR10 and CR10X I 1 I 1 Terminology I 1 I 2 Communications and Compatibility I 1 I 2 1 RF...

Page 11: ...nal Storage can be erased without altering the program by using the A Mode to re partition memory see Section 1 7 ALL memory can be erased and the CR10X completely reset by entering 98765 for the number of bytes left in Program Memory see Section 1 8 Password Program changes during power up When primary power is applied to the CR10X it tests the Flash memory and loads the current program into RAM ...

Page 12: ... voltage excursion exceeds 5 6V DC the 5V DC supply will start to rise upsetting all ana logue measurements Pulses whose positive voltage portion exceeds 5 6V DC with a duration longer than 100ms need external conditioning See the description of the Pulse Count instruction in Section 9 for details on the external condition ing 6 The CR10X module is sealed and contains desiccant to protect against ...

Page 13: ...e of the CR10XM is not compromised It is suggested that you take the following precautions 1 Use only screened cables for all connections and ensure that such screens are grounded 2 Ensure that the CR10XM is adequately grounded If there is any possibility of transients caused by electrostatic discharge for example being coupled into the wiring transient suppressers should be placed across all inpu...

Page 14: ......

Page 15: ...ou have difficulty obtaining a copy PCTOUR is a computer based guided tour of the CR10X This takes you through the use and operation of the PC208 DOS based Datalogger Support Software but can also be applied to the PC208W Windows based fully featured datalogger support software package Much of the material in this Overview is also covered in PCTOUR The sections of the Instruction Manual which shou...

Page 16: ...G A G H L A G A G H L A G A G E 3 E 3 A G A G G G A G H L A G H L A G H L A G E 3 A G G G G G G G 1 2 V 1 2 V 1 2 V 1 2 V S W IT H E D S W IT H E D 1 2 V 1 2 V G G G G 1 2 V 1 2 V S W IT H E D 1 2 V G 1 2 V G 1 2 V P O W E R P O W E R IN IN G 1 2 V P O W E R IN S E R IA L I O S E R IA L I O S E R IA L I O D IF F D IF F S E S E S E D IF F 4 5 6 4 5 6 7 8 9 1 0 1 0 1 1 1 1 1 2 1 2 7 8 9 1 0 1 1 1 2 ...

Page 17: ...Instructions 3 Pulse CS SERIAL I O Telecommunications Program Control Instructions 96 Storage Module Printer 97 Initiate Telecommunications 120 TGT1 GOES Satellite 121 ARGOS Satellite 122 INMARSAT C Satellite 123 TGT1 Automatic Program 12 Volt Power Inputs Switched 12 Volts EARTH GROUND Connect 14SWG or larger wire to earth ground EXCITATION OUTPUTS Input Output Instructions 4 Ex Del Se 5 AC Half ...

Page 18: ...ital input output ports On power up they are config ured as input ports commonly used for reading the status of an external signal High and low conditions are 3V high 5 5V 0 5V low 0 8V Configured as outputs the ports allow on off control of external devices A port can be set high 5V 0 1V set low 0 1V toggled or pulsed see Sections 3 8 and 12 Ports C6 to C8 can be configured as pulse counters for ...

Page 19: ...from the control port to the switched 12V control When the port is set high the 12V is turned on when the port is low the switched 12V is off If necessary an excitation channel programmed to give 2500mV can be used to control the switched 12V output Do not use the same excitation channel to provide AC excitation to a sensor because the excitation voltage will not be able to change quickly enough O...

Page 20: ...he Input Intermediate and Final Storage memory areas in the measurement and data processing sequence is shown in Figure OV 4 While the total size of these three areas remains constant memory can be reallocated between the areas to accommodate different measurement and processing needs see description of A Mode in Section 1 The sizes of the two additional memory areas system memory and program memo...

Page 21: ...he CR10X is powered off and then on the Active Program is loaded from Flash and run The Active Program is run in SRAM to maximise speed The program accesses Input Storage and Intermediate Storage and stores data into Final Storage for later retrieval by the user The Active Program can be copied into the Stored Programs area While 98 program names are available the number of programs stored is limi...

Page 22: ... when the Average instruction is executed it adds the values from the input locations being averaged to running totals in Intermediate Storage It also keeps track of the number of samples Final processing occurs only when the Output Flag is high The Output Processing Instructions check the Output Flag If the flag is high final values are calculated and output With the Average instruction for examp...

Page 23: ...n Input Storage Summaries for Final Storage are generated when a Program Control Instruction sets the Output Flag in response to time or events Results may be redirected to Input Storage for further processing Examples include sums averages max min standard deviation histograms etc Output Flag set high FINAL STORAGE Final results from OUTPUT PROCESSING INSTRUCTIONS are stored here for on line or i...

Page 24: ...e table an execution interval overrun occurs the CR10X finishes processing the table and waits for the next execution interval before initiating the table When an overrun occurs decimal points may be shown on either side of the G on the display in the LOG mode 0 Overruns and table priority are discussed in Section 1 The Output Interval The interval at which output occurs is independent of the exec...

Page 25: ...0 Starter Software includes Short Cut a simple step by step program builder and Term These two programs are sufficient to do the programming examples in this Overview To do the programming examples in Section OV5 you need to communicate with the CR10X If you are using Then read A CR10KD Section 0V3 1 The PC208W PC208 or Section 0V3 2 PC200 Software A computer or terminal Section OV3 3 with telecom...

Page 26: ...function as a terminal While the connection between the computer terminal and the CR10X may be via modem phone RF or short haul the most frequently used device for a short connection is the SC32A Optically Isolated RS232 Interface Most computer terminal devices need RS232 input logic levels of 5V for logic low and 5V for logic high Logic levels from the CR10X s serial I O port are 0V for logic low...

Page 27: ...g examples in this Overview before trying Short Cut or Edlog this will teach you the basics of CR10X operation Section OV4 5 describes options for loading the program into the CR10X OV4 1 Functional Modes Interaction between you and the CR10X is broken into different functional modes e g programming the measurements and output setting the time manually initiating a block data transfer to Storage M...

Page 28: ...ng time S or CTRL S Stops transmission of data 10 second time out any character restarts C or CTRL C Aborts transmission of data OV4 3 Programming Sequence In routine applications the CR10X measures sensor output signals processes the measurements over some time interval and stores the processed results A gener alised programming sequence is 1 Enter the execution interval In most cases the executi...

Page 29: ... value that occurred in an Input Storage location over the output interval The instruction has three parameters 1 REPetitionS the number of sequential Input Storage locations on which to find maxima 2 TIME an option of storing the time of occurrence with the maximum value and 3 LOC the first Input Storage location operated on by the Maximum Instruction The codes for the TIME parameter are listed i...

Page 30: ...ograms using the Short Cut program part of the PC200 software package or by using Edlog in the PC208W and PC208 software packages In the following examples there is a brief explanation of each step to help you follow the logic When the examples use an instruction find it on the Prompt Sheet and follow through the description of the parameters Using the Prompt Sheet while going through these exampl...

Page 31: ...its own internal temperature using a built in thermistor every five seconds and to send the results to Final Storage Press Display will Explanation of this these will show step keys ID Data 00 00 Enter a functional mode 1 01 00 Enter Program Table 1 A 01 0 0000 Advance to execution interval in seconds 5 01 5 Key in an execution interval of five seconds A 01 P00 Enter the five second execution inte...

Page 32: ...ust be set first 1 01 00 Exit 6 Mode Enter program table 1 2A 02 P00 Advance to 2nd instruction location this is where we left off 86 02 P86 This is the DO instruction a Program Control Instruction A 01 00 Enter 86 and advance to the first parameter which will specify the command to execute 10 01 10 This command sets the Output Flag Flag 0 A 03 P00 Enter 10 and advance to third program instruction...

Page 33: ...tion 5 can be used to view all the elements of an Output Array in this case the ID and temperature at the same time OV5 2 Sample Program 1 Using Edlog Edlog provides a useful and convenient way to write your datalogger programs on a PC off line Programs can be compiled and checked before downloading to the datalogger The following shows the same basic program example used in the previous section a...

Page 34: ...e CR10X would automatically advance through the channels sequentially and measure the output of all the thermocouples Parameter 2 is the voltage range to use when making the measurement The output of a type T thermocouple is approximately 40µV per degree C difference in temperature between the two junctions The 2 5mV scale will therefore provide a range of 2500 40 62 5oC i e this scale will not ov...

Page 35: ... slow 03 5 Input channel of TC 04 1 TC type copper constantan 05 1 Reference temp is stored in Location 1 06 2 Store TC temp in Location 2 07 1 Multiplier of 1 08 0 No offset 03 P92 If Time instruction 01 0 0 minutes into the interval 02 60 60 minute interval 03 10 Set Output Flag 0 The CR10X is programmed to measure the thermocouple temperature every sixty seconds The If Time instruction sets the...

Page 36: ...aximum in hours and minutes 03 2 Data source is Input Storage location 2 09 P74 Minimize instruction 01 1 One repetition 02 10 Output the time of the daily minimum in hours and minutes 03 2 Data source is Input Storage location 2 The program to make the measurements and to send the desired data to Final Storage has been entered At this point Instruction 96 is entered to enable data transfer from F...

Page 37: ...ternal Temperature P17 1 1 Loc CR10XTemp 2 Thermocouple Temp DIFF P14 1 1 Reps 2 1 2 5mV Slow Range 3 5 DIFF Channel 4 1 Type T Copper Constantan 5 1 Ref Temp Loc CR10XTemp 6 2 Loc TCTemp 7 1 0 Mult 8 0 0 Offset 3 If time is P92 1 0 Minutes Seconds into a 2 60 Interval same units as above 3 10 Set Output Flag High 4 Real Time P77 1 110 Day Hour Minute 5 Average P71 1 2 Reps 2 1 Loc CR10XTemp 6 If ...

Page 38: ...ieval Options There are several options for data storage and retrieval These options are covered in detail in Sections 2 4 and 5 Figure OV 5 summarises the various possible methods Regardless of the method used there are three general approaches to retrieving data from a datalogger 1 On line output of Final Storage data to a peripheral storage device such as a Storage Module On a regular schedule ...

Page 39: ...le OV 4 Data Retrieval Methods and Related Instructions Method Instruction Mode Section in Manual Storage Module Instruction 96 4 1 12 8 4 2 9 4 5 Telecommunications Telecommunications Commands 5 Instruction 97 12 Instruction 99 12 Printer or other Instruction 96 4 1 12 Serial Device Instruction 98 12 8 4 2 ...

Page 40: ...DULES RF232 RF BASE STATION DATALOGGER MD9 MULTIDROP INTERFACE RF95 RF MODEM SC932 INTERFACE DC112 PHONE MODEM RF100 RF200 TRANSCEIVER W ANTENNA CABLE SC32A RS 232 INTERFACE SRM 6A RAD SHORTHAUL MODEM MD9 MULTIDROP INTERFACE COAXIAL CABLE RF100 RF200 TRANSCEIVER W ANTENNA CABLE SC532 RS 232 INTERFACE SC12 CABLE SC12 CABLE RS 232 CABLE SRM 6A RAD SHORTHAUL MODEM HAYES COMPATIBLE PHONE MODEM COMPUTE...

Page 41: ...tches the full scale input voltage range MEASUREMENT TYPES Using the three switched excitation channels the CR10X can measure resistance and conductivity by means of ratiometric bridge measurements Standard bridge measurements include 6 wire and 4 wire full bridge 4 wire 3 wire and 2 wire half bridge Where appropriate dual polarity bridge measurements are used to eliminate DC errors AC resistance ...

Page 42: ......

Page 43: ... advances the editor to the execution interval If there is an existing program in the table keying in an instruction location number before the A advances directly to the instruction e g 5A will advance to the fifth instruction in the table 1 1 1 Execution Interval The execution interval is entered in units of seconds as shown in Table 1 1 Table 1 1 Valid Execution Intervals All times in seconds F...

Page 44: ...e processing time is one second With the execution interval set at 0 125 seconds and a one second lag between samples once every ten minutes eight measurements out of 4800 17 are missed this is an acceptable statistical error for most populations 1 1 2 Subroutines Table 3 is used to enter subroutines which can be called with Program Control Instructions in Tables 1 and 2 or other subroutines The g...

Page 45: ... inexperienced personnel to change parameters such as sensor calibrations in a datalogger program without having to understand or have access to the program The 4 function is normally used in applications where the datalogger is pre programmed but where site specific parameters still have to be entered at the time of installation The 4 Mode provides a table with 100 locations Each location used co...

Page 46: ...ocation 0 is assigned to the program table execution interval and locations 1 and 2 to the multiplier and offset of the measurement instruction respectively Note that a default execution interval of zero means the program will not execute until an alternative interval is entered in location 00 of the 4 Mode A default multiplier and offset of 1 and 0 means that the measurement value is in units of ...

Page 47: ...changes are made in the 1 2 3 4 A or C Modes the program must be compiled before it will run The compile function checks for programming errors and optimises program information for use during program execution If errors are detected the appro priate error codes are indicated on the display see Section 3 for a description of the error codes The compile function is executed when the 0 6 or B Modes ...

Page 48: ...tion 5 HH MM SS Display current time A 05 XX Display enter year A 05 XXXX Display enter day of year 1 365 366 A 05 HH MM Display enter hours minutes When entering a new value for hours and minutes enter the figures only no colon is required 1 3 Displaying and Altering Input Storage Flags and Ports 6 Mode The 6 Mode is used to display and or change Input Storage values and to toggle and display use...

Page 49: ...n be set to enable the table s If any program tables 1 2 3 or 4 are altered and compiled in the 0 Mode after values have been entered into input locations using the 6C function all values entered using 6C are set to zero To preserve these values always compile in the 6 Mode after altering the program tables 1 3 2 Displaying and Toggling User Flags If you press D while the CR10X is displaying a loc...

Page 50: ...s The total size of memory can be displayed in the B Mode The dynamic memory allocation can be shown using the A Mode Figure 1 1 below shows the memory allocation of the CR10X in diagrammatic form The results of Output Instructions data used for a permanent record are stored in Final Storage when the Output Flag is set see Section 3 The data in Final Storage can be monitored using the 7 Mode see S...

Page 51: ...gram is loaded from Flash and run The Active Program is run in SRAM to maximise speed The program accesses Input Storage and Intermediate Storage and stores data into Final Storage for later retrieval by the user The Active Program can be copied into the Stored Programs area While 98 program names are available the number of programs stored is limited by the available memory Stored programs can be...

Page 52: ...ower up to the values in Figure 1 1 The size of Final Storage is determined by the size of memory installed You can change the sizes of Input Intermediate and Final Storage Area 2 by keying in the desired value and entering it by pressing A One Input or Interme diate Storage location can be exchanged for two Final Storage locations The size of Final Storage Area 1 is adjusted automatically The max...

Page 53: ...eallocated After repartitioning memory the program must be recompiled Compiling always erases Intermediate Storage Compiling with 0 erases Input Storage compiling with 6 leaves Input Storage unaltered If Intermediate Storage is too small to accommodate the programs or instructions entered the E 04 error code is displayed in the 0 6 and B Modes You can remove this error code either by altering the ...

Page 54: ...ollows Final Storage Area 1 Final Storage Area 2 Minimum allocation 131 072 114 689 Default allocation 983 040 127 816 Maximum allocation 983 040 980 890 For the 2MB version you will also have to allow for and deduct the memory required for input intermediate location and active program storage from the maximum available space 1 6 Memory Testing and System Status B Mode The B Mode is used to 1 Rea...

Page 55: ... will display the maximum amount of time taken to erase flash during the memory test If a memory test is aborted early it will display the maximum time taken to erase flash during the testing that was completed This result can be a useful diagnostic tool if reviewed periodically For example a greatly extended erase time may indicate that the extended memory might be on the point of failing 1 7 C M...

Page 56: ... to the level determined by the passwords entered The telecommunications L command temporarily changes the security level After telecommunications ends security is reset 1 8 D Mode Save or Load Program The D Mode is used with a Storage Module a computer printer or internal flash memory to save or load your program information i e the information for the 1 2 3 4 A C and B Modes Several programs can...

Page 57: ...ta not encountered within 30 sec E 98 Uncorrectable errors detected E 99 Wrong type of file or Editor Error see Section 3 1 8 1 Internal Flash Program Storage Several programs can be stored in the CR10X Flash Memory and later recalled and run using the D Mode The Flash Electrically Erasable Programmable Read Only Memory is non volatile memory that can only be erased in 16K blocks The CR10X has 128...

Page 58: ...ards until the oldest program is reached Typing in a number xxA at any time while scrolling will cause a save or a retrieve operation Each program saved takes up the memory required for the program 6 bytes Flash memory can only be written to once before being erased Because it can only be erased in 16K blocks if one stored program is to be erased all must be erased To allow revising a program and ...

Page 59: ...ro gram number 8 and if the Storage Module is connected to the CR10X at power up program number 8 is downloaded compiled and run 1 8 3 Full Half Duplex The D Mode can also be used to set communications to full or half duplex The default is full duplex which works best in most situations Table 1 12 Setting Duplex Key entry Display D 13 00 9A 09 0x If x 0 the CR10X is set for full duplex If x 1 the ...

Page 60: ...rage to be cleared or not cleared Table 1 14 Setting Power up Options Key Entry Display D 13 00 10A 10 0X Where X is the power up option currently selected You may then change the option 0A Clears input locations ports flags user timer and Intermediate Storage locations 1A Clears Intermediate Storage only leaves Input Storage Flags Ports and User Timer unchanged 2A Nothing is cleared 1 9 Other Fun...

Page 61: ... The default size of Final Storage with standard memory is 62280 low resolution memory locations See section 2 4 for the CR10X with extended memory options Final Storage can be divided into two parts Final Storage Area 1 and Final Storage Area 2 Final Storage Area 1 is the default storage area and the only one used if you do not specifically allocate memory to Area 2 Two Final Storage Areas can be...

Page 62: ...e changed instructions added or deleted without changing the output array ID This avoids confusion during data reduction especially on long term projects where program changes or updates are likely Figure 2 2 Output Array ID If Instruction 80 is used to designate the active Final Storage Area and parameter 2 is 0 the output array ID is determined by the posi tion of Instruction 80 or by the positi...

Page 63: ...yboard for manually initiated data transmission 8 Mode All memory pointers are set to the DSP location when the CR10X compiles a program For this reason always retrieve uncollected data before making program changes 2 2 Data Output Format and Range Limits Data is stored internally in Campbell Scientific s Binary Final Storage Format see Appendix C Data can be sent to Final Storage in either low re...

Page 64: ...structions below You can view the contents of Final Storage by using the 7 Mode Enter 7 to enter this Mode If you have allocated memory to Final Storage Area 2 the display shows 07 00 Select which Storage Area you wish to view 00 or 01 Final Storage Area 1 02 Final Storage Area 2 If no memory has been allocated to Final Storage Area 2 this first window is skipped The next window displays the curre...

Page 65: ...pation of new data being read and the oldest data areas are then overwritten More specifically the Final Storage Flash memory area is divided into pages of 32k 32 768 storage locations Once the flash memory area has been filled once it starts to erase the next page of memory in the ring structure while data is still being written to the current page The effect of this is that you can only collect ...

Page 66: ......

Page 67: ...or calibrations or arithmetic operations While it is only possible to enter five digits magnitude 00001 to 99999 the internal format has a much greater range 1x10 19 to 9x10¹⁸ see Section 2 Instruction 30 can be used to enter a number in scientific notation to be loaded into an input location 3 2 Repetitions The repetitions parameter in many of the I O Processing and Output Processing Instructions...

Page 68: ...integer or Set Port command 2 digit integer parameter press C or after entering the value but before pressing A to enter the parameter Two minus signs will be displayed to the right of the parameter 3 5 Voltage Range and Overrange Detection The voltage range code parameter in Input Output Instructions is used to specify the full scale range of the measurement and the integration period for the mea...

Page 69: ...struction is executed not each time the location value is updated by an I O Instruction For example Suppose a temperature measurement is initiated by Table 1 which has an execution interval of 1 second The instructions to output the average temperature every 10 minutes are in Table 2 which has an execution interval of 10 seconds The temperature will be measured 600 times in the 10 minute period bu...

Page 70: ...divisor of 1440 minutes 24 hours the last output interval of the day is less than the specified time interval Output occurs at midnight and resumes synchronised to the new day Instruction 92 is followed in the program table by the Output Instructions which define the Output Array desired Each group of Output Processing Instructions creating an Output Array must be preceded by a Program Control Ins...

Page 71: ...in the 6 Mode see Section 1 By inserting the flag test Instruction 91 at appropriate points in the program you can use the 6 Mode to direct program execution manually 3 8 Program Control Logical Constructions Most of the Program Control Instructions have a command code parameter which is used to specify the action to be taken if the condition tested in the instruction is true Table 3 4 lists these...

Page 72: ... instruction 95 ends the If then else comparison and marks the beginning of the instructions which are to be executed regardless of the outcome of the comparison see Figure 3 1 Figure 3 1 If Then Else Execution Sequence If Then Else comparisons may be nested to form logical AND or OR branching Figure 3 2 illustrates an AND construction If conditions A and B are true the instructions included betwe...

Page 73: ...uction 95 which closes the case test see description of Instruction 93 in Section 12 3 8 2 Nesting A branching or loop instruction which occurs before a previous branch or loop has been closed is nested The maximum nesting level is nine deep Loop Instruction 87 and Begin Case Instruction 93 both count as one level Instructions 83 86 88 89 91 and 92 each count as one level when used with command 30...

Page 74: ...5R 7 0 85 0 R 1 3 17 1R 1 6 15 3R 8 7 475 0 R 2 3 107 4R 2 2 87 9R 3 3 541 0 R 3 4 118 9R 2 0 101 1R V1 on range 5 V2 on 1 6 27 2R 1 5 17 5R 1 6 17 3R 1 5 16 4R 0 3 62 4R 0 9 52 6R 0 3 69 1R 0 2 59 3R V1 on range 15 V2 on 1 5 26 2R 1 6 16 4R 1 6 16 2R 1 6 15 3R 0 3 61 3R 0 9 51 6R 0 3 68 1R 0 3 58 2R 10 BATT VOLT 1 4 8 3 11 TEMP 107 R 15 2 3 7 6R 14 48 4R 14 7 53 4R 12 RH 207 R 17 2 3 9 6R 13 TEMP...

Page 75: ...1 2 38 Z X Y 1 0 8 3 0 39 Z SQRT X 1 0 6 9 0 40 Z LN X 1 0 6 8 4 41 Z EXP X 1 0 6 6 6 42 Z 1 X 1 0 6 2 9 43 Z ABS X 1 0 6 1 0 44 Z FRAC X 1 0 6 1 1 45 Z INT X 1 0 6 1 4 46 Z X MOD F 1 0 10 3 5 47 Z XY 1 0 8 14 9 48 Z SIN X 1 0 6 7 3 49 SPA MAX 1 or 2 0 8 2 7 0 6 swath 50 SPA MIN 1 or 2 0 8 2 3 0 6 swath 51 SPA AVG 1 0 8 3 0 0 6 swath 52 RUNNING AVG 1 R par 4 R 1 11 2 1 3 7R 53 A X B 4 0 36 3 5 54 ...

Page 76: ...LUTION 0 0 3 0 4 0 4 79 SMPL ON MM R R 7 0 4 1 7 1 1R 80 STORE AREA1 0 0 7 0 3 0 3 81 RAINFLOW HIST see instruction 42 82 STD DEV 1 3R R 7 1 5 2 0R 2 9 2 1R 1Output values may be sent to either Final Storage area or Input Storage with Instruction 80 Table 3 8 Program Control Instruction Memory and Execution Times Instruction Memory Execution Time ms Inter Prog Loc Bytes 83 IF CASE F 0 10 0 5 85 LA...

Page 77: ...his should be done quickly since error messages are queued and it may take some time to communicate with the CR10X if many such messages have accumulated If using a CR10KD keyboard display you can stop a program by switching the CR10X off and back on While the display is showing HELLO on start up program execution is delayed for about two minutes allowing you to carry out any changes Error 8 is th...

Page 78: ...CASE without BEGIN CASE 30 Compile IF and or LOOP nested too deep 31 Run Time SUBROUTINES nested too deep 32 Compile Instruction 3 and interrupt subroutine use same port 33 Compile Cannot use Control Port 6 as counter or interrupt subroutine with Instruction 15 or SDM 40 Editor Instruction does not exist 41 Editor Incorrect execution interval 60 Compile Insufficient Input Storage 61 Compile Burst ...

Page 79: ...essed The CR10X can detect when the addressed device is present The CR10X will not send data meant for the Storage Module if the Storage Module is not present The 9 Mode allows you to communicate directly with an SM192 716 Storage Module and to perform several functions including review of data battery test and review of Storage Module status Cassette tape storage is not supported by the CR10X 4 1...

Page 80: ...Mark to Storage Module N 80 To the other Final Storage Area Inst 96 only new data since last output 81 To the other Final Storage Area Inst 96 only entire active Final Storage Area If the CR10X is using the 9 pin connector for other I O tasks when Instruction 96 is executed the output request is put in a queue and program execution continues As the 9 pin connector becomes available each output req...

Page 81: ...an be manually initiated in the 8 Mode To do this you need to have access to the CR10X through a computer or the CR10KD Keyboard Display The 8 Mode allows you to retrieve a specific block of data on demand regardless of whether or not the CR10X is programmed for on line data output If external storage peripherals such as a Storage Module are not left on line the maximum time between site visits an...

Page 82: ...DSP location a different location may be entered if desired A 04 00 Ready to dump To initiate dump enter any number then press A While dumping 04 is displayed in the ID field and the location number in the Data field The location number stops incrementing when the dump is complete Any key aborts transmission after completion of the current data block 4 3 Use of Storage Modules SM192 716 and CSM1 T...

Page 83: ...dress 1 will address that Storage Module regardless of the address that is actually assigned to the Module Address 1 would be used with Instruction 96 if several Storage Modules with dif ferent addresses were connected to the CR10X and were to be filled sequentially The Storage Modules would be configured as fill and stop When the lowest addressed Module was full data would be written to the next ...

Page 84: ...o the SM4M SM16M Storage Modules please see the Storage Module Manual for full details The 9 Mode is used to issue commands to an SM192 716 Storage Module from the CR10X using the CR10KD or a terminal computer These commands are like Functional Modes for the Storage Module and in some cases are directly analogous to the CR10X Functional Modes For example command 7 enters a mode used to review stor...

Page 85: ...1 fill stop D Memory Status 0 not full 1 full 04 XXXXX PROM signature 0 if bad PROM 6 06 0X BATTERY CHECK UNDER LOAD 0 low 1 OK 7 07 00 DISPLAY DATA Select the Storage Module Area with the following codes 0 Dump pointer to SRP 1 File 1 current file 2 File 2 previous to file 1 3 File 3 previous to file 2 4 File 4 previous to file 3 5 File 5 previous to file 4 7 Display pointer to SRP 9 Oldest data ...

Page 86: ...ware 4 5 1 Printable ASCII Format In the printable ASCII format each data point is preceded by a two digit data point ID and a or sign The ID and fixed spacing of the data points make particular points easy to find on a printed output This format requires ten bytes per data point to store on disk Figure 4 1 shows both high and low resolution data points in an Output Array with 12 data points The e...

Page 87: ...nated with a space CR and LF Lines of data containing less than eight data points are terminated similarly after the last data point 4 5 2 Comma Delineated ASCII Comma delineated ASCII strips all IDs leading zeros unnecessary decimal points and trailing zeros and plus signs Data points are separated by commas Arrays are separated by carriage return and line feed Comma delineated ASCII requires on ...

Page 88: ......

Page 89: ...sumption with an RF link On noisy links shorter blocks of data are more likely to get through without interruption In addition to more efficient data transfer binary data retrieval makes use of a signature for error detection The signature algorithm ensures a 99 998 probability that if either the data or its sequence changes the signature changes Campbell Scientific s Datalogger Support Software L...

Page 90: ...m value is 8191 Each time 8191 is exceeded the CR10X restarts the count e g if the sum of the ASCII values is 8192 the checksum is 0 10 Commands that return Campbell Scientific binary format data i e the F and K commands return a signature see Appendix C The CR10X sends ASCII data with eight bits no parity one start bit and one stop bit After the CR10X answers a call or completes a command it wait...

Page 91: ...the time string HR MM SS is assumed three colons means DAY HR MM SS If only the C is entered time is unaltered CR10X returns year Julian day hr min sec and Checksum Y xx Dxxxx Txx xx xx Cxxxx no of arrays D ASCII DUMP If necessary the MPTR is advanced to the next start of array CR10X sends the number of arrays specified no number defaults to 1 or the number of arrays between MPTR and Reference whi...

Page 92: ...ernal clock used for period measurements for example with Instructions 27 and 28 These coefficients are set during manufacture and should not normally be altered The command must be entered as 19287P entering P alone will produce an error Entering 19287P will display two coefficient numbers e g 0 8944 and 8133 If the two numbers are 99999 and you intend to use Instruction 27 or 28 the datalogger w...

Page 93: ...lse or low is zero 2U CR returns V 73 650 Cxxxx input location 2 equals 73 650 9003U CR returns V 1 0000 Cxxxx flag 3 is high 9107U CR returns V 0 0000 Cxxxx port 7 is low Nnnn value checksum U LOAD VALUE Loads the input location port or flag referred to by nnnn with value if the checksum is correct nnnn refers to input location flag or port as above The datalogger returns the same as the nnnnU co...

Page 94: ...generally used with a terminal for direct entry since 7H makes use of a destructive backspace and does not send ctrl Q between each entry The 2718H command functions the same as it does for other Campbell Scientific dataloggers deleting an entry causes the entire entry to be sent ctrl Q is sent after each user entry and its use will be familiar to those already working with a 21X or CR7 The CR10X ...

Page 95: ...Ring Raised by a peripheral to put the CR10X in the telecommunications mode 4 RXD I Receive Data Serial data transmitted by a peripheral is received on pin 4 5 ME O Modem Enable Raised when the CR10X determines that a modem raised the Ring line 6 SDE O Synchronous Device Enable Used to address syn chronous devices SDs and can be used as an enable line for printers 7 CLK HS I O Clock Handshake Used...

Page 96: ...terface The CR10X interprets a Ring inter rupt to come from a modem if the device raises the CR10X s Ring line and holds it high until the CR10X raises the ME line see Ring Interrupts below Only one modem terminal can be connected to the CR10X Print Peripherals are defined as peripherals which have an asynchronous serial communications port used to receive data transferred by the CR10X In most cas...

Page 97: ...RF95 RF Modem when configured as a synchronous device The SDC99 interface is used to synchronously address peripherals which are normally pin enabled see Figure 6 2 6 2 Ring Interrupts There are three peripherals which can raise the CR10X s Ring line modems the CR10KD Keyboard Display and the RF Modem configured for synchronous de vice communication RF SDC The RF SDC is used when the CR10X is inst...

Page 98: ... executed and the datalogger has exited tele communications The 8 Mode is used to manually initiate data transfer from Final Storage to a peripheral An abort flag is set if any key on the CR10KD or terminal is pressed during the transfer Data transfer is stopped and the memory location displayed when the flag is set During a 8 Mode data transfer the abort flag is checked as follows 1 Comma separat...

Page 99: ...communica tion The CR10X can put the SDs into one of six states State 1 The SD Reset State The CR10X forces the SDs to the reset request state by lowering the SDE and CLK HS lines The SD cannot drive the CLK HS or RXD lines in State 1 However it can raise the Ring line if service is needed The SD can never pull the Ring line low if a modem terminal is holding it high Data on TXD is ignored by the ...

Page 100: ... Module 0 1 0 0 X X X 1 State 3 The SD Active State The SD addressed by State 2 enters State 3 All other SDs enter State 4 An active SD returns to State 1 by resetting itself or by the CR10X forcing it to reset Active SDs have different acknowledgement and communication protocols Once addressed the SD is free to use the CLK HS TXD and RXD lines according to its protocol with the CR10X The CR10X ma...

Page 101: ...ceives a character from the terminal computer pin 2 5V is applied to the datalogger Ring line pin 3 for one second or until the Modem Enable line ME goes high The CR10X waits approximately 40 seconds to receive carriage returns which it uses to establish baud rate After the baud rate has been set the CR10X transmits a carriage return line feed and and enters the Telecommunications Command State se...

Page 102: ...l can transmit data 5 CTS I Clear to Send The receiving device raises this line to let the terminal know that the receiving device is ready to accept data 20 DTR O Data Terminal Ready The terminal raises this line to tell the modem to connect itself to the telephone line 6 DSR I Data Set Ready The modem raises this line to tell the terminal that the modem is connected to the phone line 8 DCD I Dat...

Page 103: ...a stop bit is sent after the eighth bit The start bit is always a space and the stop bit is always a mark Between characters the signal is in the marking condition Figure 6 5 shows how the ASCII character 1 is transmitted When transmitted by the CR10X using the SC32A RS232 interface spacing and marking voltages are positive and negative as shown Signal voltages at the CR10X I O port are 5V in the ...

Page 104: ...ere is 5 volts between the CR10X 5V and G terminals Call Campbell Scientific if the voltage is less than 4 8 volts Some serial ports e g the Super Serial Card for Apple computers can be configured as DTE or DCE with a jumper block Pin functions must match with Table 6 3 If you are using a computer to communicate with the datalogger communication software must be used to enable the serial port and ...

Page 105: ...nd relative humidity sensor It uses a 1000Ω PRT DIN 43760B to measure temperature and a Vaisala capacitive humidity sensor to measure relative humidity It has a high level linear output of 0 to 1V for the temperature range of 40 C to 60 C and relative humidity of 0 to 100 Its output is measured with Instruction 1 Volts SE The multiplier for temperature is found with the following relationship 60 C...

Page 106: ...Figure 7 1 Wiring Diagram for 50Y Program Turn 50Y on 01 Do P86 1 41 Set Port 1 High Allow the 50Y to warm up and stabilize on the Temperature and Relative Humidity 02 Excitation with Delay P22 1 3 Ex Channel 2 0 Delay W Ex units 0 01 sec 3 10 Delay After Ex units 0 01 sec 4 0 mV Excitation Measure Temperature 03 Volts SE P1 1 1 Reps 2 35 2500mV 50 Hz Rejection Range 3 5 SE Channel 4 1 Loc Temp_C ...

Page 107: ...xternal 12V Battery Signal 12V 1L 1H 3m 1mm Diameter 1m 1mm Diameter Power Power Figure 7 2 Typical Connection for Active Sensor with External Battery The wire used to supply power from the external battery is 1mm diameter with an average resistance of 2 2 ohms 100m The power leads to the CR10X and pH meter are 1m and 3m respectively Typical current drain for the pH meter is 300mA When making meas...

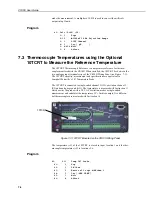
Page 108: ...e 10TCRT circuitry measurement and specifications are equivalent to Campbell Scientific s 107 Temperature Probe The 10TCRT is connected to single ended channel 1 1H excitation channel 3 E3 and analogue ground AG The temperature is measured with Instruction 11 which excites the probe with a 2 0V AC excitation makes a single ended measurement and calculates the temperature C In this example five dif...

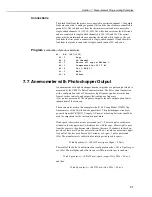
Page 109: ...he temperature gradient between the J box and the thermocouple measurement junction is smaller than the gradient between the CR10X and the measurement junction thermocouple accuracy is improved In the following example an external temperature measurement is used as the reference for five thermocouple measurements A Campbell Scientific 107 Temperature Probe is used to measure the reference temperat...

Page 110: ...e probes go to excitation channel 1 the white leads go to analogue ground AG the clear leads go to ground G and the red leads go to single ended channels 1 2 and 3 channel 1H channel 1L and channel 2H respectively Program 01 Temp 107 P11 01 3 Reps 02 1 SE Chan 03 1 Excite all reps w EXchan 1 04 1 Loc 107 T 1 05 1 Mult 06 0 Offset 7 6 207 Temperature and RH Probe Instruction 12 excites and measures...

Page 111: ...ration code of 20 measures high frequency pulses discards data from excessive intervals and outputs the reading as a frequency Hz pulses per second The frequency output is the only output option that is independent of the scan rate The anemometer used in this example is the R M Young Model 12102D Cup Anemometer with a 10 window chopper wheel The photochopper circuitry is powered from the CR10X 12V...

Page 112: ...ainfall would be recorded than was actually measured by the gauge assuming there were counts in the long inter vals Output is desired in millimetres of precipitation The gauge is calibrated for a 0 2mm tip so a multiplier of 0 2 is used In a long cable there is appreciable capacitance between the conductors The capacitance is discharged across the switch when it closes In addition to short ening s...

Page 113: ... of the voltage drop across the PRT can be made on the same range as the differential measurement of the voltage drop across Rf Connections Figure 7 7 Wiring Diagram for PRT in 4 Wire Half Bridge If the voltage drop across the PRT V2 is kept under 50mV self heating of the PRT should be less than 0 001oC in still air The best resolution is obtained when the excitation voltage is large enough to cau...

Page 114: ...00Ω resistor must be thermally stable Its precision is not important if the sensor is to be calibrated because the exact resistance can be incorporated along with that of the PRT into the calibrated multiplier The 10ppm oC temp erature coefficient of the fixed resistor will limit the error due to its change in resistance with temperature to less than 0 15oC over the specified temperature range Bec...

Page 115: ...is the same as the resistance of wire B see Figure 7 8 The maximum difference expected in wire resistance is 2 but is more likely to be of the order of 1 The resistance of Rs calculated with Instruction 7 is actually Rs plus the difference in resistances of wires A and B The average resistance of 0 6mm diameter wire is 5 53Ω per 100m which would give each 150m lead wire a nominal resistance of 8 3...

Page 116: ...1 1 Rep 02 1 Rs Ro Loc Rs Ro 03 2 Loc TEMP C 04 1 Mult 05 0 Offset 7 11 100Ω Ω Ω Ω PRT in 4 Wire Full Bridge This example describes obtaining the temperature from a 100Ω PRT in a 4 wire full bridge Instruction 6 The temperature being measured is in a constant temperature bath and is to be used as the input for a control algorithm The PRT in this case does not adhere to the DIN standard alpha 0 003...

Page 117: ... 51oC The output voltage is Vs Vx Rs Rs R1 R3 R2 R3 Vx Rs Rs 5000 0 023438 The temperature range to be covered is 50 10oC At 40oC Rs is approximately 115 8Ω or Vs 8 0224x10 4 Vx Even with an excitation voltage Vx equal to 2500mV Vs can be measured on the 2 5mV scale 40oC 115 8Ω 2 006mV 60oC 123 6Ω 1 714mV There is a change of approximately 2mV from the output at 40oC to the output at 51oC or 181µV...

Page 118: ...sitates the use of the 25mV input range The sensor is calibrated by connecting it to the CR10X and using Instruction 6 an excitation voltage of 2500 mV a multiplier of 1 and an offset of 0 noting the readings 6 Mode with 10cm of water above the sensor and with 334 6cm of water above the sensor The output of Instruction 6 is 1000 Vs Vx or millivolts per volt excitation At 10cm the reading is 0 1996...

Page 119: ...l bridge Instruction 9 avoids this problem by measuring the excitation voltage at the load cell This example shows the errors you would encounter if the actual excitation voltage was not measured and shows the use of a 6 wire full bridge to measure the output of a load cell on a weighing lysimeter a container buried in the ground filled with plants and soil used for measuring evapotranspiration Th...

Page 120: ...agnitude of the error increases with the force applied to the load cell If the resistance of the wire was constant the voltage drop could be corrected with a fixed multiplier However the resistance of copper changes by 0 4 per degree C change in temperature Assume that the cable between the load cell and the CR10X lies on the soil surface and undergoes a 25oC diurnal temperature fluctuation If the...

Page 121: ...red with the 6 Mode is 109 The offset needed to give the desired initial value of 375mm is therefore 266 However it is decided to add this offset in a separate instruction so that the result of Instruction 9 can be used as a ready reminder of the strain on the load cell range 140mm When the strain on the load cell nears its rated limits the counterbalance is readjusted and the offset recalculated ...

Page 122: ...e output The 0 1 to 2 bar polynomial requires a multiplier of 1 in the Bridge Transform instruction result in kΩ and the 0 1 to 10 bar polynomial requires a multiplier of 0 1 result in 10000s of ohms The multiplier is a scaling factor to maintain the maximum number of significant digits in the coefficients of the polynomial In this example we wish to make measurements on six gypsum blocks and outp...

Page 123: ...ensors of the vibrating wire type have a good reputation for long term stability These sensors use a change in the frequency of a vibrating wire to sense strain Two measurements are usually made the first is the measurement of the frequency of the vibrating wire The second is an optional measurement of the sensor temperature to allow temperature compensation in the frequency calculation Please ref...

Page 124: ...ove is greater than the specified maximum of 150kHz gain code 4 Variability in the amplifier components requires the 150kHz specification to be specified However by carefully selecting components frequencies up to 200kHz can be measured accurately If you need a higher frequency for your particular application please contact Campbell Scientific Table 7 2 Input Frequency Gain Codes RANGE PEAK TO PEA...

Page 125: ...ion 27 period average The pressure P and temperature T in microseconds are converted to psi and C according to the following relationships provided by Paroscientific P C 1 T02 Tau2 1 D 1 T02 Tau2 T Y1U Y2U2 Y3U3 where C C1 C2U C3U2 D D1 D2U T0 T1 T2U T3U2 T4U3 T5U4 U U1 U0 Tau measured period in microseconds of pressure U1 measured period in microseconds of temperature Values for the calibration c...

Page 126: ...e maximum error that occurs due to using 5 digit coefficients is 0 001 psi throughout a 15 psi range at any temperature between 30 and 60 C The maximum error in temperature calculations is 0 2 C over the same temperature range Connections Figure 7 14 shows the components required for connecting the transducer to the CR10X The user supplied components are commonly available at commercial electronic...

Page 127: ... are not included in this example Program Table 1 Program 01 60 Execution Interval seconds Load the coefficients if the program has just compiled 01 IF X F P89 1 17 X Loc Comp_Chk 2 1 3 0 F 4 1 Call Subroutine 1 Measure the temperature period in microseconds 02 Period Average SE P27 1 1 Reps 2 4 Input Gain 1 3 1 SE Channel 4 9000 No of Cycles 5 6 Timeout units 0 01 seconds 6 1 Loc Temp_us 7 1 Mult...

Page 128: ...temperature range of 40 C to 70 C The dew point sensor output can be measured by the CR10X using the CURS100 Terminal Input Module TIM The CURS100 uses a 100Ω 0 01 resistor to convert the 4 to 20mA range to 400 to 2000mV The millivolt range was found using the relationship V IR where V is voltage I is current and R is resistance e g the voltage at 40 C is given by V 4mA 100Ω 400mV The output of th...

Page 129: ...F Channel 4 1 Loc Dew_Pnt_C 5 06875 Mult 6 67 5 Offset Input Locations 1 Dew_Pnt_C 7 19 SDM Peripherals The SDM peripherals are measurement and control modules which are controlled by the CR10X through control ports 1 2 and 3 The instructions for these peripherals are 101 SDM INT8 8 channel interval timer 102 SDM SW8 8 channel switch closure multiplexer 103 SDM A04 4 channel analogue output multip...

Page 130: ......

Page 131: ...ge covers a fixed number of samples and is continuously updated as new samples are taken Because the output interval is shorter than the averaging period Instruction 71 cannot be used the algorithm for computing this average must be programmed by the user The following example demonstrates a program for computing a running average In this example each time a new measurement is made in this case a ...

Page 132: ...n the above example all samples for the average are stored in input locations This is necessary when an average must be output with each new sample In most cases averages are desired less frequently than sampling For example it may be necessary to sample some parameter every 5 seconds and output every hour an average of the previous three hours readings If all samples were saved this would require...

Page 133: ... Area 02 3 Array ID or location 04 P71 Average 01 1 Rep 02 5 Loc XX mg M3 05 P51 Spatial Average 01 3 Swath 02 1 First Loc AVG i 2 03 4 Avg Loc 3 HR AVG 06 P80 Set Active Storage Area 01 1 Final Storage Area 1 02 25 Array ID or location 07 P77 Real Time 01 110 Day Hour Minute 08 P70 Sample 01 1 Reps 02 4 Loc 3 HR AVG 09 P91 If Flag Port 01 10 Do if flag 0 output is high 02 30 Then Do 10 P54 Block ...

Page 134: ...ation Labels 1 Rain mm 2 15min tot 1 Table 1 Programs 01 60 Sec Execution Interval 01 P3 Pulse 01 1 Rep 02 1 Pulse Input Chan 03 2 Switch Closure 04 1 Loc Rain mm 05 2 Mult 06 0 Offset 02 P92 If time is 01 0 minutes into a 02 15 minute interval 03 10 Set high Flag 0 output 03 P80 Set Active Storage Area 01 3 Input Storage Area 02 2 Array ID or location 04 P72 Totalize 01 1 Rep 02 1 Loc Rain mm 05 ...

Page 135: ...uence of the program is 1 Temperature of the 107 probe located at the AM416 is measured to provide a TC reference 2 CR10X sets the port high which resets the AM416 3 A loop is entered within each pass The port clocking the AM416 is pulsed A delay to ensure that the relay is closed The connected TCs and moisture blocks are measured 4 CR10X sets the port controlling AM416 reset low 5 Soil moisture m...

Page 136: ...TC_ 10 22 Soil_ 5 33 Soil_ 16 1 Table 1 Programs 01 600 Sec Execution Interval 01 P11 Temp 107 Probe 01 1 Rep 02 4 IN Chan 03 1 Excite all reps w EXchan 1 04 1 Loc REF TEMP 05 1 Mult 06 0 Offset 02 P86 Do 01 41 Set high Port 1 03 P87 Beginning of Loop 01 0 Delay 02 16 Loop Count 04 P86 Do 01 72 Pulse Port 2 05 P22 Excitation with Delay 01 1 Ex Channel 02 0 Delay W Ex units 0 01sec 03 1 Delay after...

Page 137: ... 18 takes the time seconds into minute minutes into day or hours into year performs a modulo divide by a user specified value and loads it into an input location When the modulo divisor divides evenly into the interval seconds into the min ute etc the result is zero Thus the use of Instruction 18 results in a counter in an input location which periodically goes to zero In this example seconds into...

Page 138: ...nstruction 89 is used to determine when the result of Instruction 18 is less than the execution interval 0 5s in this case This is done in preference to comparing the result of Instruction 18 to zero because in a more complex program Instruc tion 18 could be executed more than 0 125s after table execution began In such a case the result of the modulo divide would not be zero but would still be les...

Page 139: ...ngauge The raingauge is connected as shown in Figure 8 2 below Figure 8 2 Connections for Raingauge Input location Assignments 10 Rain No 1 from Pulse count 11 Rain No 2 from Pulse count 12 Rain No 3 from Pulse count on Control Port 8 Program 1 Table 1 Programs 01 10 Sec Execution Interval 01 P3 Pulse 01 2 Reps 02 1 Pulse Input Chan 03 2 Switch closure 04 10 Loc Rain 1 05 254 Mult 06 0 Offset 02 P...

Page 140: ...voltage values to be output must be stored in mV in adjacent Input Storage locations the first of which is referenced in Instruction 103 The following program measures the output of the sensors every five seconds The readings are moved to another four locations and scaled to a 0 to 1000mV output for the SDM AO4 Wind direction is changed from a 0 360 degree input to an output representing 0 540 deg...

Page 141: ...3 IN Chan 04 4 Loc SR 05 14493 Mult 06 0 Offset 05 P92 If time is 01 0 minutes into a 02 60 minute interval 03 10 Set high Flag 0 output 06 P54 Block Move 01 4 No of Values 02 1 First Source Loc WS 03 1 Source Step 04 5 First Dest Loc WS output 05 1 Destination Step 07 P86 Do 01 1 Call Subroutine 1 08 P53 Scaling Array A loc B 01 5 Start Loc WS output 02 10 A1 Scale WS 0 100 M S 0 1000mV 03 0 B1 0...

Page 142: ...When faced with the necessity for strip chart output see previous example the following algorithm can be used to change a 0 360 degree input to 0 540 If you have a 0 540 potentiometer it can be used with the CR10X since Instruction 69 Wind Vector will work with this output To change 0 360 degrees to 0 540 degrees 360 degrees must sometimes be added to the reading when it is in the range of 0 to 18...

Page 143: ...8 Use of Two Final Storage Areas Saving Data Prior to Event One of the uses of two Final Storage Areas is to save a fixed amount of data be fore and after some event In this example the output of a load cell is measured every second It is assumed that at some random interval the load will exceed 11 4kg for less than 10 seconds Exceeding 11 4kg is the event to be captured The data from the 10 secon...

Page 144: ...tput code 81 which transfers the entire contents of Final Storage Area 2 to Final Storage Area 1 in chronological order oldest to newest The down counter is set to 10 instead of 11 because it is decremented after checking to see if it is 0 Input Location Labels 1 FORCE KG 2 DOWN CNT 1 Table 1 Programs 01 1 Sec Execution Interval 01 P6 Full Bridge 01 1 Rep 02 32 7 5mV 50Hz rejection Range 03 1 IN C...

Page 145: ...6 Do 01 21 Set low Flag 1 16 P95 End 17 P94 Else 18 P34 Z X F 01 2 X Loc DOWN CNT 02 1 F 03 2 Z Loc DOWN CNT 19 P95 End 20 P End Table 1 A Mode 10 Memory Allocation 01 28 Input Locations 02 64 Intermediate Locations 03 84 Final Storage Area 2 8 9 Logarithmic Sampling Using Loops A ground water pump test requires that water level be measured and recorded according to the following schedule Time int...

Page 146: ...calibration of 49 93mV 10V of excita tion or 4 993mV V at 50psi Your calibration will be different An excitation voltage of 1500mV yields a maximum signal of 7 489mV at 50psi fully utilising the 7 5mV input range to provide the best resolution The multiplier m is calculated to provide depth of water in metres m 50psi 4 993 mV V 0 703m psi m 7 04m mV V The offset is calculated to provide a final va...

Page 147: ... P86 Do 01 1 Call Subroutine 1 13 P95 End Loop 5 Output every 5 minutes for 700 minutes 14 P87 Beginning of Loop 01 30 Delay 02 140 Loop Count 15 P86 Do 01 1 Call Subroutine 1 16 P 95 End Loop 6 Output every 10 minutes until stopped by user 17 P87 Beginning of Loop 01 60 Delay 02 0 Loop Count 18 P86 Do 01 1 Call Subroutine 1 19 P91 If Flag Port 01 21 Do if flag 1 is low 02 31 Exit Loop if true 20 ...

Page 148: ...tion Table 8 1 groups the sensors according to measurement type and gives the CR10X multiplier and offset Table 8 1 Example Sensor Description and CR10X Multiplier and Offset Description Symbol Sensor Calibration Meas Type Multiplier Offset Horiz Wind U propeller 18m s V S E V 018m s V 0 0 Horiz Wind V propeller 18m s V S E V 018m s V 0 0 Vert Wind W propeller 22m s V S E V 022m s V 0 0 Air Temp T...

Page 149: ... V2 47 M V2 38 V V2 43 CV W2 Ta2 48 M Ta2 39 V Ta2 44 CV W2 e2 49 M e2 40 V e2 45 CV U2 V2 50 CV U2 Ta2 51 CV U2 e2 52 CV V2 Ta2 53 CV V2 e2 54 Table 8 3 lists the input channel configuration and Input Storage allocation for the measured values After reading the new input samples the Level 2 measurements are relocated using Block Move Instruction 54 then Ta1 is relocated through a separate move an...

Page 150: ...ble 1 Programs 01 1 Sec Execution Interval 01 P20 Set Port s 01 9999 C8 C5 nc nc nc nc 02 9933 C4 C1 nc nc 1ms 1ms 02 P1 Volt SE 01 6 Reps 02 5 2500 mV slow Range 03 1 IN Chan 04 1 Loc W1 05 018 Mult 06 0 Offset 03 P86 Do 01 42 Set high Port 2 04 P6 Full Bridge 01 1 Rep 02 32 7 5mV 50Hz rejection Range 03 4 IN Chan 04 1 Excite all reps w EXchan 1 05 350 mV Excitation 06 16 Loc Ref_Temp 07 001 Mult...

Page 151: ...01 52 Set low Port 2 13 P37 Z X F 01 1 X Loc W1 02 1 2222F 03 1 Z Loc W1 14 P37 Z X F 01 4 X Loc W2 02 1 2222F 03 4 Z Loc W2 15 P54 Block Move 01 5 No of Values 02 4 First Source Loc W2 03 1 Source Step 04 11 First Destination Loc W2_i 05 1 Destination Step 16 P31 Z X 01 9 X Loc Ta1 02 4 Z Loc W2 17 P57 Wet Dry Bulb Temp to VP 01 17 Pressure Loc Pressure 02 9 Dry Bulb Temp Loc Ta1 03 10 Wet Bulb T...

Page 152: ...01 119 02 DAY 03 HRMIN 04 M W1 05 M U1 06 M V1 07 M Ta1 08 M e1 09 V W1 10 V U1 11 V V1 12 V Ta1 13 V e1 14 CV W1 U1 15 CV W1 V1 16 CV W1 Ta1 17 CV W1 e1 18 CR W1 U1 19 CR W1 V1 20 M W2 21 M U2 22 M V2 23 M Ta2 24 M e2 25 V W2 26 V U2 27 V V2 28 V Ta2 29 V e2 30 CV W2 U2 31 CV W2 V2 32 CV W2 Ta2 33 CV W2 e2 34 CV U2 V2 35 CV U2 Ta2 36 CV U2 e2 37 CV V2 Ta2 38 CV V2 e2 8 11 Fast Fourier Transform E...

Page 153: ...ees cos 270 cos 0 90 sin 0 The 0 25Hz sig nal began at 270 degrees and ended at 126 degrees The phases of the 1 25 and 0 25Hz signals are 270 and 198 respectively see Table 8 6 TIME IN SECONDS AMPLITUDE SAMPLED AT 10 Hz 0 10 20 30 40 50 60 70 80 90 100 3 2 1 0 1 2 3 Figure 8 3 Simulated 1 25 and 0 25Hz Signals FREQUENCY IN Hz BINS 0 TO 150 AMPLITUDE Thousands 0 0 19532 0 39064 0 58596 0 78128 0 97...

Page 154: ...0 0 37302 129 1 259814 0 0 23053 130 1 26958 0 00009 0 0435 131 1 279346 0 00009 0 0006 511 4 990426 0 00009 0 Table 8 6 FFT Magnitude and Phase Results for 0 25 and 1 25Hz Signals BIN Hz FFT Mi FFT Pi 0 0 0 02303 0 1 0 009766 0 01036 0 2 0 019532 0 00206 180 3 0 029298 0 99999 22 0 214852 0 00086 185 58 23 0 224618 0 01154 17 952 24 0 234384 0 20321 197 78 25 0 24415 0 62935 17 776 26 0 253916 0 ...

Page 155: ...ed on top of each other One signal has a frequency of 1 25Hz and a zero to peak amplitude of 1 while the other signal has a frequency of 0 25Hz and a zero to peak amplitude of 2 The data simulates a sampling rate of 10Hz or a 0 1 sec scan rate This program generates power spectra FFT results without bin averaging Flag Usage Flag 1 is automatically set when the instructions have been executed once ...

Page 156: ...4 Z X F 01 1026 X Loc 02 9 F 03 1026 Z Loc 11 P 95 End The FFT is now computed and the power spectra results sent to Final Storage 12 P 60 FFT 01 10 Log base 2 of Samples 02 1 Power Spectra Taper 03 0 Log base 2 of Bins 04 1 First Sample Loc 05 1 Multiplier 13 P 87 Beginning of Loop 01 0 Delay 02 512 Loop Count 14 P 86 Do 01 10 Set high Flag 0 output 15 P 78 Resolution 01 1 High Resolution 16 P 70...

Page 157: ... than the 6999 upper limit of low resolution Final Storage data The results of the FFT are shown in Table 8 8 and illustrated in Figure 8 6 In the example program a multiplier of 0 1 is used in the FFT instruction By reducing the FFT results by a factor of 10 the low resolution output format can be used thus maximising the Final Storage capacity A low resolution data point requires two bytes of Fi...

Page 158: ... 0 0507 0 2 0 0039 0 27 0 05265 0 3 0 00585 0 28 0 0546 0 4 0 0078 0 29 0 05655 0 5 0 00975 0 30 0 0585 0 6 0 0117 0 31 0 06045 0 7 0 01365 0 32 0 0624 0 8 0 0156 0 33 0 06435 0 9 0 01755 0 34 0 0663 0 10 0 0195 0 35 0 06825 0 11 0 02145 0 36 0 0702 0 12 0 0234 0 37 0 07215 0 13 0 02535 0 38 0 0741 0 14 0 0273 0 39 0 07605 0 15 0 02925 0 40 0 078 0 16 0 0312 0 41 0 07995 0 17 0 03315 0 42 0 0819 0...

Page 159: ... SPECTRA RESULTS 1 Table 1 Programs 01 2 Sec Execution Interval If flag 1 is set the simulated ocean wave data is calculated and sent to Final Storage 01 P 91 If Flag 01 11 1 is set 02 30 Then Do 02 P 86 Do 01 1 Call Subroutine 1 03 P 87 Beginning of Loop 01 0 Delay 02 2048 Loop Count 04 P 86 Do 01 10 Set high Flag 0 output 05 P 77 Real Time 01 1 Seconds 06 P 70 Sample 01 1 Rep 02 284 Loc 07 P 95 ...

Page 160: ...End 17 P 86 Do 01 22 Set low Flag 2 18 P End Table 1 3 Table 3 Subroutines Subroutine 1 creates the simulated ocean wave data The third to seventh instructions are used to slightly randomise the wave signal 01 P 85 Beginning of Subroutine 01 1 Subroutine Number 02 P 87 Beginning of Loop 01 0 Delay 02 2048 Loop Count 03 P 55 Polynomial 01 1 Rep 02 1 X Loc 03 1 F X Loc 04 0 1 C0 05 99 C1 06 0 C2 07 ...

Page 161: ...art Loc 02 1 A1 03 144 B1 04 1 A2 05 100 77 B2 06 1 A3 07 90 B3 08 1 A4 09 72 B4 09 P 87 Beginning of Loop 01 0 Delay 02 4 Loop Count 10 P 33 Z X Y 01 3 X Loc 02 4 Y Loc 03 4 Z Loc 11 P 46 Z X MOD F 01 4 X Loc 02 360 F 03 4 Z Loc 12 P 48 Z SIN X 01 4 X Loc 02 8 Z Loc 13 P 95 End 14 P 53 Scaling Array A loc B 01 8 Start Loc 02 4 A1 03 0 B1 04 6 A2 05 0 B2 06 9 A3 07 0 B3 08 11 A4 09 0 B4 15 P 30 Z ...

Page 162: ...ery that is trickle charged by a solar panel Two 12V DC aspirated thermocouples ASPTC are used to measure air temperature To minimise the current drain of the ASPTCs the fans are turned on 20 seconds before the CR10X measures the thermocouples Immediately after the thermocouple measurements are made the fans are turned off The Switched 12V terminal on the CR10X wiring panel is used to power the AS...

Page 163: ...erval 03 41 Set high Port 1 02 P92 If time is 01 0 minutes seconds into a 02 1 minute or second interval 03 30 Then Do 03 P91 If Flag Port 01 41 Do if port 1 is high 02 30 Then Do 04 P11 Temp 107 Probe 01 1 Rep 02 1 IN Chan 03 3 Excite all reps w EXchan 3 04 1 Loc Ref_Temp 05 1 Mult 06 0 Offset 05 P14 Thermocouple Temp DIFF 10TCRT ASPTC LOWER PURPLE RED ASPTC UPPER PURPLE RED BLACK RED RED BLACK R...

Page 164: ... Mult 08 0 Offset 06 P86 Do 01 51 Set low Port 1 07 P35 Z X Y 01 3 X Loc Upper_TC 02 2 Y Loc Lower_TC 03 4 Z Loc del_TC 08 P92 If time is 01 0 minutes seconds into a 02 60 minute or second interval 03 10 Set high Flag 0 output 09 P77 Real Time 01 0110 Day Hour Minute 10 P71 Average 01 4 Reps 02 1 Loc Ref_Temp 11 P95 End 12 P95 End 13 P End Table 1 ...

Page 165: ...twice value shown 2 272µs on 2500mV range 3 25µs on 2500mV range When a voltage input exceeds the range programmed the value which is stored is set to the maximum negative number and displayed as 99999 in high resolution or 6999 in low resolution Instruction 1 Single Ended Volts This instruction is used to measure the voltage at a single ended input with respect to ground The output is in millivol...

Page 166: ... see Section 8 CR23X Pi 20k Figure 9 1 Conditioning for Long Duration Voltage Pulses If control ports 6 7 or 8 are used for pulse measurement using Instruction 3 no counts will be measured during the execution of the Burst Measurement Instruction P23 Use separate Pulse Count Instructions when measuring both pulse channels and control ports All Pulse Count instructions must be kept in the same prog...

Page 167: ...steresis 15mV Maximum Input Voltage 20V peak to peak Input Voltage and Frequency Range 64 Hz reset required above 2 kHz 20 mV 1 0 Hz to 1 kHz 200 mV 0 5 Hz to 10 kHz 1000 mV 0 3 Hz to 16 kHz Switch Closure Pulse Channels A switch closure is connected between P1 P4 and analog ground When the switch is open the CR10X pulls the pulse channel to 5V through a 100 kOhm impedance When the switch is close...

Page 168: ...Count instruction is executed At the beginning of the execution of the Table containing the Pulse Count instruction or at the beginning of each pass through a delayed loop within the table the total in the 16 bit accumulator is transferred to a temporary RAM buffer The 16 bit accumulator is then zeroed When the table execution reaches the Pulse Count instruction the value in the RAM buffer is mult...

Page 169: ...n Codes Code Configuration 0 High frequency pulse Index to change from 8Hz to 64Hz reset 1 Low level AC Index to change from 8Hz to 64Hz reset 2 Switch closure 3 High frequency pulse 16 bit counter 4 Low level AC 16 bit counter 1X Long interval data discarded 2X Long interval data discarded frequency Hz output where X is the configuration code PARAM DATA NUMBER TYPE DESCRIPTION 01 2 Repetitions 02...

Page 170: ...f the bridge output reverse the excitation voltage then repeat the measurement The difference between the two measurements is used to calculate the resulting value which is the ratio of the measurement to the excitation voltage A 1 before the excitation channel number i e 1x where x is the initial excitation channel number causes the channel to be incremented with each repetition The excitation is...

Page 171: ...gle Differential Measurement This instruction is used to determine the ratio of the sensor resistance to a known resistance using a separate voltage sensing wire from the sensor to compensate for lead wire resistance The measurement sequence is to apply an excitation voltage make two voltage measurements on two adjacent single ended channels the first on the reference resistor and the second on th...

Page 172: ...MBER TYPE DESCRIPTION 01 2 Repetitions 02 2 Range code Table 9 1 03 2 Differential input channel number for first measurement 04 2 Excitation channel number 05 4 Delay multiples of 0 01s 06 4 Excitation voltage millivolts 07 4 Input location number for first measurement 08 FP Multiplier 09 FP Offset Input locations altered 1 per repetition Instruction 9 Full Bridge with Excitation Compensation Thi...

Page 173: ...A NUMBER TYPE DESCRIPTION 01 4 Input location Input locations altered 1 Instruction 11 107 Thermistor Probe This instruction applies a 2V AC excitation voltage to a Campbell Scientific 107 Thermistor Probe makes a single ended voltage measurement across a resistor in series with the thermistor and calculates the temperature in oC with a fifth order polynomial A multiplier of 1 and an offset of zer...

Page 174: ...y to make use of the repetitions parameter in Instruction 11 The temperature value used in compensating the RH value parameter 5 must be obtained see Instruction 11 before executing Instruction 12 and must be in Celsius The RH results are placed sequentially into the input locations beginning with the first RH value In the 207 probe the RH and temperature elements use a common excitation line Neve...

Page 175: ... T copper constantan x2 E chromel constantan x3 K chromel alumel x4 J iron constantan x5 B platinum rhodium x6 R platinum rhodium x7 S platinum rhodium x8 N nickel chromium Where x 0 for normal measurements x 8 for TC input from A5B40 Isolation Amplifier uses 2 5V range x 9 to output 99999 if out of common mode range Instruction 14 only For accurate results single ended thermocouple measurements s...

Page 176: ...4 gives the thermocouple type codes for parameter 4 Entering a 9 in front of the type code causes the CR10X to make an additional check on common mode range 99999 is output for temperature if the common mode range is exceeded If you want to apply the Campbell Scientific polynomials to a millivolt value in an input location without using the measurement part of Instruction 14 you should index param...

Page 177: ... Offset Input locations altered 1 per repetition Instruction 17 Internal Temperature This instruction measures the temperature oC of a thermistor on the CR10X ana logue board inside the CR10X module This temperature is generally not adequate for use as a thermocouple reference temperature PARAM DATA NUMBER TYPE DESCRIPTION 01 4 Input location number for temperature Input locations altered 1 Instru...

Page 178: ...he status of an external signal using Instruction 25 When a port is set high or low pulsed or toggled by this instruction or a program control command it is automatically configured as an output Voltages in excess of 5 5V applied to a control port can cause the CR10X to malfunction Ports can also be set using the 6 Mode or the J and K telecommunications commands However the ports must be configure...

Page 179: ...will pulse low and vice versa Any value less than 1 including 0 gives a pulse of 10 milliseconds The maximum input value is limited to 65 000 which gives a pulse length of 650 sec Parameter 1 is the port number to be pulsed Parameter 2 is the input location containing the pulse length PARAM DATA NUMBER TYPE DESCRIPTION 01 2 Control port 02 4 Input location of pulse length in hundredths of a second...

Page 180: ...1 333ms i e one channel can be sampled at a maximum rate of 750Hz If control ports 6 7 or 8 are used for pulse measurement using the Pulse Count Instruction P3 no counts will be measured during the execution of the Burst Measurement Instruction P23 Measurement The voltage measurement must use the fast integration time of 250µs 25µs on the 2 5V range Differential measurements are made with a single...

Page 181: ...nels are to be measured parameter 6 specifies 250 scans 0 250 entered and parameter 10 specifies 1 as the first input location in which to store data The measurements from the first channel are stored in input locations 1 250 those from the second channel in locations 251 500 and so on If insufficient locations are allocated to Input Storage using the A Mode to accommodate the number of locations ...

Page 182: ...a number less than 100 decimal 64 hex which is the Instruction Location Number of Instruction 23 in the program table I2 divided by I3 is the multiplier and I4 the offset to the raw data determined by the first calibration I2 is a fixed value determined by the input range selected I5 to In are the raw measurement values Thus the value of the first measurement sent M1 in millivolts is M1 I2 I3 I5 I...

Page 183: ...R10X program execution pauses until the Telecommunications Mode is exited During this pause telecommunications i e view input locations Monitor Mode with GraphTerm etc can continue No Burst measurements are made while in tele communications and no Burst data is sent to the serial port After telecom munications has ended datalogger program execution resumes as if the Burst Measurement instruction h...

Page 184: ... See also Section 13 PARAM DATA NUMBER TYPE DESCRIPTION 01 4 Input location number press C for results of automatic calibration Input locations altered 19 Instruction 25 Port Read Instruction 25 reads the status of a group of ports selected by a mask and places the result in an input location The status is a base 2 representation of the ports converted to base 10 Port 1 is the least significant bi...

Page 185: ...red 1 0 if timer is being reset Instruction 27 Period Measurement Instruction 27 measures the period in microseconds of a signal on a single ended input channel As an option the frequency of the signal in kHz may be output instead of the period The number of cycles to measure should be chosen so that at least one millisecond transpires while counting those cycles e g if the maximum input frequency...

Page 186: ...ion 03 2 Single Ended Input Channel 04 4 No of cycles to measure 05 4 Time out in multiples of 0 01 sec at least the maximum duration of the no of cycles specified 1 5 cycles 06 4 Destination input location 07 FP Multiplier 08 FP Offset Input locations altered 1 per repetition An internal gain stage is used to amplify low level ac signals prior to a zero crossing detector for the period averaging ...

Page 187: ...ignal by a factor of 2 at 16 Hz The back to back silicon diodes D1 and D2 shown in Figure 9 2 provide ESD protection for capacitor C and the sensor and also limit large amplitude sensor signals These diodes clip large amplitude signals to approximately 1 4 V pk pk which is within the recommended input signal ranges for all range codes Diodes D1 and D2 along with resistor R1 are recommended to limi...

Page 188: ...n 29 INW PS9105 The Instrumentation Northwest PS9105 Pressure Transducer is used to measure water level This instruction excites the PS9105 with a single excitation channel and measures the sensor s output on two consecutive differential analogue input channels The pressure and sensor temperature are written into two consecutive input locations starting at the location specified in parameter 3 Eac...

Page 189: ... independently See the SDM INT8 manual for detailed instructions and examples PARAM DATA NUMBER TYPE DESCRIPTION 01 2 Address of INT8 02 4 Input configuration channels 8 7 6 5 03 4 Input configuration channels 4 3 2 1 04 4 Function channels 8 7 6 5 05 4 Function channels 4 3 2 1 06 4 Averaging option 07 4 Loc 08 FP Mult 09 FP Offset Execution Time 2 3ms 1 65ms value averaging interval if used See ...

Page 190: ...the first SW8A and the first four channels from the next will be read Only one Function Option parameter 3 may be specified per Instruction 102 If all four functions are desired four separate Instruction 102s are required Function Option 0 provides the state of the signal at the time Instruction 102 is executed A 1 or 0 corresponds to high or low states respectively Function Option 1 provides sign...

Page 191: ...er 3 Four repetitions are required for each SDM AO4 For every four repetitions another device at the next higher address is selected PARAM DATA NUMBER TYPE DESCRIPTION 01 2 Reps no of outputs 02 2 Address Base 4 03 4 Starting input location C1 is Data line C2 is Clk Handshake line C3 is SDE Enable line Input locations read 1 per repetition Instruction 104 SDM CD16 16AC Instruction 104 is used to c...

Page 192: ...eps no of CD16 16AC modules sequentially addressed 2 2 Starting Address base 4 00 33 3 4 Starting input location Input locations read 16 per repetition Instruction 105 SDI 12 Recorder Instruction 105 allows data to be collected from an SDI 12 sensor A single control port is connected to the SDI 12 sensor data line and the SDI 12 ground is connected to a G terminal on the CR10X wiring panel The CR1...

Page 193: ...rements with SDI 12 sensors that support this feature With concurrent measurements the CR10X can initiate measurements with multiple SDI 12 sensors without having to wait for each individual sensor to complete its sequence before proceeding to the next sensor The CR10X will issue the C SDI 12 concurrent measurement command and wait for the sensor response which includes the amount of time in secon...

Page 194: ... 4 128 Send second value 5 0 End command string 6 0 7 0 8 0 Parameter 3 Port Enter the CR10X control port connected to the SDI 12 sensor data line Any port C1 C8 may be used The default port is port C8 Parameter 4 Input Location Enter the Input Location where the returned data is to be stored If multiple values are returned from the SDI 12 sensor they are stored in adjacent locations beginning at ...

Page 195: ...tine 98 located in Table 3 An SDI 12 recorder addresses the SDI 12 sensor CR10X by sending a Break followed by the sensor s address The sensor CR10X calls subroutine 98 whenever it detects activity on the SDI 12 data line attached to port 8 but if the Break and the specified address are not received by Instruction 106 the remainder of the subroutine is not executed There are two programming techni...

Page 196: ...Instruction 97 must be in Table 1 and the SDI 12 instructions must be in Table 2 PARAM DATA NUMBER TYPE DESCRIPTION 01 4 Address 0 9 10 126 02 4 Time Values tttnn ttt time sec nn no values 03 4 Location starting loc for n values Input locations altered 0 Intermediate Locations required 182 To accomodate this number if keying in data manually increase the value in A window 2 Parameter 1 Address Ent...

Page 197: ...ent by the recorder Results of Instruction 106 The sensor CR10X returns a set of data values from Input Storage in response to the M or M1 M9 command sequence The set of values returned is determined by parameters 2 and 3 of Instruction 106 The three values sent in response to a V command sequence indicate the status of the sensor CR10X The first and second values are from the B Mode of the sensor...

Page 198: ...ruction is used to synchronise the measurements of up to 15 SDM sensors that support the group trigger protocol The data is retrieved with the appropriate device specific instruction Instruction 110 does not have any parameters Instruction 113 SDM SIO4 This instruction communicates with the SDM SIO4 serial input multiplexer See the SDM SIO4 manual for further details Instruction 114 Set Time This ...

Page 199: ...ocation The datalogger ID is set in the D Mode with Command 8 see Section 1 PARAM DATA NUMBER TYPE DESCRIPTION 01 4 Input location number Instruction 118 SDM CAN Instruction 118 is used to configure and control Campbell Scientific s SDM CAN interface This interface is used to communicate directly with a CAN bus network See the SDM CAN manual for details Instruction 119 TDR100 Instruction 119 is us...

Page 200: ...weeping from the Starting Frequency to the Ending Frequency The 1 T 2 value stored in the first Input Location specified in Parameter 11 is the result after the number of Cycles specified in Parameter 9 The 1 T 2 value stored in the sequential Input Location is the result after 5 times the number of Cycles specified in Parameter 9 The value in the second Input Location is the correct value to use ...

Page 201: ...ange from 1 x 10 19 to 9 x 10¹⁸ A value smaller than the minimum is set to 0 while a value larger than the maximum is set to the maximum PAR DATA NO TYPE DESCRIPTION 01 FP Mantissa F 02 2 Exponent of 10 Press C to change sign 03 4 Destination input location Z Input locations altered 1 Instruction 31 Move Input Data Z X This instruction moves data from one input location to another PAR DATA NO TYPE...

Page 202: ...No TYPE DESCRIPTION 01 4 Input location of X X 02 FP Fixed number F 03 4 Dest input location of X F Z Input locations altered 1 Instruction 35 X Y This instruction subtracts Y from X and places the result in an input location PAR DATA NO TYPE DESCRIPTION 01 4 Input location of X X 02 4 Input location of Y Y 03 4 Dest input location for X Y Z Input locations altered 1 Instruction 36 X Y This instru...

Page 203: ...ION 01 4 Input location of X X 02 4 Input location of Y Y 03 4 Dest input location for X Y Z Input locations altered 1 Instruction 39 Square Root X1 2 This instruction takes the square root of X and places the result in an input location If X is negative 0 is stored as the result PAR DATA NO TYPE DESCRIPTION 01 4 Input location of X X 02 4 Dest input location for X1 2 Y Input locations altered 1 I...

Page 204: ...DESCRIPTION 01 4 Input location of X X 02 4 Dest input location for 1 X Z Input locations altered 1 Instruction 43 ABS X This instruction takes the absolute ABS value of X i e the value without any sign and places the result in an input location PAR DATA NO TYPE DESCRIPTION 01 4 Input location of X X 02 4 Dest input location for ABS X Z Input locations altered 1 Instruction 44 Fractional Value of ...

Page 205: ...SCRIPTION 01 4 Input location of X X 02 FP Fixed divisor F 03 4 Dest input loc for X MOD F Z Input locations altered 1 Instruction 47 XY This instruction raises X to the power of Y and places the result in an input location PAR DATA NO TYPE DESCRIPTION 01 4 Input location of X X 02 4 Input location of Y Y 03 4 Dest input location for XY Z Input locations altered 1 Instruction 48 Sin X This instruc...

Page 206: ... SWATH 02 4 Starting input location 1ST LOC 03 4 Dest input location for maximum Z Input locations altered 1 or 2 Instruction 50 Spatial Minimum This instruction finds the spatial minimum SPA MIN value of the given set or swath of input locations and places the result in an input location To find the input location where the minimum value occurs follow the instructions given above for Spatial Maxi...

Page 207: ...h Multiplier and Offset This instruction takes four input location values multiplies each by a floating point constant then adds another floating point constant to the resulting products and places the final results back into each of the original four input locations PAR DATA NO TYPE DESCRIPTION 01 4 First input location STRT LOC 02 FP Multiplier 1 A1 03 FP Offset 1 B1 04 FP Multiplier 2 A2 05 FP ...

Page 208: ...ease the number of significant digits Older versions of Edlog and the CR10KD limit the number of significant gigits that can be entered to 5 0 00001 to 99999 PAR DATA NO TYPE DESCRIPTION 01 2 Repetitions REPS 02 4 Starting input location for X X 03 4 Destination input location for F X F X or Z 04 FP C0 coefficient C0 05 FP C1 coefficient C1 06 FP C2 coefficient C2 07 FP C3 coefficient C3 08 FP C4 ...

Page 209: ...lb temperature oC Ta ambient air temperature oC P air pressure in kilopascals A 0 000660 B 0 00115 Although the algorithm requires an air pressure entry the daily fluctuations are small enough that for most applications a fixed entry of the standard pressure at the site elevation will suffice If a pressure sensor is employed the current pressure can be used PAR DATA NO TYPE DESCRIPTION 01 4 Input ...

Page 210: ...ocation that X was PAR DATA NO TYPE DESCRIPTION 01 2 Repetitions REPS 02 4 Starting input location and destination X 03 FP Multiplier Rf MULT Input locations altered 1 per repetition Instruction 60 Fast Fourier Transform Instruction 60 performs a Fast Fourier Transform FFT on a set of data contained in contiguous locations in Input Storage The FFT is used to obtain information on the relative magn...

Page 211: ...jacent bins 04 4 Input location containing the first value in the original time series After the instruction has executed this location will contain the first spectral bin or bin average of the result 05 FP Multiplier for scaling FFT results Input storage locations Greater than or equal to the number of values required in the original time series data Intermediate storage locations required 2 0 12...

Page 212: ...ines which input location will contain the first value of the original time series data Once the FFT instruction has executed this location contains the first resulting value Parameter 5 is a scaling multiplier that is applied to the FFT results i e after the FFT computation has been done The multiplier is not applied to the DC component Memory Requirements The number of Input Storage locations al...

Page 213: ...mponents Ri followed by N 2 input locations containing the imaginary components Ii There is a real and an imaginary com ponent for each bin The value of i varies from 1 to N 2 The real and imaginary results at each frequency i are related to the magnitude Mi and phase Pi as shown below Ri Mi cos Pi 2 Ii Mi sin Pi 3 where Mi is the magnitude and Pi is the phase of the signal in degrees Magnitude is...

Page 214: ...ctra can also be expressed as either of the following PSi N Ui Ui 7 PSi F T Ui Ui 8 Ui is defined as the root mean square RMS value of the sine component of fre quency i fi Ui is the magnitude Mi of the sine wave multiplied by the square root of 2 in units of the input signal multiplied by the scaling multiplier In equation 8 F is the sampling frequency Hz and T is the duration of the original tim...

Page 215: ...Sn Σ PSi 0 5 PSnA A 2 PSnA A 2 A 10 where i goes from nA A 2 1 to nA A 2 1 Table 10 1 illustrates how bin averaging is done given a time series of 1024 values taken at one per second with the resulting 512 spectral bins averaged in groups of 4 parameter 3 log base 2 of 4 2 to produce 127 averaged bins Bin averaging the 1024 values produces bins with representative frequencies that are the same as ...

Page 216: ...s the results in Input Storage The instruction requires the set of input values to be located contiguously in Input Storage The user specifies the location of the first value and how many total values exist The number of input values processed by each type of calculation means variances etc is independently specified for each type The order of the input values determines which inputs are processed...

Page 217: ...ng period 08 4 Input storage location of first value in sequential input string 09 4 First Input Storage location to store string of final results Table 10 2 shows the maximum number of outputs which can be generated and the output order for K input values located sequentially in Input Storage The output order shown in Table 10 2 flows from left to right and top to bottom If the specified number o...

Page 218: ...lue Instruction Processing The COV CORR Instruction contains 3 separate processing phases 1 Input Processing 2 Averaging Period Processing 3 Output Processing The Input Processing phase is where new input values are received the necessary squares or cross products formed and the appropriate summations calculated as required by the desired final output The rate at which the measurements can be made...

Page 219: ... the number of input samples specified in parameter 7 is accumulated Regardless of whether all of the input samples for the averaging period specified in parameter 7 have occurred or not averaging period processing occurs whenever the Output Flag is set This accommodates situations where the Output Interval may not be an integer multiple of the averaging period If for example a 30 minute Output In...

Page 220: ...he measurement portion of the programming The fastest method is to group as many sensors as possible into the fewest measurement instructions ignoring the input location order required by the COV CORR Instruction After the measurements are made use move instructions i e 31 and 54 to obtain the proper input order The slower alternative is to order separate measurement instructions directly as requi...

Page 221: ...tion 64 converts period to temperature and pressure according to the following relationships provided by Paroscientific Pressure psi C 1 T0 2 Tau2 1 D 1 T0 2 Tau2 Temperature C Y1U Y2U2 Y3U3 where C C1 C2U C3U2 psi T0 T1 T2U T3U2 T4U3 T5U4 microsecond D D1 D2U microsecond U U t U0 microsecond Tau measured pressure microsecond U t measured temperature microsecond Values for the calibration coeffici...

Page 222: ...14 265 7114 3 Y3 102779 1 102 78 C1 70 29398 70 294 C2 6 610141 6 6101 C3 119 2867 119 29 D1 0 0308837 30 884 D2 0 0 0 0 T1 26 33703 26 337 T2 0 8516985 0 85170 T3 21 80118 21 801 T4 0 0 0 0 T5 0 0 0 0 Y3 and D1 coefficients are entered as Y3 1000 and D1 1000 The large number of coefficients which must be entered into the program often leads to entry error As a check on coefficient entry the third...

Page 223: ...ation Input locations altered 8 Instruction 66 Arctan This instruction calculates the angle in degrees whose tangent is X Y The polarity of X and Y must be known to determine the quadrant of the angle as shown here If 0 is entered for parameter 2 the arctangent of X is the result limits of ARCTAN X are 90o ARCTAN 90o Quadrant see Figure 10 1 Sign of X Sign of Y I II III IV PAR DATA NO TYPE DESCRIP...

Page 224: ...tion 2 See Appendix F for information on Instruction 67 Input locations altered 2 or 6 Instruction 68 Parameter Extension 4 Digit This instruction is used to give other instructions additional parameters Each of the eight parameters in Instruction 68 is defined by the instruction it follows Refer to the specific instruction that uses extended parameters Input locations altered 0 ...

Page 225: ... the computation of wind direction At low wind speeds when the wind direction readings may be erroneous you may not want a sample less than the sensor threshold used in the calculation of mean unit vector direction mean resultant wind direction or resultant wind speed If this is the case Instruction 89 can be used to check the wind speed and if less than the threshold Instruction 30 can set the wi...

Page 226: ...0 scans when the sub interval is 0 With a sub interval of 900 scans 15 minutes the standard deviation is the average of the four sub interval standard deviations The last sub interval is weighted if it does not contain the specified number of scans There are three output options which specify the values calculated Option 0 Mean horizontal wind speed S Unit vector mean wind direction Θ Θ Θ Θ1 Stand...

Page 227: ...t head to tail vectors are the input sample vectors described by si and Θi the sample speed and direction or by Uei and Uni the east and north components of the sample vector At the end of output interval T the sum of the sample vectors is described by a vector of magnitude U and direction Θu If the input sample interval is t the number of samples in output interval T is N T t The mean vector magn...

Page 228: ...l sensors Ue ΣUei N Un ΣUni N Resultant mean wind direction Θ Θ Θ Θu Θ Θ Θ Θu Arctan Ue Un Standard deviation of wind direction σ σ σ σ Θ Θ Θ Θu using Campbell Scientific algo rithm σ σ σ σ Θ Θ Θ Θu 81 1 U S 1 2 The algorithm for σ θu is developed by noting Figure 11 3 that Cos U s where i i Θ Θ Θ Θ i i i u si Θ i Θu Ui U Figure 11 3 Standard Deviation of Direction The Taylor Series for the Cosine...

Page 229: ...OAA Idaho Falls ID and MERDI Butte MT In these tests the maximum differences in σ σ Θ Θ Θ u N u U S i 2 1 2 1 2 2 1 and have never been greater than a few degrees The final form is arrived at by converting from radians to degrees 57 296 degrees radian σ Θu U S U S 2 1 811 1 2 1 2 Instruction 70 Sample This instruction stores the value from each specified input location The value s stored are those...

Page 230: ... is formatted and activated by entering one of the following codes for parameter 2 Code Options 00 Output value only 01 Output value with seconds 10 Output value with hour minute 11 Output value with hr min sec PARAM DATA NUMBER TYPE DESCRIPTION 01 2 Repetitions 02 2 Time of maximum optional 03 4 Starting input location no Outputs Generated 1 per repetition plus 1 or 2 additional outputs per repet...

Page 231: ...otal in each bin by the total number of scans This form of output is also referred to as a frequency distribu tion The weighted value histogram uses data from two input locations One location contains the bin select value e g wind direction the other contains the weighted value e g wind speed Each time the instruction is executed the weighted value is added to a bin The sub range that the bin sele...

Page 232: ...the following example for temperature values Lower range limit 10oC Upper range limit 30oC Number of bins 10 Closed Form Open Form Range of first bin 10 to 11 99oC 12oC Range of last bin 28 to 29 99oC 28oC A common use of a closed form weighted value histogram is the wind speed rose Wind speed values the weighted value input are accumulated into corresponding direction sectors bin select input PAR...

Page 233: ...ed The default format is low resolution At the beginning of each program table execution the low resolution format is automatically enabled PARAM DATA NUMBER TYPE DESCRIPTION 01 2 0 low resolution 1 high resolution Outputs Generated 0 Instruction 79 Sample on Maximum or Minimum Used in conjunction with Instructions 73 or 74 this instruction copies specified input location values into Intermediate ...

Page 234: ... 1 511 are valid IDs Instruction 81 Rainflow Histogram Instruction 81 implements the rainflow counting algorithm essential to estimating cumulative damage fatigue to components undergoing stress strain cycles Data is provided by making measurements in either the standard or the Burst Mode The Rainflow instruction can either process a swath of data following the Burst Mode or it can process on line...

Page 235: ... has a mean value less than the lower limit or greater than the upper limit is counted in the minimum or maximum mean bin In the closed form a cycle that is beyond the amplitude or mean limits is not counted The minimum distance between peak and valley parameter 8 determines the smallest amplitude cycle that will be counted The distance should be less than the amplitude bin width high limit low li...

Page 236: ... 2 x No of Amplitude Bins 4 where Bins No Mean Bins x No Amplitude Bins Outputs generated No Mean Bins x No Amplitude Bins x Reps Instruction 82 Standard Deviation in Time This instruction calculates the standard deviation STD DEV of a given input location The standard deviation is calculated using the formula S ΣXi2 ΣXi 2 N N 1 2 where Xi is the ith measurement and N is the number of samples PARA...

Page 237: ...hat called the subroutine Instruction 83 If Case X F If the value in the location specified in the Begin Case instruction Instruction 93 is less than the fixed value entered as parameter 1 of Instruction 83 then the CR10X executes the command in parameter 2 and goes to the end of the case statement when the next Instruction 83 occurs Otherwise it continues to the next instruction See Instruction 9...

Page 238: ... is subroutine 98 subroutine 97 subroutine 96 Table 1 Table 2 If subroutines 96 97 and 98 are all pending ports go high at the same time or all go high during the execution of the same instruction in one of the tables subroutine 98 will be executed first then subroutine 97 and finally subroutine 96 Subroutines 96 97 and 98 cannot interrupt each other and cannot be interrupted by a program table Ho...

Page 239: ...ntered one pass through the loop is made then the CR10X delays until the next execution interval and makes the second pass through the loop After making the fifth pass through the loop there is the fifth delay after which execution passes to the instruction following the End instruction which goes with the loop While in a loop with delay the table is not initiated at each execution interval Howeve...

Page 240: ...vel in the CR10X is eleven deep This applies to If Then Else comparisons and Loops or any combination thereof An If Then Else comparison which uses the Else instruction Instruction 94 counts as being nested two deep PARAM DATA NUMBER TYPE DESCRIPTION 01 4 Delay 02 4 Iteration count Examples The following example involves the use of the Loop instruction without a delay to perform a block data trans...

Page 241: ...lay can be used so that only the instructions within the Loop are executed while certain conditions are met As a simple example suppose it is desired to execute one set of instructions from midnight until 6 AM another set between 6 AM and 4 PM and a third set between 4 PM and midnight Between 6 AM and 4 PM samples are desired every 10 seconds the rest of the time one minute between samples is suff...

Page 242: ... 04 31 Exit Loop if true 29 P95 End 30 P87 Beginning of Loop 01 6 Delay 02 0 Loop Count 36 P86 Do 01 1 Call Subroutine 1 37 P89 If X F 01 25 X Loc DAY 02 3 03 5 F 04 32 Exit Loop if false 38 P95 End 39 P End Table 1 3 Table 3 Subroutines 01 P85 Beginning of Subroutine 01 1 Subroutine Number 02 P18 Time 01 2 Hours into current year maximum 8784 02 24 Mod by 03 25 Loc DAY 03 P95 End ...

Page 243: ...ATA NUMBER TYPE DESCRIPTION 01 4 Input location for X 02 2 Comparison code Table 12 5 03 FP Fixed value 04 2 Command Table 12 2 Instruction 90 Step Loop Index When used within a loop Instruction 87 Instruction 90 increments the index counter by a specified amount after the first time through the loop thus affecting all indexed input location parameters in subsequent instructions For example if 4 i...

Page 244: ...ys starts at midnight 0 minutes The time into an interval is only true the first time Instruction 92 is executed within a given minute or second For example if the command is to set the Output Flag at 0 minutes into a 10 minute interval and the execution interval of the table is 10 seconds every 10 minutes there will only be one output generated by this instruction not five The time into interval ...

Page 245: ...in execution branching directly to the End instruction Instruction 94 has no parameters Instruction 95 End Instruction 95 is used to indicate the end return of a subroutine Instruction 85 the end of a loop Instruction 87 the end of an If Then Else sequence Instructions 88 92 when used with command 30 or the end of a Case sequence Instruction 93 The End instruction has no parameters Instruction 96 ...

Page 246: ...d Character also uses this queue When an entry reaches the top of the queue the CR10X sends all data accumu lated since the last transfer to the device up to the location of the DSP at the time the device became active this allows everything in the queue to get a turn even if data is being stored faster than it can be transferred to a particular device The other Final Storage Area device option th...

Page 247: ...dem ID numbers phone numbers or other commands given in the subsequent Instruction s 63 or 68 Once the computer answers the call the CR10X sends the ID number Parameter 8 to identify itself to the computer When the computer sends back the same ID number the CR10X will go into the normal telecommunications mode see Section 5 and the computer is now in charge of the call The computer uses the ID num...

Page 248: ... and the interrupt disable flag Parameter 2 is low the CR10X initiates the call The datalogger will continue to attempt communications until the interrupt disable flag has been set high As soon as the flag is set high the datalogger quits trying to initiate the call After a successful call has ended the flag is automatically set high Be careful to make sure the only times this flag is set low or h...

Page 249: ...xits communications Each time the CR10X receives a correct character of the ID it restarts the 4 second timer The CR10X must receive the correct ID each digit in order with no more than 4 seconds between each digit If an incorrect character is detected or the 4 second time limit expires the CR10X will immediately resend the correct ID If the complete ID is not received by the CR10X within the time...

Page 250: ...ed on line help and Tutorials which explain how to set up communications between your datalogger and voice modem The Callback Tutorial illustrates the use of Instruction P97 for voice communication set up and this is reproduced below for convenience Callback is a feature where the datalogger will automatically initiate a call to a defined telephone number when a user flag is set low Often this fea...

Page 251: ...rity For example to send the ASCII character control R 18 would be entered Enter a null 0 to terminate the string Appendix E contains a listing of the ASCII characters If the I O port is already active when Instruction 98 is executed the output request is put in a queue see Instruction 96 This instruction can be used to send a control character to activate a listing device The specified character ...

Page 252: ...arsat Interface Notes for detailed information on using Instruction 122 Instruction 123 Automatic Programming of a TGT1 Instruction 123 performs automatic programming of the TGT1 Telonics GOES transmitter See the TGT1 manual for detailed information Instruction 124 Fire Data to HDR GOES Instruction 124 transfers FireWeather format data to SAT HDR GOES transmitter See the SAT HDR GOES manual for de...

Page 253: ... for voltage measurement instructions the slow integration 2 72ms or the fast integration 250µs The slow integration time provides a more noise free reading than the fast integration time Integration time is specified in the Range Code of the measurement instruction Instructions 1 14 Range codes Slow 2 72ms Integration time Fast 250µ µ µ µs Integration time 60Hz rejection 50Hz rejection Full Scale...

Page 254: ...ed to the low then with the inputs reversed see Figure 13 3 The CR10X computes the differential voltage by averaging the mag nitude of the results from the two integrations and using the polarity from the first An exception to this is the differential measurement in Instruction 8 which makes only one integration Figure 13 3 Differential Voltage Measurement Sequence Because a single ended measureme...

Page 255: ...on a sensor that is not referenced to CR10X ground through a separate connection e g a net radiometer a jumper wire should be connected between the low side of the differential input and ground to hold the sensor signal inside the common mode range A differential measurement has better noise rejection than a single ended measurement Integrating the signal in both directions also reduces input offs...

Page 256: ...rors may occur There are three potential sources of error which must settle before the measurement is made 1 The signal must rise to its correct value 2 A small transient 5mV caused by switching the analogue input into the measurement circuitry must settle 3 A larger transient usually about 40mV V caused by the switched precision excitation voltage used in resistive bridge measurements must settle...

Page 257: ...in Ve the input settling error Ve Vso e t RoCT rise 6 Ve Ve o e t RoCT decay 7 Where Ve o Veo Vso the difference between the peak transient voltage and the true signal voltage Since the peak transient Veo causes significant error only if it is several times larger than the signal Vso error calculations made in this section approximate Ve o by Veo i e Veo Veo Vso If the input settling time constant...

Page 258: ...Rs the source resistance can be approximated by Equations 9 to 11 respectively Ro Rf Rf Rs 9 Ro Rf 2 Rf Rs 10 Ro Rs Rf Rs 11 The source resistance for several Campbell Scientific sensors is given in column 3 of Table 13 5 Determining Lead Capacitance Wire manufacturers typically provide two capacitance specifications 1 the capacitance between the two leads with the shield floating and 2 the capaci...

Page 259: ...surements i e 50mV or less The primary rule to follow in minimising dielectric absorption is avoid PVC insulation around conductors PVC cable jackets are permissible since the jackets don t contribute to the lead capacitance being outside the shield Campbell Scientific uses only polyethylene and polypropylene insulated conductors in CR10X sensors see Table 13 2 since these materials have negligibl...

Page 260: ...lues in Table 13 3 show that significant error occurs at large direction values for leads in excess of 155m Instruction 4 Excite Delay and Measure should be used to eliminate errors in these types of situations Using a 10ms delay settling errors are eliminated up to lengths that exceed the drive capability of the excitation channel 700m Other measurement errors are possible when using a potentiome...

Page 261: ...hree Belden Lead Wires Used by Campbell Scientific Veo mV Vx mV Rf 1kΩ Ω Ω Ω Rf 10kΩ Ω Ω Ω 8641 8771 8723 8641 8771 8723 2000 50 100 60 100 140 80 1000 25 65 40 60 90 40 Example Lead Length Calculation for 107 Temperature Sensor Assume a limit of 0 05oC over a 0oC to 40oC range is established for the tran sient settling error This limit is a reasonable choice since it approximates the linearisatio...

Page 262: ...If the capacitive load exceeds 0 1µF and the resistive load is negligible Vx oscillates about its control point If the capacitive load is 0 1µF or less Vx settles to within 0 1 of its correct value in 150µs A lead length of 600m is permitted for the Model 227 before approaching the drive limitation Table 13 5 Summary of Input Settling Data For Campbell Scientific Resistive Sensors Sensor Belden Ro...

Page 263: ...sponse at point P The source resistance at point P column 5 of Table 13 7 is essentially the same as the input source resistance of configuration A Moving R f out to the thermistor as shown in Figure 13 10C optimises the signal settling time because it becomes a function of Rf and Cw only Columns 4 and 7 of Table 13 7 list the signal voltages as a function of temperature using a 2000mV excitation ...

Page 264: ...Ω Ω Ω kΩ Ω Ω Ω kΩ Ω Ω Ω 40 884 6 29 0 66 30 0 1 2 2 20 271 2 27 200 27 8 1 6 6 0 94 98 22 8 480 23 4 1 15 9 25 30 00 15 0 1000 15 2 1 32 8 40 16 15 10 5 1300 10 6 1 42 4 60 7 60 6 1 1596 6 1 1 51 8 Figure 13 10 Half Bridge Configuration for YSI 44032 Thermistor Connected to CR10X Showing A large source resistance B large source resistance at point P and C configuration optimised for input settling...

Page 265: ...Rf Substituting values of Rf 1kΩ and Rl 012kΩ see Table 13 2 gives an approximate 1 error in the signal with extended leads Converting the error to oC gives approximately a 0 3oC error at 0oC 0 6oC error at 20oC and a 1 5oC error at 40oC The error can be avoided by ensuring that the Rf is moved to the CR10X end of the extended leads because R1 does not add to the bridge completion resistor Rf and ...

Page 266: ...ws is limited to these errors in calibration and measurement and does not include errors in installation or matching the sensor to the environment being measured Reference Junction Temperature The junction which is created when a thermocouple is wired to the wiring panel is referred to as the reference junction The temperature of the reference junction must be known in order to calculate the absol...

Page 267: ...erature Whichever is greater Type Range oC Standard Special T 200 to 0 1 0oC or 1 5 0 to 350 1 0oC or 0 75 0 5oC or 0 4 J 0 to 750 2 2oC or 0 75 1 1oC or 0 4 E 200 to 0 1 7oC or 1 0 0 to 900 1 7oC or 0 5 1 0oC or 0 4 K 200 to 0 2 2oC or 2 0 0 to 1250 2 2oC or 0 75 1 1oC or 0 4 R or S 0 to 1450 1 5 oC or 0 25 0 6 oC or 0 1 B 800 to 1700 0 5 Not established N 0 Not established 0 to 1250 2 2 oC or 0 ...

Page 268: ...lves a slope error the error is propor tional to the measurement being made although this is limited by the resolution The error in the temperature due to inaccuracy in the measurement of the ther mocouple voltage is worst at temperature extremes where a relatively large scale is necessary to read the thermocouple output For example assume type K chromel alumel thermocouples are used to measure te...

Page 269: ...erature range and subtracting Table 13 10 gives the reference temperature ranges covered and the limits of error in the linearisations within these ranges Two sources of error arise when the reference temperature is out of range The most significant error is in the calculated compensation voltage however error is also created in the temperature difference calculated from the thermocouple output Fo...

Page 270: ...ouple Temperature Source Error oC of Total Error 1oC 1 Slope Error Error Reference Temp 0 6 36 1 69 6 TC Output ANSI 1 0 60 1 0 01 x 20oC 0 2 23 2 Voltage Measurement 0 06 3 6 7 0 Reference Linearisation 0 001 0 1 0 1 Output Linearisation 0 001 0 1 0 1 _________________________________________________________________ Total Error With ANSI error 1 662 100 Assuming 1 0 862 100 slope error 13 4 2 Use...

Page 271: ... valid reference temperature can be measured and to avoid a thermoelectric offset voltage which will be induced if the terminals at which the thermocouple leads are connected points A and B in Figure 13 14 are at different temperatures The box should contain elements of high thermal conductivity which will act to rapidly remove any thermal gradients to which the box is subjected It is not necessar...

Page 272: ...ime and making a differential voltage measurement If a delay of 0 is specified the inputs for the differential meas urement are not switched for a second integration as is normally the case see Section 13 2 The result stored is the voltage measured The resolution and common mode rejection of Instruction 8 are not as good as the ratiometric bridge measurement instructions It does however provide a ...

Page 273: ...y Ratiometric output 8 Differential Makes a differential measurement without Measurement reversing excitation polarity Used for fast with Excitation measurements on load cells PRTs etc Resolution and common mode rejection worse than Instruction 6 if used with delay 0 Measured voltage output 9 6 Wire Compensates for lead wire resistance Two Full Bridge differential measurements at each excitation o...

Page 274: ...Rf ________ 59 Mult Rf 1 X Vx 1 4 Mult 1 Vx offset 0 Rf ____________________ 59 Mult 1 Rs X Vx 1 X Vx Rs 42 5 X Rs Rs Rf X 5 Mult 1 offset 0 Rs Rf _____ 59 Mult Rf 1 X 1 5 Mult 1 offset 0 Rf _____________ 59 Mult 1 Rs offset 0 X 1 X Rs 42 6 8 9 X 1000 R3 R3 R4 R2 R1 R2 used for full bridge 6 or 9 Mult 0 001 offset R3 R3 R4 1 8 Mult 1 Vx offset R3 R3 R4 R1 _______________ 59 Mult 1 R2 X1 1 X1 R2 42...

Page 275: ...to minimise the time excitation is on it also grounds the excitation as soon as the signal is integrated see Figure 13 17 The slow integration time should never be used with a sensor requiring AC excitation because it results in the excitation lasting about 1 5 times as long allowing polarisation to affect the measurement Figure 13 17 AC Excitation and Measurement Sequence for AC Half Bridge 13 6 ...

Page 276: ...venting sensor deterioration the capacitors block any DC component from affecting the measurement 13 7 Calibration Process The CR10X makes voltage measurements by integrating the input signal for a fixed time and then holding the integrated value for the analogue to digital A D conversion The A D conversion is made by a 13 bit approximation using a digital to analogue converter DAC The result from...

Page 277: ...ation is the use of Instruction 24 the calibration instruction Instruction 24 implements a complete calibration which occurs only when executed by a program table Instruction 24 calibration is the average of 10 calibrations and takes approximately 2 8 seconds to complete Automatic calibration is disabled when a program is compiled that contains Instruction 24 Instruction 24 calibration as opposed ...

Page 278: ...4 also has an option to store the results of the automatic calibration in Input Storage This can be used to detect hardware problems If 99999 appears in any of the 19 input locations the CR10X has a hardware problem or needs factory calibration ...

Page 279: ...nual for further information 14 2 Power Requirements The CR10X operates at a nominal 12V DC Below 9 6V or above 16V the CR10X will not operate correctly The CR10X is diode protected against accidental reversal of the positive and ground leads from the battery Input voltages in excess of 18V may damage the CR10X and or power supply A transzorb provides transient protection by limiting the voltage a...

Page 280: ...12 M Power Supplies User Guide 14 3 1 Use of Rechargeable Batteries There are inherent hazards associated with the use of sealed lead acid batteries Under normal operation lead acid batteries generate a small amount of hydrogen gas This gaseous by product is generally insignificant because the hydrogen dissipates naturally before build up to an explosive level 4 occurs However if the batteries are...

Page 281: ...rminals on the Wiring Panel The metal surfaces of the Wiring Panel and mounting bracket are at power ground Make connections to the Wiring Panel first and then to the power supply If the power supply must be connected first connect the positive to the Wiring Panel before the ground to avoid shorting to the Wiring Panel or mounting bracket 14 6 Vehicle Power Supply Connections If you want to power ...

Page 282: ...rrent is directed away from the CR10X through the diodes A blown track may be replaced by soldering conventional 5 amp fuse wire or 35 SWG 0 21mm diameter wire between the soldering pads provided This wire must be of the correct thickness as indicated to enable it to act as a new fuse A modem telephone line connected to the Wiring Panel provides another path for transients to enter and damage the ...

Page 283: ...In a laboratory application where more than one AC socket may be used to power various sensors it is not always safe to assume that the power grounds are at the same potential To be safe the ground of all the AC sockets in use should be tied together with a 14 SWG wire 14 8 CR10WP Wiring Panel The purpose of the CR10WP Wiring Panel is to provide transient protection improve excitation voltage accu...

Page 284: ...l This closes the relay contacts which completes the power circuit to a fan turning the fan on Campbell Scientific offers the A6REL 12 Six Channel Relay Driver with manual override 12V coil for use with the CR10X Figure 14 3 Relay Driver Circuit with Relay In other applications it may be desirable to simply switch power to a device without going through a relay Figure 14 4 illustrates a circuit fo...

Page 285: ...nternal Battery The CR10X module contains a lithium coin cell battery that operates the clock and SRAM when the CR10X is not connected to an external power source The CR10X does not draw any power from the lithium battery while it is powered externally In a CR10X stored at room temperature the lithium battery should last approximately 4 years less at temperature extremes Where the CR10X is powered...

Page 286: ... C 7 C 6 C 5 C 4 C 3 C 2 C 1 S W IT H E D S W IT H E D 1 2 V C O N T R O L C O N T R O L S W IT H E D 1 2 V C O N T R O L C R 1 0 C R 1 0 C R 1 0 M A D E IN U S A M A D E IN U S A W IR IN G P A N E L N O W IR IN G P A N E L N O M A D E IN U S A W IR IN G P A N E L N O 1 0 6 3 A G H L A G H L A G H L A G E 3 E 3 A G G G A G H L A G H L A G H L A G E 3 A G G G G G G G 1 2 V 1 2 V 1 2 V S W IT H E D ...

Page 287: ...pring clip with a fingernail until the cell falls out DESI PAK SPEC IFICATION MIL D 3464 TYPE II REACTIVATION TIME IN GAB 16 HOURS AT 250 F 0 DE SIC CA NT AC TIV ATED BAGG ED FO R CONTENTS 1 6 UNIT PACK AG E US E AN D STATIC DE HU MIDIF ICA TIO N DO NOT EAT UNITED DESICCANTS GATES P O BO X 105 BELEN NE W ME XIC O 87002 DESI PAK SPEC IFICATION MIL D 3464 TYPE II REACTIVATION TIME IN GAB 16 HOURS AT...

Page 288: ......

Page 289: ...terface the baud rate settings of two pieces of equipment must match each other Data Point A data value which is sent to Final Storage as the result of an Output Instruction Strings of data points which are output at the same time make up Output Arrays Execution Interval The time between initiating each execution of a given Program Table If the exe cution interval is evenly divisible into 24 hours...

Page 290: ...as an instruction parameter may be indexed by pressing C before it is entered by pressing A two dashes will appear at the right of the display Within a loop Instruction 87 this will cause the location to be in cremented with each pass through the loop Indexing is also used with Instruction 75 to cause an input location which normally remains constant to be incremented with each repetition Input St...

Page 291: ...a points output to Final Storage Output occurs only when the Output Flag is set The first point of an Output Array is the Output Array ID which gives the program table number and the instruction location number of the instruction which sets the Output Flag The data points which complete the array are the result of the Output Processing Instructions which are executed while the Output Flag is set T...

Page 292: ...e sequence of execution of Instructions contained in Program Tables also used to set or clear flags Program Table That portion of memory allocated for storing programs consisting of a sequence of user instructions which control data acquisition processing and output to Final Storage Programming can be separated into two tables each having its own user entered Execution Interval A third table is av...

Page 293: ...throughput rate see Sample Rate The primary factor affecting throughput rate is the amount of processing specified by the user In normal operation all processing called for by an instruction must be completed before moving on to the next instruction The absolute maximum throughput rate for a fast single ended measurement is approximately 256 meas urements per second 12 measurements repeated about ...

Page 294: ......

Page 295: ... Global Positioning Receivers GPS Data sent by the sensor can be ASCII data values hexadecimal pairs in ASCII representation or decimal encoded binary bytes see description of parameter 2 in Section B 2 Output Output can be a preamble set of commands to the sensor or data from the CR10X s input locations see description of parameter 6 in Section B 2 For most versions of this instruction the execut...

Page 296: ...data bits no parity 1 stop bit A special version of Instruction 15 is available to enable the CR10X to receive seven data bits in addition to the standard eight data bits If you have purchased this version and you select the 7 bit option you should amend references to eight data bits in this manual accordingly B 2 Instruction 15 and Parameter Descriptions PAR DATA NO TYPE DESCRIPTION 01 2 Repetiti...

Page 297: ...TE Times are shorter if CTS and or data input is done before parameter 9 time out B 2 1 Parameter 1 Repetitions Parameter 1 specifies the number of sensors that can be read using the same Instruction 15 parameter configuration For example three repetitions are used for three identical sensors or three sensors that are satisfied by the same parameter configuration Instruction 15 must be entered sep...

Page 298: ...ues The value from each pair is stored in a separate input location starting with the location specified in parameter 10 The data is input assuming one start bit eight data bits no parity and one stop bit with the eighth parity bit ignored All eight bits are checked for the terminator character specified in parameter 7 Example The input string 7F7E0A0B0C1E cr lf is translated into 127 126 10 11 12...

Page 299: ... parameter 6 means send nothing When sending a preamble or some command characters to a sensor the characters must be in the ASCII decimal equivalent code see Appendix E The preamble is stored in sequential input locations with one ASCII decimal equivalent code 0 to 127 in each location The CR10X sends the preamble one ASCII character per input location The decimal codes may be loaded into input l...

Page 300: ...ved it acts like a termination character If no characters have been received a 99999 is stored to indicate a fault in communication Both of the above parameter 3 0 parameter 6 0 and parameter 8 0 If output and input are completed before the end of the delay program execution immediately advances to the next instruction Thus the delay may be over esti mated without slowing down table execution If t...

Page 301: ...e control port used for the RTS DTR line while the next port connects to the Serial Input line Two control ports are used per repetition B 3 2 Configuration 2 Serial data is output from the CR10X without using the CTS line There is no input Parameters 3 and 6 must be greater than zero and parameter 8 must be zero Parameter 4 specifies the control port used for the DTR RTS line the next port connec...

Page 302: ...5 Configuration 5 Serial data is output and received by the CR10X The CTS line is used Parameter 3 must be zero while parameters 6 and 8 must be greater than zero Parameter 4 specifies the control port used for the RTS DTR line the next port is for CTS and the third and fourth ports are for Serial Output and Serial Input respectively Four control ports are used per repetition B 4 Program Examples ...

Page 303: ...aged may be read by the CR10X Instruction 15 execution time is prolonged when the barometer makes several measurements to compute an average Baud Rate 300 or 1200 baud RS232 Jumpers For typical field use where power is limited the RS232 jumpers should be removed to enable a TTL 0 5V level output B 4 1 2 CR10X Barometer Connection Table B 3 CR10X Barometer Connection Details Table B 3 provides conn...

Page 304: ...current drain Configuration 3 The purpose of this configuration is to read the barometer on a standard RS232 device such as a printer or terminal instead of the CR10X If failure occurs this configuration allows the use of a third device to check if the problem is with the barometer or with the CR10X To avoid damage to the barometer CMOS chips connect ground first and power last All sensor leads no...

Page 305: ...e number of characters to expect from various barometer modes If the barometer output contains multiple data points the input location specified in parameter 10 is sequentially incremented for each data point Parameter 9 The time out parameter limits the amount of time that Instruction 15 waits to receive input The execution time of Instruction 15 is dependent on both the configuration and the bar...

Page 306: ...ut and Memory Requirements for Various Barometer Output Modes Example Program 1 01 P15 Control Port Serial I O 01 1 Repetitions 02 00 Configuration code ASCII TTL 03 0 CTS Delay before send 04 1 First control port RTS DTR 1 RX 2 05 0 Output start location 06 0 Number of locations to send 07 13 Input termination character 13 CR 08 9 Max characters to receive 09 100 Delay for CTS input Wait 1 second...

Page 307: ...owing example shows how data can be sent between two CR10Xs The program for the CR10X sending the data CR10X 1 includes a loop which creates artificial data to send the numbers are generated and stored in input locations 1 to 10 Instruction 15 then transfers the contents of locations 1 to 10 to CR10X 2 Instruction 15 in CR10X 2 receives and stores the values in input locations 11 to 20 As shown in...

Page 308: ...5 End End Loop to generate values 05 P15 Control Port Serial I O 01 1 Repetitions 02 1 Configuration code RS232 1200 baud 03 0 CTS Delay before send 04 6 First control port RTS C6 05 1 Output start location 06 10 Number of locations to send Start at Loc 10 and convert 07 0 Input termination character 08 0 Max characters to receive 09 100 Delay for CTS input wait 1 sec for CTS to go high 10 28 Firs...

Page 309: ...0 Offset 03 P95 End Input Location Labels 11 VALUE 1 16 VALUE 6 12 VALUE 2 17 VALUE 7 13 VALUE 3 18 VALUE 8 14 VALUE 4 19 VALUE 9 15 VALUE 5 20 VALUE 10 The following examples represent portions of a larger more complete application program and SHOULD NOT BE USED VERBATIM B 5 Summary of Barometer Jumper Configurations Jumper 7 6 5 4 3 2 1 0 Barometer mode serial output u u r r n n 0 0 Barometer mo...

Page 310: ...0 0 Test mode 1200 0 1 300 1 0 110 1 1 Parallel output data format Bar parallel mode and ASCII coded output 0 0 Alt parallel mode Binary coded output 0 1 Test mode tests Raw data press mb 0 0 Serial ID test 0 1 SA test 1 0 Raw data 1 1 Key to table abbreviations r Serial output baud rate n Number of measurements to be averaged b Format of parallel output binary ASCII coded u Units of output Don t ...

Page 311: ...at and can either be decoded on the fly using user written code to decode the data as described in Section C 2 or decoded using the Split program After the data the last two bytes sent are a binary checksum This is a much more effective checksum than that used for ASCII data transfer For further details of this checksum see Section C 3 Command Description no of loc F BINARY DUMP CR10X sends in Fin...

Page 312: ...he datalogger version number is reported as V4 the datalogger OS can use the new 2413J as well as the new S T and U commands See Section 5 Telecommunications for a description of these commands 2413J 3142J The format of the command is as follows 2413J CR abcd nNULL or 3142J CR abcd nNULL where 1 either 2413J CR or 3142J CR is the command 2 a is a 1 byte value representing the user flags to be togg...

Page 313: ...and Alternately 11111111 binary aborts the J command If aborted flags will not be toggled and location requests will not be saved User Datalogger Enters Echo 3 3 1 1 4 4 2 2 J J CR CR LF a a b b c c d d n n Null Null K The K command returns datalogger time user flag status port status if requested the data at the input locations requested in the J command and Final Storage data if requested by the...

Page 314: ...ort status The most significant bit represents Port 8 and so on to the least significant bit which represents Port 1 For each input location requested by the J command four bytes of data are returned The bytes are coded in Campbell Scientific Floating Point Format The format is decoded to the following Sign Mantissa 2 Exponent Data byte 1 contains the Sign and the Exponent The most significant bit...

Page 315: ...bits Converting the binary to hexadecimal 111111 BINARY 3F HEX or 63 decimal 3F 40 HEX FF FF FF FF FF HEX Or in decimal 63 64 1 Exponent is 1 decimal The binary representation of Data bytes 2 to 4 is 10000010 00001100 01001001 Summing all the fractional values 2 1 2 7 2 13 2 14 2 18 2 21 2 24 0 50800 Using the estimate method to find the Mantissa 82 0C 49 HEX 1 00 00 00 HEX or 8522825 16777216 whi...

Page 316: ... first time byte to the 7F 00 HEX bytes Calculate the signature of the bytes received and compare with the signature received to determine the validity of the transmission C 2 Final Storage Format CR10X data is formatted as either 2 byte Low Resolution or 4 byte High Resolution values The first two bytes of an output array contain a code noting the start of the output array and the output array ID...

Page 317: ...for the second byte but the word can be decoded on the basis of the first byte only C 2 2 High Resolution Format Continuing to use the A H bit representation the 4 byte number is shown as two 2 byte pairs AB0111GH XXXXXXXX 001111GH XXXXXXXX Table C 2 Description of High Resolution Format Bits first Byte 1st Pair Description CDEF 0111 Code designating first byte pair of 4 byte number B Polarity 0 1...

Page 318: ...re respectively M represents a transmitted data byte n represents the existing byte n 1 represents the new byte T represents a temporary location C represents the carry bit from a shift operation 1 The signature is initialised with both bytes set to hexadecimal AA S1 n S0 n AA 2 When a transmitted byte M n 1 is received form a new high signature byte by setting it equal to the existing low byte Sa...

Page 319: ...evice It will be ready to send or receive data as soon as command 1 or 2 is issued Table C 3 D Command 1 and 2 Options Command Option Code Description 1 2 1x Synchronously addressed 4x Hardware enabled x Baud Rate Codes 0 300 1 1200 2 9600 3 76800 After the option code is entered enter A to execute the command Command 2 will be aborted if no data is received within 40 seconds When Command 2 is exe...

Page 320: ...val 3 The colons are used to mark the start of actual data 4 A semicolon tells the CR10X to ignore the rest of the line and can be used after an entry so that a comment can be added There are four two character control codes which may be used to verify that the CR10X receives a file correctly B B 2hex 2hex Discard current buffer and reset signature C C 3hex 3hex Send signature for current buffer D...

Page 321: ...Appendix C Binary Telecommunications C 11 the buffer into the editor and reset the signature Once the complete file has been sent and verified send E E to compile the program and exit the load command ...

Page 322: ......

Page 323: ... 3 12 EX CTRL 2 13 EX CTRL 1 14 AG 15 P1 16 C7 17 C5 18 C3 19 C1 20 G 21 6H 22 5L 23 AG 24 4H 25 3L 26 AG 27 2H 28 1L 29 AG 30 E3 31 E2 32 E1 33 P2 34 C8 35 C6 36 C4 37 C2 The EX CTRL lines must be connected to the excitation lines E1 E2 E3 at the point where excitation is provided e g the excitation terminals on the CR10WP ...

Page 324: ......

Page 325: ...3 I 105 i 10 CONTROL J 42 74 J 106 j 11 CONTROL K 43 75 K 107 k 12 CONTROL L 44 76 L 108 l 13 CONTROL M 45 77 M 109 m 14 CONTROL N 46 78 N 110 n 15 CONTROL O 47 79 O 111 o 16 CONTROL P 48 0 80 P 112 p 17 CONTROL Q 49 1 81 Q 113 q 18 CONTROL R 50 2 82 R 114 r 19 CONTROL S 51 3 83 S 115 s 20 CONTROL T 52 4 84 T 116 t 21 CONTROL U 53 5 85 U 117 u 22 CONTROL V 54 6 86 V 118 v 23 CONTROL W 55 7 87 W 11...

Page 326: ......

Page 327: ...stem by heating and assuming 4 186 Joules of energy are required to heat each gram of sap 1 C the flow rate can be calculated Accumulated flow can be calculated using datalogger Instruction 72 Totalize F 2 Instruction Details Dynagage Sap Flow P67 1 0000 Begin Input Location _________ 2 0 0 Ksh W mV 3 0 0 Heater Resistance Ohm 4 0 0 Stem Area sq cm 5 0 0 Thermal Conductivity W m K 6 0 0 Thermocoup...

Page 328: ...ions are very low flow rates and high flow rates both of which cause dT to approach zero In these cases the output must be filtered so that only reasonable flow rates are processed To do this values of 0 5 C and 0 042cms 1 should be used for Parameters 7 and 8 respectively You should use these values unless your own site experience indicates otherwise Parameter 7 Low flow filter 0 5 C This filter ...

Page 329: ...Sapflow g h 1 Sapflow g h 1 Kshapp W mV 1 Kshapp W mV 1 dT C power input W Qv Vertical Flux W Qr Radial Flux W Qf Sapflow Flux W Sapflow g h 1 The calculated sap flow rate If total sapflow is desired Output Processing Instruction 72 can be used in conjunction with Instruction 67 to totalize sap flow Qf and dT Qf is the residual energy that is assumed lost through sap flow and is defined as Qf Qh Q...

Page 330: ...e used Par Instruction P67 parameter Pin Loc 4 Loc 4 Par 3 Qv Loc 3 Loc 2 4 0 Par 6 Par 4 Par 5 Qr Loc 1 Par 2 Qf Pin Qv Qr Kshapp Pin Qv Loc 1 dT Loc 2 Loc 3 2 0 25 0 Sapflow Qf dT 4 186 If Par 7 0 0 then go to XXXXXX If Qf 0 2 Pin and If dT Par 7 then Sapflow 0 0 If Qf 0 2 Pin and If Qf 0 0 then Sapflow 0 00001 XXXXXX If Par 8 0 0 then go to YYYYYY Fmax Par 8 Par 4 If Sapflow Fmax the Sapflow Fm...

Page 331: ...and stores hourly data Whenever the temperature is above 32 C the datalogger initiates a call to a dedicated computer Instruction 97 uses the status of a Flag to determine when to initiate the call Any user flags 1 8 may be used as Instruction 97 s Interrupt Flag In this example when temperature is within acceptable limits 32 C Flag 5 is set high otherwise Flag 5 is set low If Flag 5 is low when I...

Page 332: ...Delay W Ex units 0 01 sec 3 15 Delay After Ex units 0 01 sec 4 0 mV Excitation 5 Volts SE P1 1 1 Reps 2 35 2500mV 50Hz Rejection Range 3 2 SE Channel 4 2 Loc RH 5 1 Mult 6 0 Offset 6 Do P86 1 51 Set Port 1 Low 7 If time is P92 1 0 Minutes Seconds into a 2 60 Interval same units as above 3 10 Set Output Flag High 8 Real Time P77 1 120 Day Hour Minute 2400 at midnight 9 Average P71 1 2 Reps 2 1 Loc ...

Page 333: ...eter of the 5 00 Option final Instruction 63 6 00 Option 7 00 Option 8 00 Option G 3 Setting Up the PC208 DOS Software Package The station file must be called STN where is the 3 digit ID number parameter 8 of Instruction 97 from the datalogger program After the computer answers the call it searches for a station file STN with the name of the 3 digit ID number The computer will then collect data ba...

Page 334: ...file is the same for PC208E or Telcom Figure G 2 Make sure to modify the file to show the correct COM port for your system A COM2 1200 W Figure G 2 Example SCR file for Datalogger Initiated Communications 3 Once the SCR file is created set the phone modem at the computer to Auto Answer See the phone modem manual or the PC208 User Guide for details 4 The final step is to run the SCR file The comput...

Page 335: ...configure the Network Settings for the station Figure G 4 shows an example station for a CR10X site called CR10X_1 There are several key items to configure or verify for your Network settings Ensure that you have correctly selected the following The correct COM port COM2 for this example That the COM port Hardware settings has Allow Callback on This Port selected Figure G 5 The correct modem type ...

Page 336: ...f PC208W is fully explained in the PC208W manual If using TCOM you must be viewing the Network Status window accessed from the menu bar View Network Status As calls are answered and data is collected the Network Status window will update the information displayed on the screen You can stop PC208W waiting for a call in several ways you can Close the Session or Terminate the call de select the Allow...

Page 337: ...Appendix G Datalogger Initiated Communications G 7 Figure G 5 COM Port Hardware Settings in PC208W Figure G 6 Example Modem Settings ...

Page 338: ...Reference Manual G 8 Figure G 7 Data Collection Settings Example in PC208W Figure G 8 Example Schedule Settings in PC208W Note that the screens when using TCOM will be similar to those shown for PC208W above ...

Page 339: ... specified input locations The collected values are stored in the calling datalogger s input locations beginning at the location after the failure location Parameter 7 of Instruction 97 In the example below the remote datalogger is programmed to make measurements when flag 1 is set high and then after measurements are completed to set flag 1 low The calling datalogger toggles flag 1 and then waits...

Page 340: ...surements lower the flag and allow for the input location to be transferred Parameters 4 5 6 and 8 These parameters do not apply when calling a datalogger Leave these options as 0 Parameter 7 Parameter 7 specifies the location to store the number of times the call fails The collected values are stored in the calling datalogger s input locations beginning at the location after the Failure Location ...

Page 341: ...ta collection It collects 3 input locations beginning at the remote datalogger s location 1 These values are stored in locations 2 3 and 4 Flag 2 is used to control Instruction 97 when to make the call The program only needs to set the flag low Instruction 97 will set it high after a successful transfer Table 1 Program 01 1 0 Execution Interval seconds 1 If time is P92 1 0 Minutes Seconds into a 2...

Page 342: ...gh 3 45 Seconds Call Time Limit 4 0 Seconds Before Fast Retry 5 0 Fast Retries 6 0 Minutes before Slow Retry 7 1 Failures Loc Failures 8 0000 Data Logger ID 3 Extended Parameters P63 1 4 RF ID of repeater site 4 2 32 Space 3 1 RF ID of second site 10 4 0 5 70 F 6 68 D to call datalogger 7 3 of Locs to Collect 8 1 1st Loc to Collect 4 Extended Parameters P63 1 1 Flag to toggle in Remote Datalogger ...

Page 343: ...am Example for a Remote 21X This program measures battery voltage and internal and external temperatures in response to a call from the CR10X Flag 1 will be set high by the calling datalogger The flag is lowered after the measurements are made 1 Table 1 Programs 01 1 Sec Execution Interval 01 P91 If Flag 01 11 1 is set 02 30 Then Do 02 P10 Battery Voltage 01 1 Loc 03 P17 Panel Temperature 01 2 Loc...

Page 344: ......

Page 345: ...entific For example in SCADA running software using Modbus to reference the CR10 10X s input location number 3 specify register 40005 F The CR10 10X s input locations are analogous to registers in Modbus Because of floating point considerations two registers of memory are required for each input location Modbus registers are offset by 40000 therefore the register equivalent of any input location X...

Page 346: ...e CR10 10X at each specific site In the SCADA software the COM port settings and the Modbus address need to be set No dialling is necessary as the RF95s would connect through to the correct CR10 10X Repeater stations are not supported All remote dataloggers must communicate directly with the RF232 base station Many popular radio systems for Modbus applications will not be compatible with PC208W PC...

Page 347: ...nary Hex 8765 4321 Slave address 11 Function 01 Byte Count 02 Data Coils 7 0 CD 1100 1101 Data Coils 15 8 6B 0110 1011 Error check LRC or CRC The status of coils 7 0 is CD hex or 1100 1101 binary Coil 15 is the Most Significant Bit MSB The CR10 s C1 C3 C4 C7 C8 are on C2 C5 and C6 are off Flags 1 2 4 6 and 7 are high I 3 2 Example 2 Function 3 to Read Registers 40009 to 40012 from Slave Device 17 ...

Page 348: ...009 C0 Data Lo Register 40009 00 Data Hi Register 40010 44 Data Lo Register 40010 0A Data Hi Register 40011 00 Data Lo Register 40011 00 Data Hi Register 40012 1F Data Lo Register 40012 00 Error check LRC or CRC The contents of 40008 and 40009 are C0 00 44 0A hex or a value of 555 000 in input location 5 Input location 6 0 For complete documentation please refer to the Modicon publication referenc...

Page 349: ...nel 7 4 7 4 Thermocouples with External Reference Junction 7 5 7 5 Wiring Diagram for Anemometer 7 8 7 6 Wiring Diagram for Raingauge with Long Leads 7 8 7 7 Wiring Diagram for PRT in 4 Wire Half Bridge 7 9 7 8 3 Wire Half Bridge Used to Measure 100Ω PRT 7 11 7 9 Full Bridge Schematic for 100Ω PRT 7 12 7 10 Wiring Diagram for Full Bridge Pressure Transducer 7 15 7 11 Lysimeter Weighing Mechanism 7...

Page 350: ...to 9 13 20 13 16 Excitation and Measurement Sequence for 4 Wire Full Bridge 13 21 13 17 AC Excitation and Measurement Sequence for AC Half Bridge 13 23 13 18 Model Of Resistive Sensor with Ground Loop 13 23 14 1 Connecting to Vehicle Power Supply 14 3 14 2 CR10WP Wiring Panel Grounding Diagram and Excitation Control 14 4 14 3 Relay Driver Circuit with Relay 14 6 14 4 Power Switching without Relay ...

Page 351: ...Instruction Memory and Execution Times 3 8 3 6 Processing Instruction Memory and Execution Times 3 9 3 7 Output Instruction Memory and Execution Times 3 10 3 8 Program Control Instruction Memory and Execution Times 3 10 3 9 Error Codes 3 12 4 1 Output Device Codes for Instruction 96 and 8 Mode 4 2 4 2 8 Mode Entries 4 4 4 3 9 Commands for SM192 716 Storage Modules 4 7 6 1 Pin Description 6 1 6 2 S...

Page 352: ...ientific Resistive Sensors 13 10 13 6 Maximum Lead Length vs Error for Campbell Scientific Resistive Sensors 13 10 13 7 Source Resistances and Signal Levels for YSI 44032 Thermistor Configurations Shown in Figure 13 10 2V Excitation 13 12 13 8 Limits of Error For Thermocouple Wire Reference Junction at 0 C 13 15 13 9 Limits of Error in CR10X Thermocouple Output Linearisation Relative to NBS Standa...

Page 353: ...ground definition OV 3 OV 4 Analogue inputs OV 3 OV 4 Analogue output see SDM AO4 Analogue to Digital A D conversion 13 1 AND construction Logical 3 6 Anemometer Photochopper output Programming example 7 7 AO4 Analogue Output see SDM AO4 ARCTAN X Y Instruction 66 10 23 ARGOS Instruction 121 125 12 16 Array ID and Output Interval 2 2 Calculating data points 4 3 Definition A 3 Setting ID 2 2 11 8 AS...

Page 354: ...OV 4 Displaying and Toggling 1 7 C 1 Indexing 3 2 Switch Closures Measuring on Control Ports 8 9 9 2 Use of digital I O ports for switching relays 14 6 Using control ports for RS232 Input B 1 Voltages 5 5 Applying xii 9 13 Control port serial I O Instruction 15 9 12 B 1 Programming examples B 2 B 12 Copy input location data to another location Copy input location data to another location Instructi...

Page 355: ...9 Programming example 8 13 Enclosures Environmental 14 1 END Instruction 95 12 9 Programming examples 7 23 8 13 Erasing all memory xi 1 10 Error codes 3 11 Overranging 3 2 Overrun occurrences 1 2 Examples programming OV 16 Ex Del Diff Instruction 8 9 7 13 21 13 22 Ex Del SE see Excite Delay and Measure Instruction 4 Excit Del see Excitation with Delay Instruction 22 Excitation outputs OV 3 OV 4 Ex...

Page 356: ...pared to F Instruction 89 12 7 Programming examples 8 8 12 6 If X Compared to Y Instruction 88 12 7 Increment Value in Input Location Instruction 32 10 1 Indexing 3 1 A 1 Indirect Move Instruction 61 10 16 Initiate Telecommunications Instruction 97 12 11 From one datalogger to another H 1 Programming example G 3 H 3 Input Locations Indexing 3 2 Input Storage Altering 1 6 Changing size of 1 10 Data...

Page 357: ...1 6 Instruction execution time 3 8 Intermediate Storage OV 6 1 10 Internal OV 6 1 8 Pointers 2 1 Program OV 5 1 9 3 8 System OV 6 1 9 Testing and system status B 1 12 Minimize Instruction 74 11 5 Programming example OV 24 Minus sign Entering 3 2 Modbus I 1 Modes General overview OV 13 0 Compile Log Data 1 8 1 Program Table 1 1 1 2 Program Table 2 1 1 3 Program Table 3 1 1 4 Parameter Entry Table 1...

Page 358: ...t with Duration Instruction 21 Ports see Control Logic ports Power ground OV 4 OV 5 14 5 Power Raising to Y Instruction 47 10 5 Power requirements OV5 14 1 Power supplies 14 2 Connecting directly to Wiring Panel 14 5 Connecting to CR10X OV 3 OV 5 Power up Options Setting 1 18 Power up Sequence vii xi PPTR 2 2 Pressure transducer Programming examples 7 15 7 19 Print device Definition A 4 PRINT opti...

Page 359: ...B 1 RTD Temp see Temperature from Platinum RTD Instruction 16 RTS Request To Send 6 8 B 1 Run program from flash Instruction 111 12 14 Run Time errors 3 12 Running average Instruction 52 10 7 S Sample Instruction 70 11 4 Programming examples OV 19 8 2 Sample on Maximum or Minimum Instruction 79 11 8 Sample rate 1 1 A 4 Saturation Vapour Pressure VP Instruction 56 10 8 Save program in flash memory ...

Page 360: ...eviation in Time Instruction 82 Step Loop Index Instruction 90 12 7 Stop Bit 6 9 Storage see Final Storage Input Storage and Intermediate Storage Storage and retrieval options Data OV 24 4 1 6 1 Storage Module Pointer SPTR 2 2 Storage Modules 4 4 Addressing with CR10X 4 3 4 5 Commands to 9 Mode 4 6 Current drain Typical 14 2 File Mark 4 4 Manually initiated data output 8 Mode 4 6 Save load program...

Page 361: ...ample 8 4 Transmitted Data TD 6 8 Trigger SDM Group Instruction 110 9 32 Tutorial OV 1 U UDG01 see SDM UDG01 User flags 3 5 Using the PC208W PC208W Terminal Emulator OV 11 V Vapour Pressure From Wet Dry Bulb Temperatures Instruction 57 10 9 Programming examples 8 21 12 5 Vehicle power supply 14 3 Vibrating wire measure sensor Geokon 7 19 Vibrating Wire Measurement Instruction 28 9 21 Voice Modem C...

Page 362: ...Z SQRT X Instruction 39 10 3 Z X Instruction 31 10 1 Programming examples 8 13 8 21 Z X F Instruction 34 10 2 Z X Y Instruction 33 10 2 Z X Y Instruction 35 10 2 Z X F Instruction 37 10 3 Z X Y Instruction 36 10 2 Z X Y Instruction 38 10 3 Z X MOD F Instruction 46 10 5 Z X Y Instruction 47 10 5 Z Z 1 Instruction 32 10 1 Programming example B 14 ...

Page 363: ......

Reviews: