B-1
Appendix B. Tube Installation
B.1 Introduction
B.1.1 Soil
Suitability
EasyAG
TM
may be installed into a range of soil types ranging in texture from
light sand to heavy clay. It is unsuitable for installation into stony ground
where the average stone size is greater than 10 mm. Larger stones may damage
the plastic cutting tip of the probe and divert the direction of the insertion.
EasyAG
TM
is also not suited to insertion into dry ground, as this causes
significant back pressure when using the sledgehammer and leads to damage at
the top of the access tube. The potential insertion site should be moistened to a
depth of 1 meter before installation.
In hard soils, it is possible to cause minor damage to the top of the access tube
in the top cap. If this occurs, simply remove the burred edges with a sharp
knife or file when fully inserted, so that the electronic circuitry may be
installed. Care must be taken in any subsequent re-installations, as the
available surface area for contact of the EasyAG
TM
dolly will be reduced.
EasyAG
TM
is ideal for well tilthed cultivated soils such as commonly found in
vegetable production areas.
B.1.2 Sledgehammer Technique
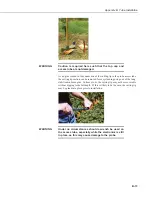
Blows from the sledgehammer should be well directed straight down onto the
beating head of the soil auger with as little lateral (sideways) impact as is
possible. This minimizes the formation of an air gap between the soil and the
access tube. Any air gap here will result in preferential path flow of water
down the access tube and into deeper soil layers.
B.1.3 Soil Sampler Extraction
When extracting the soil sampler, care must be taken so that the integrity of the
hole is not compromised. The soil sampler must be pulled directly and
smoothly upward.
At no stage should the soil sampler be reinserted, as this will damage the hole
integrity. It is better to simply start again if the installation is not progressing
well.
B.1.4 Air Gap Correction
At every stage, the formation of an air gap between the soil and the access tube
must be limited. If this is unavoidable, then there are some corrective
measures that may be taken.
Small air gaps of 1
–
2 mm between the soil and the access tube near the
surface may be closed with light finger pressure without causing major errors
in the soil moisture detection.
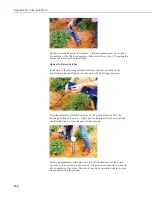
A significant air gap of greater than 2 mm between the soil and the access tube
near the surface may be corrected by carefully pushing a spade into the soil
Summary of Contents for EasyAG SDI-12
Page 2: ......
Page 3: ......
Page 26: ...Appendix A Normalization and Function Test A 6 ...
Page 40: ...Appendix B Tube Installation B 14 ...
Page 42: ...Appendix C Site Selection C 2 ...


